

oobeSystem pass được khởi chạy sau khi máy tính khởi động lại lần thứ hai trong quá trình cài đặt. Giai đoạn này sẽ cấu hình các thiết lập được áp dụng trong lần khởi động đầu tiên của người dùng cuối hay còn được gọi là Out-Of-Box Experience (OOBE). oobeSystem được xử lý trước khi người dùng đăng nhập vào Windows lần đầu tiên.
Out-of-Box-Experience (OOBE) sẽ được khởi chạy đầu tiên khi người dùng khởi động một máy tính mới đã được cấu hình. OOBE chạy trước khi Windows shell hoặc bất kỳ phần mềm bổ sung nào chạy và nó thực hiện một tập hợp nhỏ các tác vụ được yêu cầu để cấu hình và chạy Windows.
Pass này thường được sử dụng để cấu hình các các tùy chọn Windows Shell như: thiết lập ngôn ngữ và địa điểm, tạo mới tài khoản người dùng, cấu hình taskbar…
Khi các bạn thao tác với Windows System Image Manager thì cần chú ý một số component hay được sử dụng như: Microsoft-Windows-International-Core (cấu hình ngôn ngữ, địa điểm, bàn phím…), Microsoft-Windows-Shell-Setup (cấu hình Taskbar, UserAccounts, FirstLogonCommands, TimeZone, EULAPage, NetworkLocation, ProtectYourPC, WirelessSetup,…). Cách thao tác thì giống với Phần 2 về windowsPE pass. Còn ở đây để cho nhanh mình sẽ đưa nội dung file trả lời mẫu mà bạn có thể sử dụng được luôn.
File mẫu dùng cho oobeSystem pass
Windows 7
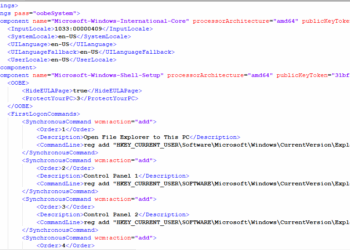
 <settings pass="oobeSystem">
    <component name="Microsoft-Windows-International-Core" processorArchitecture="x86" publicKeyToken="31bf3856ad364e35" language="neutral" versionScope="nonSxS" xmlns:wcm="http://schemas.microsoft.com/WMIConfig/2002/State" xmlns:xsi="http://www.w3.org/2001/XMLSchema-instance">
        <InputLocale>1033:00000409</InputLocale>
        <SystemLocale>en-US</SystemLocale>
        <UILanguage>en-US</UILanguage>
        <UILanguageFallback>en-US</UILanguageFallback>
        <UserLocale>en-US</UserLocale>
    </component>
    <component name="Microsoft-Windows-International-Core" processorArchitecture="amd64" publicKeyToken="31bf3856ad364e35" language="neutral" versionScope="nonSxS" xmlns:wcm="http://schemas.microsoft.com/WMIConfig/2002/State" xmlns:xsi="http://www.w3.org/2001/XMLSchema-instance">
        <InputLocale>1033:00000409</InputLocale>
        <SystemLocale>en-US</SystemLocale>
        <UILanguage>en-US</UILanguage>
        <UILanguageFallback>en-US</UILanguageFallback>
        <UserLocale>en-US</UserLocale>
    </component>
    <component name="Microsoft-Windows-Shell-Setup" processorArchitecture="x86" publicKeyToken="31bf3856ad364e35" language="neutral" versionScope="nonSxS" xmlns:wcm="http://schemas.microsoft.com/WMIConfig/2002/State" xmlns:xsi="http://www.w3.org/2001/XMLSchema-instance">
        <FirstLogonCommands>
            <SynchronousCommand wcm:action="add">
                <Description>Control Panel View</Description>
                <CommandLine>reg add HKEY_CURRENT_USER\Software\Microsoft\Windows\CurrentVersion\Explorer\ControlPanel /v StartupPage /t REG_DWORD /d 1 /f</CommandLine>
                <Order>1</Order>
                <RequiresUserInput>true</RequiresUserInput>
            </SynchronousCommand>
            <SynchronousCommand wcm:action="add">
                <CommandLine>reg add HKEY_CURRENT_USER\Software\Microsoft\Windows\CurrentVersion\Explorer\ControlPanel /v AllItemsIconView /t REG_DWORD /d 0 /f</CommandLine>
                <Description>Control Panel Icon Size</Description>
                <Order>2</Order>
                <RequiresUserInput>true</RequiresUserInput>
            </SynchronousCommand>
        </FirstLogonCommands>
        <OOBE>
            <HideEULAPage>true</HideEULAPage>
            <NetworkLocation>Work</NetworkLocation>
            <ProtectYourPC>3</ProtectYourPC>
            <HideWirelessSetupInOOBE>true</HideWirelessSetupInOOBE>
        </OOBE>
        <TaskbarLinks>
            <Link0>%programdata%\Microsoft\Windows\Start Menu\Programs\Microsoft Edge.lnk</Link0>
            <Link1>%programdata%\Microsoft\Windows\Start Menu\Programs\Google Chrome.lnk</Link1>
            <Link2></Link2>
        </TaskbarLinks>
        <UserAccounts>
            <LocalAccounts>
                <LocalAccount wcm:action="add">
                    <Password>
                        <Value>123456a@</Value>
                        <PlainText>true</PlainText>
                    </Password>
                    <Description>Admin</Description>
                    <DisplayName>Nguyen Duc Manh</DisplayName>
                    <Group>Administrators</Group>
                    <Name>manhnd</Name>
                </LocalAccount>
            </LocalAccounts>
        </UserAccounts>
        <TimeZone>SE Asia Standard Time</TimeZone>
    </component>
    <component name="Microsoft-Windows-Shell-Setup" processorArchitecture="amd64" publicKeyToken="31bf3856ad364e35" language="neutral" versionScope="nonSxS" xmlns:wcm="http://schemas.microsoft.com/WMIConfig/2002/State" xmlns:xsi="http://www.w3.org/2001/XMLSchema-instance">
        <FirstLogonCommands>
            <SynchronousCommand wcm:action="add">
                <Description>Control Panel View</Description>
                <CommandLine>reg add HKEY_CURRENT_USER\Software\Microsoft\Windows\CurrentVersion\Explorer\ControlPanel /v StartupPage /t REG_DWORD /d 1 /f</CommandLine>
                <Order>1</Order>
                <RequiresUserInput>true</RequiresUserInput>
            </SynchronousCommand>
            <SynchronousCommand wcm:action="add">
                <CommandLine>reg add HKEY_CURRENT_USER\Software\Microsoft\Windows\CurrentVersion\Explorer\ControlPanel /v AllItemsIconView /t REG_DWORD /d 0 /f</CommandLine>
                <Description>Control Panel Icon Size</Description>
                <Order>2</Order>
                <RequiresUserInput>true</RequiresUserInput>
            </SynchronousCommand>
        </FirstLogonCommands>
        <OOBE>
            <HideEULAPage>true</HideEULAPage>
            <NetworkLocation>Work</NetworkLocation>
            <ProtectYourPC>3</ProtectYourPC>
            <HideWirelessSetupInOOBE>true</HideWirelessSetupInOOBE>
        </OOBE>
        <TaskbarLinks>
            <Link0>%programdata%\Microsoft\Windows\Start Menu\Programs\Microsoft Edge.lnk</Link0>
            <Link1>%programdata%\Microsoft\Windows\Start Menu\Programs\Google Chrome.lnk</Link1>
            <Link2></Link2>
        </TaskbarLinks>
        <UserAccounts>
            <LocalAccounts>
                <LocalAccount wcm:action="add">
                    <Password>
                        <Value>123456a@</Value>
                        <PlainText>true</PlainText>
                    </Password>
                    <Description>Admin</Description>
                    <DisplayName>Nguyen Duc Manh</DisplayName>
                    <Group>Administrators</Group>
                    <Name>manhnd</Name>
                </LocalAccount>
            </LocalAccounts>
        </UserAccounts>
        <TimeZone>SE Asia Standard Time</TimeZone>
    </component>
</settings>
Windows 10 và Windows 11
<settings pass="oobeSystem">
<component name="Microsoft-Windows-International-Core" processorArchitecture="amd64" publicKeyToken="31bf3856ad364e35" language="neutral" versionScope="nonSxS" xmlns:wcm="http://schemas.microsoft.com/WMIConfig/2002/State" xmlns:xsi="http://www.w3.org/2001/XMLSchema-instance">
<InputLocale>1033:00000409</InputLocale>
<SystemLocale>en-US</SystemLocale>
<UILanguage>en-US</UILanguage>
<UILanguageFallback>en-US</UILanguageFallback>
<UserLocale>en-US</UserLocale>
</component>
<component name="Microsoft-Windows-International-Core" processorArchitecture="x86" publicKeyToken="31bf3856ad364e35" language="neutral" versionScope="nonSxS" xmlns:wcm="http://schemas.microsoft.com/WMIConfig/2002/State" xmlns:xsi="http://www.w3.org/2001/XMLSchema-instance">
<InputLocale>1033:00000409</InputLocale>
<SystemLocale>en-US</SystemLocale>
<UILanguage>en-US</UILanguage>
<UILanguageFallback>en-US</UILanguageFallback>
<UserLocale>en-US</UserLocale>
</component>
<component name="Microsoft-Windows-Shell-Setup" processorArchitecture="amd64" publicKeyToken="31bf3856ad364e35" language="neutral" versionScope="nonSxS" xmlns:wcm="http://schemas.microsoft.com/WMIConfig/2002/State" xmlns:xsi="http://www.w3.org/2001/XMLSchema-instance">
<FirstLogonCommands>
<SynchronousCommand wcm:action="add">
<Order>1</Order>
<Description>Open File Explorer to This PC</Description>
<CommandLine>reg add "HKEY_CURRENT_USER\Software\Microsoft\Windows\CurrentVersion\Explorer\Advanced" /v LaunchTo /t REG_DWORD /d 1 /f</CommandLine>
</SynchronousCommand>
<SynchronousCommand wcm:action="add">
<Order>2</Order>
<Description>Control Panel 1</Description>
<CommandLine>reg add "HKEY_CURRENT_USER\SOFTWARE\Microsoft\Windows\CurrentVersion\Explorer\ControlPanel" /v AllItemsIconView /t REG_DWORD /d 0 /f</CommandLine>
</SynchronousCommand>
<SynchronousCommand wcm:action="add">
<Order>3</Order>
<Description>Control Panel 2</Description>
<CommandLine>reg add "HKEY_CURRENT_USER\SOFTWARE\Microsoft\Windows\CurrentVersion\Explorer\ControlPanel" /v StartupPage /t REG_DWORD /d 1 /f</CommandLine>
</SynchronousCommand>
</FirstLogonCommands>
<OOBE>
<HideEULAPage>true</HideEULAPage>
<ProtectYourPC>3</ProtectYourPC>
<HideLocalAccountScreen>true</HideLocalAccountScreen>
<HideOEMRegistrationScreen>true</HideOEMRegistrationScreen>
<HideOnlineAccountScreens>true</HideOnlineAccountScreens>
<HideWirelessSetupInOOBE>true</HideWirelessSetupInOOBE>
<NetworkLocation>Work</NetworkLocation>
<UnattendEnableRetailDemo>false</UnattendEnableRetailDemo>
</OOBE>
<TaskbarLinks>
<Link0>%programdata%\Microsoft\Windows\Start Menu\Programs\Google Chrome.lnk</Link0>
<Link1>%programdata%\Microsoft\Windows\Start Menu\Programs\Word.lnk</Link1>
<Link2>%programdata%\Microsoft\Windows\Start Menu\Programs\Excel.lnk</Link2>
<Link3></Link3>
</TaskbarLinks>
<UserAccounts>
<LocalAccounts>
<LocalAccount wcm:action="add">
<Password>
<Value>123456a@</Value>
<PlainText>true</PlainText>
</Password>
<Description>Local admin account</Description>
<DisplayName>Nguyen Duc Manh</DisplayName>
<Group>Administrators</Group>
<Name>manhnd</Name>
</LocalAccount>
<LocalAccount wcm:action="add">
<Description>Daily standard account</Description>
<DisplayName>Vuong Viet Dung</DisplayName>
<Group>Users</Group>
<Name>dungvv</Name>
</LocalAccount>
</LocalAccounts>
</UserAccounts>
<TimeZone>SE Asia Standard Time</TimeZone>
</component>
<component name="Microsoft-Windows-Shell-Setup" processorArchitecture="x86" publicKeyToken="31bf3856ad364e35" language="neutral" versionScope="nonSxS" xmlns:wcm="http://schemas.microsoft.com/WMIConfig/2002/State" xmlns:xsi="http://www.w3.org/2001/XMLSchema-instance">
<FirstLogonCommands>
<SynchronousCommand wcm:action="add">
<Order>1</Order>
<Description>Open File Explorer to This PC</Description>
<CommandLine>reg add "HKEY_CURRENT_USER\Software\Microsoft\Windows\CurrentVersion\Explorer\Advanced" /v LaunchTo /t REG_DWORD /d 1 /f</CommandLine>
</SynchronousCommand>
<SynchronousCommand wcm:action="add">
<Order>2</Order>
<Description>Control Panel 1</Description>
<CommandLine>reg add "HKEY_CURRENT_USER\SOFTWARE\Microsoft\Windows\CurrentVersion\Explorer\ControlPanel" /v AllItemsIconView /t REG_DWORD /d 0 /f</CommandLine>
</SynchronousCommand>
<SynchronousCommand wcm:action="add">
<Order>3</Order>
<Description>Control Panel 2</Description>
<CommandLine>reg add "HKEY_CURRENT_USER\SOFTWARE\Microsoft\Windows\CurrentVersion\Explorer\ControlPanel" /v StartupPage /t REG_DWORD /d 1 /f</CommandLine>
</SynchronousCommand>
</FirstLogonCommands>
<OOBE>
<HideEULAPage>true</HideEULAPage>
<ProtectYourPC>3</ProtectYourPC>
<HideLocalAccountScreen>true</HideLocalAccountScreen>
<HideOEMRegistrationScreen>true</HideOEMRegistrationScreen>
<HideOnlineAccountScreens>true</HideOnlineAccountScreens>
<HideWirelessSetupInOOBE>true</HideWirelessSetupInOOBE>
<NetworkLocation>Work</NetworkLocation>
<UnattendEnableRetailDemo>false</UnattendEnableRetailDemo>
</OOBE>
<TaskbarLinks>
<Link0>%programdata%\Microsoft\Windows\Start Menu\Programs\Google Chrome.lnk</Link0>
<Link1>%programdata%\Microsoft\Windows\Start Menu\Programs\Word.lnk</Link1>
<Link2>%programdata%\Microsoft\Windows\Start Menu\Programs\Excel.lnk</Link2>
<Link3></Link3>
</TaskbarLinks>
<UserAccounts>
<LocalAccounts>
<LocalAccount wcm:action="add">
<Password>
<Value>123456a@</Value>
<PlainText>true</PlainText>
</Password>
<Description>Local admin account</Description>
<DisplayName>Nguyen Duc Manh</DisplayName>
<Group>Administrators</Group>
<Name>manhnd</Name>
</LocalAccount>
<LocalAccount wcm:action="add">
<Description>Daily standard account</Description>
<DisplayName>Vuong Viet Dung</DisplayName>
<Group>Users</Group>
<Name>dungvv</Name>
</LocalAccount>
</LocalAccounts>
</UserAccounts>
<TimeZone>SE Asia Standard Time</TimeZone>
</component>
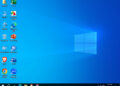
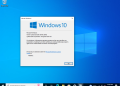
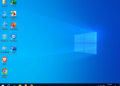
</settings>Ảnh demo khi tạo tài khoản bằng file trả lời tự động trong oobeSystem pass
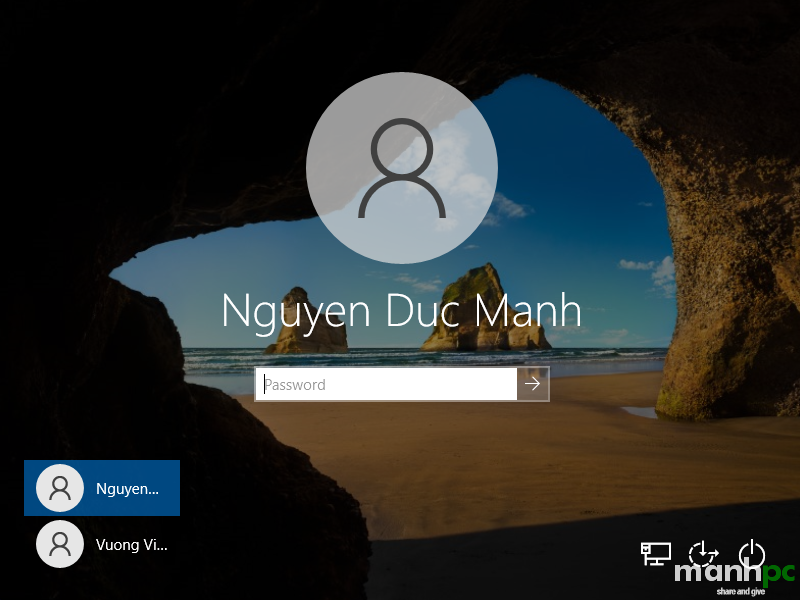
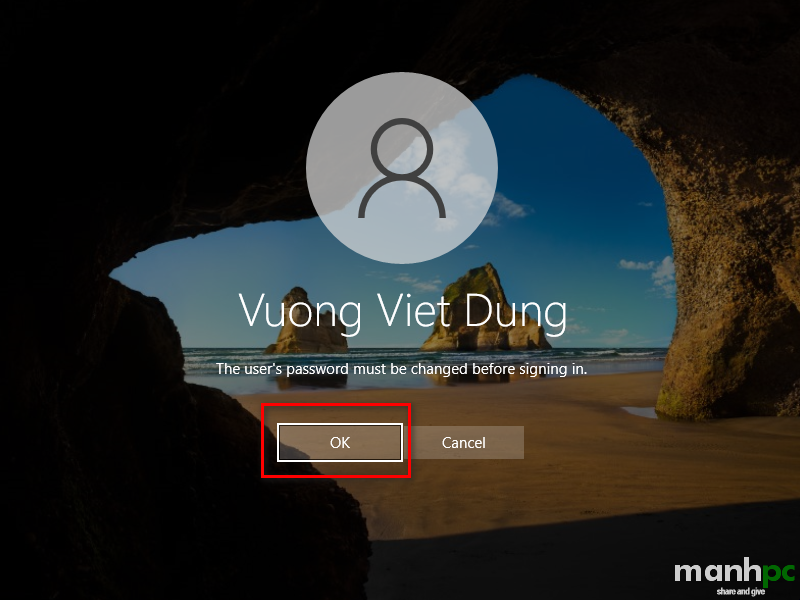
Trong hình đầu tiên thì trong file unattend.xml đã có thông tin mật khẩu của user manhnd rồi cho nên đến bước này chỉ cần đăng nhập là xong. Với hình thứ hai là tài khoản dungvv chưa được đặt mật khẩu trong file unattend.xml vì vậy hệ thống sẽ bắt phải đặt mật khẩu lần đầu tiên. Nhấn OK để đặt mật khẩu.
Cấu hình tự động đăng nhập vào tài khoản dùng (sysprep)
Trong trường hợp bạn không muốn đặt mật khẩu cho user manhnd (tự động đăng nhập vào tài khoản manhnd) thì bạn có thể sử dụng đoạn file xml sau:
Windows 7
 <settings pass="oobeSystem">
    <component name="Microsoft-Windows-International-Core" processorArchitecture="x86" publicKeyToken="31bf3856ad364e35" language="neutral" versionScope="nonSxS" xmlns:wcm="http://schemas.microsoft.com/WMIConfig/2002/State" xmlns:xsi="http://www.w3.org/2001/XMLSchema-instance">
        <InputLocale>1033:00000409</InputLocale>
        <SystemLocale>en-US</SystemLocale>
        <UILanguage>en-US</UILanguage>
        <UILanguageFallback>en-US</UILanguageFallback>
        <UserLocale>en-US</UserLocale>
    </component>
    <component name="Microsoft-Windows-International-Core" processorArchitecture="amd64" publicKeyToken="31bf3856ad364e35" language="neutral" versionScope="nonSxS" xmlns:wcm="http://schemas.microsoft.com/WMIConfig/2002/State" xmlns:xsi="http://www.w3.org/2001/XMLSchema-instance">
        <InputLocale>1033:00000409</InputLocale>
        <SystemLocale>en-US</SystemLocale>
        <UILanguage>en-US</UILanguage>
        <UILanguageFallback>en-US</UILanguageFallback>
        <UserLocale>en-US</UserLocale>
    </component>
    <component name="Microsoft-Windows-Shell-Setup" processorArchitecture="x86" publicKeyToken="31bf3856ad364e35" language="neutral" versionScope="nonSxS" xmlns:wcm="http://schemas.microsoft.com/WMIConfig/2002/State" xmlns:xsi="http://www.w3.org/2001/XMLSchema-instance">
        <FirstLogonCommands>
            <SynchronousCommand wcm:action="add">
                <Description>Control Panel View</Description>
                <CommandLine>reg add HKEY_CURRENT_USER\Software\Microsoft\Windows\CurrentVersion\Explorer\ControlPanel /v StartupPage /t REG_DWORD /d 1 /f</CommandLine>
                <Order>1</Order>
                <RequiresUserInput>true</RequiresUserInput>
            </SynchronousCommand>
            <SynchronousCommand wcm:action="add">
                <CommandLine>reg add HKEY_CURRENT_USER\Software\Microsoft\Windows\CurrentVersion\Explorer\ControlPanel /v AllItemsIconView /t REG_DWORD /d 0 /f</CommandLine>
                <Description>Control Panel Icon Size</Description>
                <Order>2</Order>
                <RequiresUserInput>true</RequiresUserInput>
            </SynchronousCommand>
        </FirstLogonCommands>
        <AutoLogon>
            <Password>
                <Value></Value>
                <PlainText>true</PlainText>
            </Password>
            <Enabled>true</Enabled>
            <Username>manhnd</Username>
        </AutoLogon>
        <OOBE>
            <HideEULAPage>true</HideEULAPage>
            <ProtectYourPC>3</ProtectYourPC>
            <HideLocalAccountScreen>true</HideLocalAccountScreen>
            <HideOEMRegistrationScreen>true</HideOEMRegistrationScreen>
            <HideWirelessSetupInOOBE>true</HideWirelessSetupInOOBE>
            <NetworkLocation>Work</NetworkLocation>
        </OOBE>
        <TaskbarLinks>
            <Link0>%programdata%\Microsoft\Windows\Start Menu\Programs\Microsoft Edge.lnk</Link0>
            <Link1>%programdata%\Microsoft\Windows\Start Menu\Programs\Google Chrome.lnk</Link1>
            <Link2></Link2>
        </TaskbarLinks>
        <UserAccounts>
            <LocalAccounts>
                <LocalAccount wcm:action="add">
                    <Password>
                        <Value></Value>
                        <PlainText>true</PlainText>
                    </Password>
                    <Description>Local admin account</Description>
                    <DisplayName>Nguyen Duc Manh</DisplayName>
                    <Group>Administrators</Group>
                    <Name>manhnd</Name>
                </LocalAccount>
            </LocalAccounts>
        </UserAccounts>
        <TimeZone>SE Asia Standard Time</TimeZone>
    </component>
    <component name="Microsoft-Windows-Shell-Setup" processorArchitecture="amd64" publicKeyToken="31bf3856ad364e35" language="neutral" versionScope="nonSxS" xmlns:wcm="http://schemas.microsoft.com/WMIConfig/2002/State" xmlns:xsi="http://www.w3.org/2001/XMLSchema-instance">
        <FirstLogonCommands>
            <SynchronousCommand wcm:action="add">
                <Description>Control Panel View</Description>
                <CommandLine>reg add HKEY_CURRENT_USER\Software\Microsoft\Windows\CurrentVersion\Explorer\ControlPanel /v StartupPage /t REG_DWORD /d 1 /f</CommandLine>
                <Order>1</Order>
                <RequiresUserInput>true</RequiresUserInput>
            </SynchronousCommand>
            <SynchronousCommand wcm:action="add">
                <CommandLine>reg add HKEY_CURRENT_USER\Software\Microsoft\Windows\CurrentVersion\Explorer\ControlPanel /v AllItemsIconView /t REG_DWORD /d 0 /f</CommandLine>
                <Description>Control Panel Icon Size</Description>
                <Order>2</Order>
                <RequiresUserInput>true</RequiresUserInput>
            </SynchronousCommand>
        </FirstLogonCommands>
        <AutoLogon>
            <Password>
                <Value></Value>
                <PlainText>true</PlainText>
            </Password>
            <Enabled>true</Enabled>
            <Username>manhnd</Username>
        </AutoLogon>
        <OOBE>
            <HideEULAPage>true</HideEULAPage>
            <ProtectYourPC>3</ProtectYourPC>
            <HideLocalAccountScreen>true</HideLocalAccountScreen>
            <HideOEMRegistrationScreen>true</HideOEMRegistrationScreen>
            <HideWirelessSetupInOOBE>true</HideWirelessSetupInOOBE>
            <NetworkLocation>Work</NetworkLocation>
        </OOBE>
        <TaskbarLinks>
            <Link0>%programdata%\Microsoft\Windows\Start Menu\Programs\Microsoft Edge.lnk</Link0>
            <Link1>%programdata%\Microsoft\Windows\Start Menu\Programs\Google Chrome.lnk</Link1>
            <Link2></Link2>
        </TaskbarLinks>
        <UserAccounts>
            <LocalAccounts>
                <LocalAccount wcm:action="add">
                    <Password>
                        <Value></Value>
                        <PlainText>true</PlainText>
                    </Password>
                    <Description>Local admin account</Description>
                    <DisplayName>Nguyen Duc Manh</DisplayName>
                    <Group>Administrators</Group>
                    <Name>manhnd</Name>
                </LocalAccount>
            </LocalAccounts>
        </UserAccounts>
        <TimeZone>SE Asia Standard Time</TimeZone>
    </component>
</settings>
Windows 10 và Windows 11
    <settings pass="oobeSystem">
    <component name="Microsoft-Windows-International-Core" processorArchitecture="amd64" publicKeyToken="31bf3856ad364e35" language="neutral" versionScope="nonSxS" xmlns:wcm="http://schemas.microsoft.com/WMIConfig/2002/State" xmlns:xsi="http://www.w3.org/2001/XMLSchema-instance">
        <InputLocale>1033:00000409</InputLocale>
        <SystemLocale>en-US</SystemLocale>
        <UILanguage>en-US</UILanguage>
        <UILanguageFallback>en-US</UILanguageFallback>
        <UserLocale>en-US</UserLocale>
    </component>
    <component name="Microsoft-Windows-International-Core" processorArchitecture="x86" publicKeyToken="31bf3856ad364e35" language="neutral" versionScope="nonSxS" xmlns:wcm="http://schemas.microsoft.com/WMIConfig/2002/State" xmlns:xsi="http://www.w3.org/2001/XMLSchema-instance">
        <InputLocale>1033:00000409</InputLocale>
        <SystemLocale>en-US</SystemLocale>
        <UILanguage>en-US</UILanguage>
        <UILanguageFallback>en-US</UILanguageFallback>
        <UserLocale>en-US</UserLocale>
    </component>
    <component name="Microsoft-Windows-Shell-Setup" processorArchitecture="amd64" publicKeyToken="31bf3856ad364e35" language="neutral" versionScope="nonSxS" xmlns:wcm="http://schemas.microsoft.com/WMIConfig/2002/State" xmlns:xsi="http://www.w3.org/2001/XMLSchema-instance">
        <FirstLogonCommands>
            <SynchronousCommand wcm:action="add">
                <Order>1</Order>
                <Description>Open File Explorer to This PC</Description>
                <CommandLine>reg add "HKEY_CURRENT_USER\Software\Microsoft\Windows\CurrentVersion\Explorer\Advanced" /v LaunchTo /t REG_DWORD /d 1 /f</CommandLine>
            </SynchronousCommand>
            <SynchronousCommand wcm:action="add">
                <Order>2</Order>
                <Description>Control Panel 1</Description>
                <CommandLine>reg add "HKEY_CURRENT_USER\SOFTWARE\Microsoft\Windows\CurrentVersion\Explorer\ControlPanel" /v AllItemsIconView /t REG_DWORD /d 0 /f</CommandLine>
            </SynchronousCommand>
            <SynchronousCommand wcm:action="add">
                <Order>3</Order>
                <Description>Control Panel 2</Description>
                <CommandLine>reg add "HKEY_CURRENT_USER\SOFTWARE\Microsoft\Windows\CurrentVersion\Explorer\ControlPanel" /v StartupPage /t REG_DWORD /d 1 /f</CommandLine>
            </SynchronousCommand>
        </FirstLogonCommands>
        <AutoLogon>
            <Password>
                <Value></Value>
                <PlainText>true</PlainText>
            </Password>
            <Enabled>true</Enabled>
            <Username>manhnd</Username>
        </AutoLogon>
        <OOBE>
            <HideEULAPage>true</HideEULAPage>
            <ProtectYourPC>3</ProtectYourPC>
            <HideLocalAccountScreen>true</HideLocalAccountScreen>
            <HideOEMRegistrationScreen>true</HideOEMRegistrationScreen>
            <HideOnlineAccountScreens>true</HideOnlineAccountScreens>
            <HideWirelessSetupInOOBE>true</HideWirelessSetupInOOBE>
            <NetworkLocation>Work</NetworkLocation>
            <UnattendEnableRetailDemo>false</UnattendEnableRetailDemo>
        </OOBE>
        <TaskbarLinks>
            <Link0>%programdata%\Microsoft\Windows\Start Menu\Programs\Google Chrome.lnk</Link0>
            <Link1>%programdata%\Microsoft\Windows\Start Menu\Programs\Word.lnk</Link1>
            <Link2>%programdata%\Microsoft\Windows\Start Menu\Programs\Excel.lnk</Link2>
            <Link3></Link3>
        </TaskbarLinks>
        <UserAccounts>
            <LocalAccounts>
                <LocalAccount wcm:action="add">
                    <Password>
                        <Value></Value>
                        <PlainText>true</PlainText>
                    </Password>
                    <Description>Local admin account</Description>
                    <DisplayName>Nguyen Duc Manh</DisplayName>
                    <Group>Administrators</Group>
                    <Name>manhnd</Name>
                </LocalAccount>
            </LocalAccounts>
        </UserAccounts>
        <TimeZone>SE Asia Standard Time</TimeZone>
    </component>
    <component name="Microsoft-Windows-Shell-Setup" processorArchitecture="x86" publicKeyToken="31bf3856ad364e35" language="neutral" versionScope="nonSxS" xmlns:wcm="http://schemas.microsoft.com/WMIConfig/2002/State" xmlns:xsi="http://www.w3.org/2001/XMLSchema-instance">
        <FirstLogonCommands>
            <SynchronousCommand wcm:action="add">
                <Order>1</Order>
                <Description>Open File Explorer to This PC</Description>
                <CommandLine>reg add "HKEY_CURRENT_USER\Software\Microsoft\Windows\CurrentVersion\Explorer\Advanced" /v LaunchTo /t REG_DWORD /d 1 /f</CommandLine>
            </SynchronousCommand>
            <SynchronousCommand wcm:action="add">
                <Order>2</Order>
                <Description>Control Panel 1</Description>
                <CommandLine>reg add "HKEY_CURRENT_USER\SOFTWARE\Microsoft\Windows\CurrentVersion\Explorer\ControlPanel" /v AllItemsIconView /t REG_DWORD /d 0 /f</CommandLine>
            </SynchronousCommand>
            <SynchronousCommand wcm:action="add">
                <Order>3</Order>
                <Description>Control Panel 2</Description>
                <CommandLine>reg add "HKEY_CURRENT_USER\SOFTWARE\Microsoft\Windows\CurrentVersion\Explorer\ControlPanel" /v StartupPage /t REG_DWORD /d 1 /f</CommandLine>
            </SynchronousCommand>
        </FirstLogonCommands>
        <AutoLogon>
            <Password>
                <Value></Value>
                <PlainText>true</PlainText>
            </Password>
            <Enabled>true</Enabled>
            <Username>manhnd</Username>
        </AutoLogon>
        <OOBE>
            <HideEULAPage>true</HideEULAPage>
            <ProtectYourPC>3</ProtectYourPC>
            <HideLocalAccountScreen>true</HideLocalAccountScreen>
            <HideOEMRegistrationScreen>true</HideOEMRegistrationScreen>
            <HideOnlineAccountScreens>true</HideOnlineAccountScreens>
            <HideWirelessSetupInOOBE>true</HideWirelessSetupInOOBE>
            <NetworkLocation>Work</NetworkLocation>
            <UnattendEnableRetailDemo>false</UnattendEnableRetailDemo>
        </OOBE>
        <TaskbarLinks>
            <Link0>%programdata%\Microsoft\Windows\Start Menu\Programs\Google Chrome.lnk</Link0>
            <Link1>%programdata%\Microsoft\Windows\Start Menu\Programs\Word.lnk</Link1>
            <Link2>%programdata%\Microsoft\Windows\Start Menu\Programs\Excel.lnk</Link2>
            <Link3></Link3>
        </TaskbarLinks>
        <UserAccounts>
            <LocalAccounts>
                <LocalAccount wcm:action="add">
                    <Password>
                        <Value></Value>
                        <PlainText>true</PlainText>
                    </Password>
                    <Description>Local admin account</Description>
                    <DisplayName>Nguyen Duc Manh</DisplayName>
                    <Group>Administrators</Group>
                    <Name>manhnd</Name>
                </LocalAccount>
            </LocalAccounts>
        </UserAccounts>
        <TimeZone>SE Asia Standard Time</TimeZone>
    </component>
</settings>
Cấu hình tự động đăng nhập vào tài khoản dùng (autounattend.xml)
Nội dung bên trên là dùng cho file unattend.xml được sử dụng khi bạn chạy lệnh sysprep.exe. Còn trong trường hợp bạn muốn dùng nó ở ngay thư mục gốc (root) của bộ cài (ngang hàng với setup.exe) thì bạn có thể áp dụng nội dung file autounattend.xml như sau:
<?xml version="1.0" encoding="utf-8"?>
<unattend xmlns="urn:schemas-microsoft-com:unattend">
  <settings pass="windowsPE">
    <component name="Microsoft-Windows-International-Core-WinPE" processorArchitecture="amd64" publicKeyToken="31bf3856ad364e35" language="neutral" versionScope="NonSxS" xmlns:wcm="http://schemas.microsoft.com/WMIConfig/2002/State" xmlns:xsi="http://www.w3.org/2001/XMLSchema-instance">
      <SetupUILanguage>
        <UILanguage>en-US</UILanguage>
      </SetupUILanguage>
      <UILanguage>en-US</UILanguage>
      <UserLocale>en-US</UserLocale>
      <SystemLocale>en-US</SystemLocale>
      <InputLocale>0409:00000409</InputLocale>
    </component>
    <component name="Microsoft-Windows-Setup" processorArchitecture="amd64" publicKeyToken="31bf3856ad364e35" language="neutral" versionScope="NonSxS" xmlns:wcm="http://schemas.microsoft.com/WMIConfig/2002/State" xmlns:xsi="http://www.w3.org/2001/XMLSchema-instance">
      <UserData>
        <AcceptEula>true</AcceptEula>
      </UserData>
    </component>
  </settings>
  <settings pass="oobeSystem">
    <component name="Microsoft-Windows-Shell-Setup" processorArchitecture="amd64" publicKeyToken="31bf3856ad364e35" language="neutral" versionScope="NonSxS" xmlns:wcm="http://schemas.microsoft.com/WMIConfig/2002/State" xmlns:xsi="http://www.w3.org/2001/XMLSchema-instance">
      <UserAccounts>
        <LocalAccounts>
          <LocalAccount wcm:action="add">
            <Password>
              <Value />
            </Password>
            <Name>manhnd</Name>
            <DisplayName>NGUYEN DUC MANH</DisplayName>
            <Group>Administrators</Group>
          </LocalAccount>
        </LocalAccounts>
      </UserAccounts>
      <AutoLogon>
        <Enabled>true</Enabled>
        <LogonCount>8888</LogonCount>
        <Username>manhnd</Username>
      </AutoLogon>
      <OOBE>
        <HideEULAPage>true</HideEULAPage>
        <HideLocalAccountScreen>true</HideLocalAccountScreen>
        <HideOnlineAccountScreens>true</HideOnlineAccountScreens>
        <HideWirelessSetupInOOBE>true</HideWirelessSetupInOOBE>
        <ProtectYourPC>3</ProtectYourPC>
        <SkipMachineOOBE>true</SkipMachineOOBE>
      </OOBE>
    </component>
    <component name="Microsoft-Windows-International-Core" processorArchitecture="amd64" publicKeyToken="31bf3856ad364e35" language="neutral" versionScope="NonSxS" xmlns:wcm="http://schemas.microsoft.com/WMIConfig/2002/State" xmlns:xsi="http://www.w3.org/2001/XMLSchema-instance">
      <UILanguage>en-US</UILanguage>
      <UserLocale>en-US</UserLocale>
      <SystemLocale>en-US</SystemLocale>
      <InputLocale>0409:00000409</InputLocale>
    </component>
  </settings>
</unattend>
Chú ý bên trong <settings pass=”oobeSystem”> là những component dùng cho việc tự động đăng nhập vào tài khoản manhnd. Bạn có thể thêm các component khác vào file này. Bạn có thể sửa các component: <Name>, <DisplayName>, <Group> (nếu bạn nắm rõ) , <Username>, <ProtectYourPC> (nó chính là UAC: 1 là tắt và 4 là cao nhất, mặc định là 3).
Kết luận
Như vậy tôi đã chia sẽ với các bạn các thông tin về oobesystem pass, cùng với đó là hai file .xml mẫu mà tôi đã thực tế triển khai. Bạn có thể copy các lệnh bên trên tại đây.Trong quá trình thao tác thực tế nếu còn vướng mắc điều gì bạn hãy để lại bình luận phía bên dưới nhé. Cảm ơn các bạn đã đọc bài!
Chúc bạn thành công!
Xem thêm:


Cho mình hỏi nếu như chỉ cần desktop có mấy biểu tượng như THis PC , Control Panel thôi thì làm sao ?
Bạn mở cmd với quyền Administrator rồi chạy lần lượt các lệnh bên dưới:
1. Add This-PC Desktop Icon
reg add HKEY_LOCAL_MACHINE\SOFTWARE\Microsoft\Windows\CurrentVersion\Explorer\HideDesktopIcons\ClassicStartMenu /v {871C5380-42A0-1069-A2EA-08002B30309D}.default /t REG_DWORD /d 0 /f
reg add HKEY_LOCAL_MACHINE\SOFTWARE\Microsoft\Windows\CurrentVersion\Explorer\HideDesktopIcons\NewStartPanel /v {20D04FE0-3AEA-1069-A2D8-08002B30309D} /t REG_DWORD /d 0 /f
2. Add Control Panel Desktop Icon
reg add HKEY_LOCAL_MACHINE\Software\Microsoft\Windows\CurrentVersion\Explorer\HideDesktopIcons\NewStartPanel /v "{5399E694-6CE5-4D6C-8FCE-1D8870FDCBA0}" /t REG_DWORD /d 0 /f
reg add HKEY_LOCAL_MACHINE\Software\Microsoft\Windows\CurrentVersion\Explorer\HideDesktopIcons\ClassicStartMenu /v "{5399E694-6CE5-4D6C-8FCE-1D8870FDCBA0}" /t REG_DWORD /d 0 /f
Text link tại đây
<?xml version="1.0" encoding="utf-8"?>
<unattend xmlns="urn:schemas-microsoft-com:unattend">
    <settings pass="generalize">
        <component name="Microsoft-Windows-Security-SPP" processorArchitecture="amd64" publicKeyToken="31bf3856ad364e35" language="neutral" versionScope="nonSxS" xmlns:wcm="http://schemas.microsoft.com/WMIConfig/2002/State" xmlns:xsi="http://www.w3.org/2001/XMLSchema-instance">
            <SkipRearm>1</SkipRearm>
        </component>
        <component name="Microsoft-Windows-Security-SPP" processorArchitecture="x86" publicKeyToken="31bf3856ad364e35" language="neutral" versionScope="nonSxS" xmlns:wcm="http://schemas.microsoft.com/WMIConfig/2002/State" xmlns:xsi="http://www.w3.org/2001/XMLSchema-instance">
            <SkipRearm>1</SkipRearm>
        </component>
        <component name="Microsoft-Windows-WorkstationService" processorArchitecture="amd64" publicKeyToken="31bf3856ad364e35" language="neutral" versionScope="nonSxS" xmlns:wcm="http://schemas.microsoft.com/WMIConfig/2002/State" xmlns:xsi="http://www.w3.org/2001/XMLSchema-instance">
            <AllowInsecureGuestAuth>1</AllowInsecureGuestAuth>
        </component>
        <component name="Microsoft-Windows-WorkstationService" processorArchitecture="x86" publicKeyToken="31bf3856ad364e35" language="neutral" versionScope="nonSxS" xmlns:wcm="http://schemas.microsoft.com/WMIConfig/2002/State" xmlns:xsi="http://www.w3.org/2001/XMLSchema-instance">
            <AllowInsecureGuestAuth>1</AllowInsecureGuestAuth>
        </component>
    </settings>
    <settings pass="specialize">
        <component name="Microsoft-Windows-Deployment" processorArchitecture="amd64" publicKeyToken="31bf3856ad364e35" language="neutral" versionScope="nonSxS" xmlns:wcm="http://schemas.microsoft.com/WMIConfig/2002/State" xmlns:xsi="http://www.w3.org/2001/XMLSchema-instance">
            <RunSynchronous>
                <RunSynchronousCommand wcm:action="add">
                    <Description>Allow Insecure Guest Auth</Description>
                    <Order>1</Order>
                    <Path>cmd /c  reg add HKLM\SYSTEM\CurrentControlSet\Services\LanmanWorkstation\Parameters /v AllowInsecureGuestAuth /t REG_DWORD /d 1 /f</Path>
                </RunSynchronousCommand>
                <RunSynchronousCommand wcm:action="add">
                    <Description>Disable Reserves</Description>
                    <Order>2</Order>
                    <Path>cmd /c  reg add HKLM\SOFTWARE\Microsoft\Windows\CurrentVersion\ReserveManager /v ShippedWithReserves /t REG_DWORD /d 0 /f</Path>
                </RunSynchronousCommand>
                <RunSynchronousCommand wcm:action="add">
                    <Description>Disable Acrylic Background On Logon</Description>
                    <Order>3</Order>
                    <Path>cmd /c  reg add HKLM\SOFTWARE\Policies\Microsoft\Windows\System /v DisableAcrylicBackgroundOnLogon /t REG_DWORD /d 1 /f</Path>
                </RunSynchronousCommand>
                <RunSynchronousCommand wcm:action="add">
                    <Description>Copy To folder</Description>
                    <Order>4</Order>
                    <Path>cmd /c  reg add HKCR\AllFilesystemObjects\shellex\ContextMenuHandlers\{C2FBB630-2971-11D1-A18C-00C04FD75D13} /f</Path>
                </RunSynchronousCommand>
                <RunSynchronousCommand wcm:action="add">
                    <Description>Move To folder</Description>
                    <Order>5</Order>
                    <Path>cmd /c  reg add HKCR\AllFilesystemObjects\shellex\ContextMenuHandlers\{C2FBB631-2971-11D1-A18C-00C04FD75D13} /f</Path>
                </RunSynchronousCommand>
                <RunSynchronousCommand wcm:action="add">
                    <Description>Add This PC Desktop Icon ClassicStartMenu</Description>
                    <Order>6</Order>
                    <Path>cmd /c  reg add HKLM\SOFTWARE\Microsoft\Windows\CurrentVersion\Explorer\HideDesktopIcons\ClassicStartMenu /v {871C5380-42A0-1069-A2EA-08002B30309D}.default /t REG_DWORD /d 0 /f</Path>
                </RunSynchronousCommand>
                <RunSynchronousCommand wcm:action="add">
                    <Description>Add This PC Desktop Icon NewStartPanel</Description>
                    <Order>7</Order>
                    <Path>cmd /c  reg add HKLM\SOFTWARE\Microsoft\Windows\CurrentVersion\Explorer\HideDesktopIcons\NewStartPanel /v {20D04FE0-3AEA-1069-A2D8-08002B30309D} /t REG_DWORD /d 0 /f</Path>
                </RunSynchronousCommand>
                <RunSynchronousCommand wcm:action="add">
                    <Description>Support URL</Description>
                    <Order>8</Order>
                    <Path>cmd /c  reg add HKLM\SOFTWARE\Microsoft\Windows\CurrentVersion\OEMInformation /v Manufacturer /t REG_SZ /d IT-BAOZ /f</Path>
                </RunSynchronousCommand>
                <RunSynchronousCommand wcm:action="add">
                    <Description>Support URL</Description>
                    <Order>9</Order>
                    <Path>cmd /c  reg add HKLM\SOFTWARE\Microsoft\Windows\CurrentVersion\OEMInformation /v SupportURL /t REG_SZ /d https://baozdimsum.com/f</Path>
                </RunSynchronousCommand>
                <RunSynchronousCommand wcm:action="add">
                    <Description>Support URL</Description>
                    <Order>10</Order>
                    <Path>cmd /c  reg add HKLM\SOFTWARE\Microsoft\Windows\CurrentVersion\OEMInformation /v SupportHours /t REG_SZ /d 24/7 /f</Path>
                </RunSynchronousCommand>
                <RunSynchronousCommand wcm:action="add">
                    <Description>Support URL</Description>
                    <Order>11</Order>
                    <Path>cmd /c  reg add HKLM\SOFTWARE\Microsoft\Windows\CurrentVersion\OEMInformation /v SupportPhone /t REG_SZ /d "+84 906 135 120" /f</Path>
                </RunSynchronousCommand>
            </RunSynchronous>
        </component>
        <component name="Microsoft-Windows-Deployment" processorArchitecture="x86" publicKeyToken="31bf3856ad364e35" language="neutral" versionScope="nonSxS" xmlns:wcm="http://schemas.microsoft.com/WMIConfig/2002/State" xmlns:xsi="http://www.w3.org/2001/XMLSchema-instance">
            <RunSynchronous>
                <RunSynchronousCommand wcm:action="add">
                    <Description>Allow Insecure Guest Auth</Description>
                    <Order>1</Order>
                    <Path>cmd /c  reg add HKLM\SYSTEM\CurrentControlSet\Services\LanmanWorkstation\Parameters /v AllowInsecureGuestAuth /t REG_DWORD /d 1 /f</Path>
                </RunSynchronousCommand>
                <RunSynchronousCommand wcm:action="add">
                    <Description>Disable Reserves</Description>
                    <Order>2</Order>
                    <Path>cmd /c  reg add HKLM\SOFTWARE\Microsoft\Windows\CurrentVersion\ReserveManager /v ShippedWithReserves /t REG_DWORD /d 0 /f</Path>
                </RunSynchronousCommand>
                <RunSynchronousCommand wcm:action="add">
                    <Description>Disable Acrylic Background On Logon</Description>
                    <Order>3</Order>
                    <Path>cmd /c  reg add HKLM\SOFTWARE\Policies\Microsoft\Windows\System /v DisableAcrylicBackgroundOnLogon /t REG_DWORD /d 1 /f</Path>
                </RunSynchronousCommand>
                <RunSynchronousCommand wcm:action="add">
                    <Description>Copy To folder</Description>
                    <Order>4</Order>
                    <Path>cmd /c  reg add HKCR\AllFilesystemObjects\shellex\ContextMenuHandlers\{C2FBB630-2971-11D1-A18C-00C04FD75D13} /f</Path>
                </RunSynchronousCommand>
                <RunSynchronousCommand wcm:action="add">
                    <Description>Move To folder</Description>
                    <Order>5</Order>
                    <Path>cmd /c  reg add HKCR\AllFilesystemObjects\shellex\ContextMenuHandlers\{C2FBB631-2971-11D1-A18C-00C04FD75D13} /f</Path>
                </RunSynchronousCommand>
                <RunSynchronousCommand wcm:action="add">
                    <Description>Add This PC Desktop Icon 1</Description>
                    <Order>6</Order>
                    <Path>cmd /c  reg add HKLM\SOFTWARE\Microsoft\Windows\CurrentVersion\Explorer\HideDesktopIcons\ClassicStartMenu /v {871C5380-42A0-1069-A2EA-08002B30309D}.default /t REG_DWORD /d 0 /f</Path>
                </RunSynchronousCommand>
                <RunSynchronousCommand wcm:action="add">
                    <Description>Add This PC Desktop Icon 2</Description>
                    <Order>7</Order>
                    <Path>cmd /c  reg add HKLM\SOFTWARE\Microsoft\Windows\CurrentVersion\Explorer\HideDesktopIcons\NewStartPanel /v {20D04FE0-3AEA-1069-A2D8-08002B30309D} /t REG_DWORD /d 0 /f</Path>
                </RunSynchronousCommand>
                <RunSynchronousCommand wcm:action="add">
                    <Description>Support URL</Description>
                    <Order>8</Order>
                    <Path>cmd /c  reg add HKLM\SOFTWARE\Microsoft\Windows\CurrentVersion\OEMInformation /v Manufacturer /t REG_SZ /d IT-BAOZ /f</Path>
                </RunSynchronousCommand>
                <RunSynchronousCommand wcm:action="add">
                    <Description>Support URL</Description>
                    <Order>9</Order>
                    <Path>cmd /c  reg add HKLM\SOFTWARE\Microsoft\Windows\CurrentVersion\OEMInformation /v SupportURL /t REG_SZ /d https://baozdimsum.com /f</Path>
                </RunSynchronousCommand>
                <RunSynchronousCommand wcm:action="add">
                    <Description>Support URL</Description>
                    <Order>10</Order>
                    <Path>cmd /c  reg add HKLM\SOFTWARE\Microsoft\Windows\CurrentVersion\OEMInformation /v SupportHours /t REG_SZ /d 24/7 /f</Path>
                </RunSynchronousCommand>
                <RunSynchronousCommand wcm:action="add">
                    <Description>Support URL</Description>
                    <Order>11</Order>
                    <Path>cmd /c  reg add HKLM\SOFTWARE\Microsoft\Windows\CurrentVersion\OEMInformation /v SupportPhone /t REG_SZ /d "+84 906 135 120" /f</Path>
                </RunSynchronousCommand>
            </RunSynchronous>
        </component>
        <component name="Microsoft-Windows-Shell-Setup" processorArchitecture="x86" publicKeyToken="31bf3856ad364e35" language="neutral" versionScope="nonSxS" xmlns:wcm="http://schemas.microsoft.com/WMIConfig/2002/State" xmlns:xsi="http://www.w3.org/2001/XMLSchema-instance">
            <ProductKey>
                <Key>KBN8V-HFGQ4-MGXVD-347P6-PDQGT</Key>
            </ProductKey>
            <copyprofile>true</copyprofile>
        </component>
        <component name="Microsoft-Windows-Shell-Setup" processorArchitecture="amd64" publicKeyToken="31bf3856ad364e35" language="neutral" versionScope="nonSxS" xmlns:wcm="http://schemas.microsoft.com/WMIConfig/2002/State" xmlns:xsi="http://www.w3.org/2001/XMLSchema-instance">
            <copyprofile>true</copyprofile>
        </component>
    </settings>
    <settings pass="oobeSystem">
        <component name="Microsoft-Windows-International-Core" processorArchitecture="amd64" publicKeyToken="31bf3856ad364e35" language="neutral" versionScope="nonSxS" xmlns:wcm="http://schemas.microsoft.com/WMIConfig/2002/State" xmlns:xsi="http://www.w3.org/2001/XMLSchema-instance">
            <InputLocale>1033:00000409</InputLocale>
            <SystemLocale>en-US</SystemLocale>
            <UILanguage>en-US</UILanguage>
            <UILanguageFallback>en-US</UILanguageFallback>
            <UserLocale>en-US</UserLocale>
        </component>
        <component name="Microsoft-Windows-International-Core" processorArchitecture="x86" publicKeyToken="31bf3856ad364e35" language="neutral" versionScope="nonSxS" xmlns:wcm="http://schemas.microsoft.com/WMIConfig/2002/State" xmlns:xsi="http://www.w3.org/2001/XMLSchema-instance">
            <InputLocale>1033:00000409</InputLocale>
            <SystemLocale>en-US</SystemLocale>
            <UILanguage>en-US</UILanguage>
            <UILanguageFallback>en-US</UILanguageFallback>
            <UserLocale>en-US</UserLocale>
        </component>
        <component name="Microsoft-Windows-Shell-Setup" processorArchitecture="amd64" publicKeyToken="31bf3856ad364e35" language="neutral" versionScope="nonSxS" xmlns:wcm="http://schemas.microsoft.com/WMIConfig/2002/State" xmlns:xsi="http://www.w3.org/2001/XMLSchema-instance">
            <FirstLogonCommands>
                <SynchronousCommand wcm:action="add">
                    <Order>1</Order>
                    <Description>Open File Explorer to This PC</Description>
                    <CommandLine>reg add "HKEY_CURRENT_USER\Software\Microsoft\Windows\CurrentVersion\Explorer\Advanced" /v LaunchTo /t REG_DWORD /d 1 /f</CommandLine>
                </SynchronousCommand>
                <SynchronousCommand wcm:action="add">
                    <Order>2</Order>
                    <Description>Control Panel 1</Description>
                    <CommandLine>reg add "HKEY_CURRENT_USER\SOFTWARE\Microsoft\Windows\CurrentVersion\Explorer\ControlPanel" /v AllItemsIconView /t REG_DWORD /d 0 /f</CommandLine>
                </SynchronousCommand>
                <SynchronousCommand wcm:action="add">
                    <Order>3</Order>
                    <Description>Control Panel 2</Description>
                    <CommandLine>reg add "HKEY_CURRENT_USER\SOFTWARE\Microsoft\Windows\CurrentVersion\Explorer\ControlPanel" /v StartupPage /t REG_DWORD /d 1 /f</CommandLine>
                </SynchronousCommand>
            </FirstLogonCommands>
            <OOBE>
                <HideEULAPage>true</HideEULAPage>
                <ProtectYourPC>1</ProtectYourPC>
            </OOBE>
            <TaskbarLinks>
                <Link0>%programdata%\Microsoft\Windows\Start Menu\Programs\Google Chrome.lnk</Link0>
                <Link1>%programdata%\Microsoft\Windows\Start Menu\Programs\Microsoft Edge.lnk</Link1>
                <Link2>%programdata%\Microsoft\Windows\Start Menu\Programs\Firefox.lnk</Link2>
                <Link3>%programdata%\Microsoft\Windows\Start Menu\Programs\Ultraviewer.lnk</Link3>
                <Link4>%programdata%\Microsoft\Windows\Start Menu\Programs\TeamViewerQS_x64_v15</Link4>
                <Link5>%programdata%\Microsoft\Windows\Start Menu\Programs\EVKey64.lnk</Link5>
                <Link6>%programdata%\Microsoft\Windows\Start Menu\Programs\Word.lnk</Link6>
                <Link7>%programdata%\Microsoft\Windows\Start Menu\Programs\Excel.lnk</Link7>
                <Link8>%programdata%\Microsoft\Windows\Start Menu\Programs\PowerPoint.lnk</Link8>
            </TaskbarLinks>
            <RegisteredOrganization>BAOZGROUP</RegisteredOrganization>
            <TimeZone>SE Asia Standard Time</TimeZone>
        </component>
        <component name="Microsoft-Windows-Shell-Setup" processorArchitecture="x86" publicKeyToken="31bf3856ad364e35" language="neutral" versionScope="nonSxS" xmlns:wcm="http://schemas.microsoft.com/WMIConfig/2002/State" xmlns:xsi="http://www.w3.org/2001/XMLSchema-instance">
            <FirstLogonCommands>
                <SynchronousCommand wcm:action="add">
                    <Order>1</Order>
                    <Description>Open File Explorer to This PC</Description>
                    <CommandLine>reg add "HKEY_CURRENT_USER\Software\Microsoft\Windows\CurrentVersion\Explorer\Advanced" /v LaunchTo /t REG_DWORD /d 1 /f</CommandLine>
                </SynchronousCommand>
                <SynchronousCommand wcm:action="add">
                    <Order>2</Order>
                    <Description>Control Panel 1</Description>
                    <CommandLine>reg add "HKEY_CURRENT_USER\SOFTWARE\Microsoft\Windows\CurrentVersion\Explorer\ControlPanel" /v AllItemsIconView /t REG_DWORD /d 0 /f</CommandLine>
                </SynchronousCommand>
                <SynchronousCommand wcm:action="add">
                    <Order>3</Order>
                    <Description>Control Panel 2</Description>
                    <CommandLine>reg add "HKEY_CURRENT_USER\SOFTWARE\Microsoft\Windows\CurrentVersion\Explorer\ControlPanel" /v StartupPage /t REG_DWORD /d 1 /f</CommandLine>
                </SynchronousCommand>
                <SynchronousCommand wcm:action="add">
                    <Order>4</Order>
                    <Description>Add This PC Icon to Desktop</Description>
                    <CommandLine>reg add "HKEY_CURRENT_USER\SOFTWARE\Microsoft\Windows\CurrentVersion\Explorer\HideDesktopIcons\ClassicStartMenu" /v {871C5380-42A0-1069-A2EA-08002B30309D}.default /t REG_DWORD /d 0 /f</CommandLine>
                </SynchronousCommand>
                <SynchronousCommand wcm:action="add">
                    <Order>5</Order>
                    <Description>Add Control Panel Icon to Desktop</Description>
                    <CommandLine>reg add "HKEY_CURRENT_USER\SOFTWARE\Microsoft\Windows\CurrentVersion\Explorer\HideDesktopIcons\ClassicStartMenu" /v {21EC2020-3AEA-1069-A2DD-08002B30309D}.default /t REG_DWORD /d 0 /f</CommandLine>
                </SynchronousCommand>
                <SynchronousCommand wcm:action="add">
                    <Order>6</Order>
                    <Description>Add Recycle Bin Icon to Desktop</Description>
                    <CommandLine>reg add "HKEY_CURRENT_USER\SOFTWARE\Microsoft\Windows\CurrentVersion\Explorer\HideDesktopIcons\ClassicStartMenu" /v {645FF040-5081-101B-9F08-00AA002F954E}.default /t REG_DWORD /d 0 /f</CommandLine>
                </SynchronousCommand>
                <SynchronousCommand wcm:action="add">
                    <Order>7</Order>
                    <Description>Add Network Icon to Desktop</Description>
                    <CommandLine>reg add "HKEY_CURRENT_USER\SOFTWARE\Microsoft\Windows\CurrentVersion\Explorer\HideDesktopIcons\ClassicStartMenu" /v {F02C1A0D-BE21-4350-88B0-7367FC96EF3C}.default /t REG_DWORD /d 0 /f</CommandLine>
                </SynchronousCommand>
                <SynchronousCommand wcm:action="add">
                    <Order>8</Order>
                    <Description>Create Google Chrome Shortcut on Desktop</Description>
                    <CommandLine>cmd /c copy "%programfiles%\Google\Chrome\Application\chrome.exe" "%userprofile%\Desktop\Google Chrome.lnk"</CommandLine>
                </SynchronousCommand>
                <SynchronousCommand wcm:action="add">
                    <Order>9</Order>
                    <Description>Create Mozilla Firefox Shortcut on Desktop</Description>
                    <CommandLine>cmd /c copy "%programfiles%\Mozilla Firefox\firefox.exe" "%userprofile%\Desktop\Mozilla Firefox.lnk"</CommandLine>
                </SynchronousCommand>
            </FirstLogonCommands>
            <OOBE>
                <HideEULAPage>true</HideEULAPage>
                <ProtectYourPC>1</ProtectYourPC>
            </OOBE>
            <TaskbarLinks>
                <Link0>%programdata%\Microsoft\Windows\Start Menu\Programs\Google Chrome.lnk</Link0>
                <Link1>%programdata%\Microsoft\Windows\Start Menu\Programs\Microsoft Edge.lnk</Link1>
                <Link2>%programdata%\Microsoft\Windows\Start Menu\Programs\Firefox.lnk</Link2>
                <Link3>%programdata%\Microsoft\Windows\Start Menu\Programs\Ultraviewer.lnk</Link3>
                <Link4>%programdata%\Microsoft\Windows\Start Menu\Programs\TeamViewerQS_x64_v15</Link4>
                <Link5>%programdata%\Microsoft\Windows\Start Menu\Programs\EVKey64.lnk</Link5>
                <Link6>%programdata%\Microsoft\Windows\Start Menu\Programs\Word.lnk</Link6>
                <Link7>%programdata%\Microsoft\Windows\Start Menu\Programs\Excel.lnk</Link7>
                <Link8>%programdata%\Microsoft\Windows\Start Menu\Programs\PowerPoint.lnk</Link8>
            </TaskbarLinks>
            <TimeZone>SE Asia Standard Time</TimeZone>
        </component>
    </settings>
</unattend>
Mình làm thêm cái file tự động của bạn, khi chạy sysprep + file , mình để cùng nằm chung thư mục luôn, tên file là unattend.xml
Nhờ bạn xem giúp mình lỗi gì mà khi chạy xong, lên win ko được luôn =))
Đây nè, nó báo lỗi, mặc dù trước khi chạy mình đã chạy lệnh cmd hết rồi, tới bước này mình chay lại windows sau khi sysprep thành công
Windows couldn’t parse or process unattend file [C:\Windows\Panther\unattend.xml] for pass [oobeSytem]. A component or setting specified in the answer file doesn’t exist.
Mặc dù trên trang chủ của Microsoft hướng dẫn cấu hình phần TaskbarLinks như bạn làm là đúng. Nhưng thực tế thì bạn cần thêm cho mình dòng này vào 2 đoạn amd64 và x86:
Thực tế nó không nhận đến 8 link như vậy đâu. Mình nhớ không nhầm thì chỉ nhận 3 link thì phải. Mình toàn làm 1.