
Tiếp theo, trong phần 3 này tôi sẽ hướng dẫn các bạn cách tạo file trả lời tự động (unattend.xml) cho các Configuration pass: offlineServicing, generalize, specialize.
pass offlineServicing
offlineServicing là giai đoạn sau windowsPE configuration pass và trước khi khởi động lại máy lần đầu tiên. Trong configuration pass này thì các packages, updates, drivers, hoặc language packs sẽ được apply vào Windows image vừa được copy vào ổ cứng. Quá trình này diễn ra hoàn toàn tự động và không có sự can thiệp của người cài đặt.
pass generalize
Trong configuration pass này các thông tin dành riêng cho máy tính sẽ được xóa bỏ, từ đó bạn có thể capture và apply sang các máy tính khác. Ví dụ trong pass này thì SID và các driver đã cài từ trước đó sẽ bị loại bỏ.
Để vào pass này chúng ra dùng lệnh
sysprep /generalizeSau khi pass generalize kết thúc thì trong lần khởi động tiếp theo pass specialize sẽ được chạy. Nếu bạn muốn giữ lại các driver đã cài thì bạn có thể sử dụng thiết lập Microsoft-Windows-PnpSysprep và PersistAllDeviceInstalls trong file trả lời. Bạn có thể xem thêm thông tin hai thiết lập này tại: PersistAllDeviceInstalls và DoNotCleanUpNonPresentDevices
Bên dưới đây là một số các thiết lập trong configuration pass generalize mà bạn có thể set cho Windows 7 và 10:
Windows 7
<settings pass="generalize">
    <component name="Microsoft-Windows-Security-SPP" processorArchitecture="x86" publicKeyToken="31bf3856ad364e35" language="neutral" versionScope="nonSxS" xmlns:wcm="http://schemas.microsoft.com/WMIConfig/2002/State" xmlns:xsi="http://www.w3.org/2001/XMLSchema-instance">
        <SkipRearm>1</SkipRearm>
    </component>
</settings>
<settings pass="generalize">
    <component name="Microsoft-Windows-Security-SPP" processorArchitecture="amd64" publicKeyToken="31bf3856ad364e35" language="neutral" versionScope="nonSxS" xmlns:wcm="http://schemas.microsoft.com/WMIConfig/2002/State" xmlns:xsi="http://www.w3.org/2001/XMLSchema-instance">
        <SkipRearm>1</SkipRearm>
    </component>
</settings>
Windows 10
<settings pass="generalize">
    <component name="Microsoft-Windows-Security-SPP" processorArchitecture="x86" publicKeyToken="31bf3856ad364e35" language="neutral" versionScope="nonSxS" xmlns:wcm="http://schemas.microsoft.com/WMIConfig/2002/State" xmlns:xsi="http://www.w3.org/2001/XMLSchema-instance">
        <SkipRearm>1</SkipRearm>
    </component>
    <component name="Microsoft-Windows-Security-SPP" processorArchitecture="amd64" publicKeyToken="31bf3856ad364e35" language="neutral" versionScope="nonSxS" xmlns:wcm="http://schemas.microsoft.com/WMIConfig/2002/State" xmlns:xsi="http://www.w3.org/2001/XMLSchema-instance">
        <SkipRearm>1</SkipRearm>
    </component>
    <component name="Microsoft-Windows-WorkstationService" processorArchitecture="x86" publicKeyToken="31bf3856ad364e35" language="neutral" versionScope="nonSxS" xmlns:wcm="http://schemas.microsoft.com/WMIConfig/2002/State" xmlns:xsi="http://www.w3.org/2001/XMLSchema-instance">
        <AllowInsecureGuestAuth>1</AllowInsecureGuestAuth>
    </component>
    <component name="Microsoft-Windows-WorkstationService" processorArchitecture="amd64" publicKeyToken="31bf3856ad364e35" language="neutral" versionScope="nonSxS" xmlns:wcm="http://schemas.microsoft.com/WMIConfig/2002/State" xmlns:xsi="http://www.w3.org/2001/XMLSchema-instance">
        <AllowInsecureGuestAuth>1</AllowInsecureGuestAuth>
    </component>
</settings>
Nếu bạn muốn giữ lại driver:
<settings pass="generalize">
    <component name="Microsoft-Windows-PnpSysprep" processorArchitecture="amd64" publicKeyToken="31bf3856ad364e35" language="neutral" versionScope="nonSxS" xmlns:wcm="http://schemas.microsoft.com/WMIConfig/2002/State" xmlns:xsi="http://www.w3.org/2001/XMLSchema-instance">
        <PersistAllDeviceInstalls>true</PersistAllDeviceInstalls>
        <DoNotCleanUpNonPresentDevices>true</DoNotCleanUpNonPresentDevices>
    </component>
    <component name="Microsoft-Windows-PnpSysprep" processorArchitecture="x86" publicKeyToken="31bf3856ad364e35" language="neutral" versionScope="nonSxS" xmlns:wcm="http://schemas.microsoft.com/WMIConfig/2002/State" xmlns:xsi="http://www.w3.org/2001/XMLSchema-instance">
        <PersistAllDeviceInstalls>true</PersistAllDeviceInstalls>
        <DoNotCleanUpNonPresentDevices>true</DoNotCleanUpNonPresentDevices>
    </component>
</settings>
pass specialize
Sau khi Windows khởi động lại lần đầu tiên thì configuration pass này sẽ được chạy. Pass này dùng để tạo và cấu hình các thông tin trong Windows image, cài đặt các thiết bị phần cứng với các driver mặc định có trong image.
Trong pass này SID mới sẽ được tạo. Ngoài ra trong pass này bạn có thể cấu hình Windows features, network settings, international settings, và thông tin domain.
Bên dưới đây là một số các thiết lập trong configuration pass specialize mà bạn có thể set cho Windows 7 và 10:
Windows 7
<settings pass="specialize">
     <component name="Microsoft-Windows-Security-SPP-UX" processorArchitecture="x86" publicKeyToken="31bf3856ad364e35" language="neutral" versionScope="nonSxS" xmlns:wcm="http://schemas.microsoft.com/WMIConfig/2002/State" xmlns:xsi="http://www.w3.org/2001/XMLSchema-instance">
         <SkipAutoActivation>true</SkipAutoActivation>
     </component>
     <component name="Microsoft-Windows-Security-SPP-UX" processorArchitecture="amd64" publicKeyToken="31bf3856ad364e35" language="neutral" versionScope="nonSxS" xmlns:wcm="http://schemas.microsoft.com/WMIConfig/2002/State" xmlns:xsi="http://www.w3.org/2001/XMLSchema-instance">
         <SkipAutoActivation>true</SkipAutoActivation>
     </component>
     <component name="Microsoft-Windows-Shell-Setup" processorArchitecture="x86" publicKeyToken="31bf3856ad364e35" language="neutral" versionScope="nonSxS" xmlns:wcm="http://schemas.microsoft.com/WMIConfig/2002/State" xmlns:xsi="http://www.w3.org/2001/XMLSchema-instance">
         <copyprofile>true</copyprofile>
         <TimeZone>SE Asia Standard Time</TimeZone>
     </component>
     <component name="Microsoft-Windows-Shell-Setup" processorArchitecture="amd64" publicKeyToken="31bf3856ad364e35" language="neutral" versionScope="nonSxS" xmlns:wcm="http://schemas.microsoft.com/WMIConfig/2002/State" xmlns:xsi="http://www.w3.org/2001/XMLSchema-instance">
         <copyprofile>true</copyprofile>
         <TimeZone>SE Asia Standard Time</TimeZone>
     </component>
     <component name="Microsoft-Windows-SystemRestore-Main" processorArchitecture="x86" publicKeyToken="31bf3856ad364e35" language="neutral" versionScope="nonSxS" xmlns:wcm="http://schemas.microsoft.com/WMIConfig/2002/State" xmlns:xsi="http://www.w3.org/2001/XMLSchema-instance">
         <DisableSR>1</DisableSR>
     </component>
     <component name="Microsoft-Windows-SystemRestore-Main" processorArchitecture="amd64" publicKeyToken="31bf3856ad364e35" language="neutral" versionScope="nonSxS" xmlns:wcm="http://schemas.microsoft.com/WMIConfig/2002/State" xmlns:xsi="http://www.w3.org/2001/XMLSchema-instance">
         <DisableSR>1</DisableSR>
     </component>
     <component name="Microsoft-Windows-Deployment" processorArchitecture="x86" publicKeyToken="31bf3856ad364e35" language="neutral" versionScope="nonSxS" xmlns:wcm="http://schemas.microsoft.com/WMIConfig/2002/State" xmlns:xsi="http://www.w3.org/2001/XMLSchema-instance">
         <RunSynchronous>
             <RunSynchronousCommand wcm:action="add">
                 <Description>Add Computer Desktop Icon 1</Description>
                 <Order>1</Order>
                 <Path>cmd /c  reg add HKLM\SOFTWARE\Microsoft\Windows\CurrentVersion\Explorer\HideDesktopIcons\ClassicStartMenu /v {871C5380-42A0-1069-A2EA-08002B30309D}.default /t REG_DWORD /d 0 /f</Path>
             </RunSynchronousCommand>
             <RunSynchronousCommand wcm:action="add">
                 <Description>Add Computer Desktop Icon 2</Description>
                 <Order>2</Order>
                 <Path>cmd /c  reg add HKLM\SOFTWARE\Microsoft\Windows\CurrentVersion\Explorer\HideDesktopIcons\NewStartPanel /v {20D04FE0-3AEA-1069-A2D8-08002B30309D} /t REG_DWORD /d 0 /f</Path>
             </RunSynchronousCommand>
             <RunSynchronousCommand wcm:action="add">
                 <Description>Support URL</Description>
                 <Order>3</Order>
                 <Path>cmd /c  reg add HKLM\SOFTWARE\Microsoft\Windows\CurrentVersion\OEMInformation /v Manufacturer /t REG_SZ /d MANHPC /f</Path>
             </RunSynchronousCommand>
             <RunSynchronousCommand wcm:action="add">
                 <Description>Support URL</Description>
                 <Order>4</Order>
                 <Path>cmd /c  reg add HKLM\SOFTWARE\Microsoft\Windows\CurrentVersion\OEMInformation /v SupportURL /t REG_SZ /d https://manhpc.com /f</Path>
             </RunSynchronousCommand>
             <RunSynchronousCommand wcm:action="add">
                 <Description>Support URL</Description>
                 <Order>5</Order>
                 <Path>cmd /c  reg add HKLM\SOFTWARE\Microsoft\Windows\CurrentVersion\OEMInformation /v SupportHours /t REG_SZ /d 24/7 /f</Path>
             </RunSynchronousCommand>
             <RunSynchronousCommand wcm:action="add">
                 <Description>Support URL</Description>
                 <Order>6</Order>
                 <Path>cmd /c  reg add HKLM\SOFTWARE\Microsoft\Windows\CurrentVersion\OEMInformation /v SupportPhone /t REG_SZ /d "+84 91 664 8537" /f</Path>
             </RunSynchronousCommand>
         </RunSynchronous>
     </component>
     <component name="Microsoft-Windows-Deployment" processorArchitecture="amd64" publicKeyToken="31bf3856ad364e35" language="neutral" versionScope="nonSxS" xmlns:wcm="http://schemas.microsoft.com/WMIConfig/2002/State" xmlns:xsi="http://www.w3.org/2001/XMLSchema-instance">
         <RunSynchronous>
             <RunSynchronousCommand wcm:action="add">
                 <Description>Add Computer Desktop Icon 1</Description>
                 <Order>1</Order>
                 <Path>cmd /c  reg add HKLM\SOFTWARE\Microsoft\Windows\CurrentVersion\Explorer\HideDesktopIcons\ClassicStartMenu /v {871C5380-42A0-1069-A2EA-08002B30309D}.default /t REG_DWORD /d 0 /f</Path>
             </RunSynchronousCommand>
             <RunSynchronousCommand wcm:action="add">
                 <Description>Add Computer Desktop Icon 2</Description>
                 <Order>2</Order>
                 <Path>cmd /c  reg add HKLM\SOFTWARE\Microsoft\Windows\CurrentVersion\Explorer\HideDesktopIcons\NewStartPanel /v {20D04FE0-3AEA-1069-A2D8-08002B30309D} /t REG_DWORD /d 0 /f</Path>
             </RunSynchronousCommand>
             <RunSynchronousCommand wcm:action="add">
                 <Description>Support URL</Description>
                 <Order>3</Order>
                 <Path>cmd /c  reg add HKLM\SOFTWARE\Microsoft\Windows\CurrentVersion\OEMInformation /v Manufacturer /t REG_SZ /d MANHPC /f</Path>
             </RunSynchronousCommand>
             <RunSynchronousCommand wcm:action="add">
                 <Description>Support URL</Description>
                 <Order>4</Order>
                 <Path>cmd /c  reg add HKLM\SOFTWARE\Microsoft\Windows\CurrentVersion\OEMInformation /v SupportURL /t REG_SZ /d https://manhpc.com /f</Path>
             </RunSynchronousCommand>
             <RunSynchronousCommand wcm:action="add">
                 <Description>Support URL</Description>
                 <Order>5</Order>
                 <Path>cmd /c  reg add HKLM\SOFTWARE\Microsoft\Windows\CurrentVersion\OEMInformation /v SupportHours /t REG_SZ /d 24/7 /f</Path>
             </RunSynchronousCommand>
             <RunSynchronousCommand wcm:action="add">
                 <Description>Support URL</Description>
                 <Order>6</Order>
                 <Path>cmd /c  reg add HKLM\SOFTWARE\Microsoft\Windows\CurrentVersion\OEMInformation /v SupportPhone /t REG_SZ /d "+84 91 664 8537" /f</Path>
             </RunSynchronousCommand>
         </RunSynchronous>
     </component>
 </settings>
Windows 10
<settings pass="specialize">
     <component name="Microsoft-Windows-Deployment" processorArchitecture="amd64" publicKeyToken="31bf3856ad364e35" language="neutral" versionScope="nonSxS" xmlns:wcm="http://schemas.microsoft.com/WMIConfig/2002/State" xmlns:xsi="http://www.w3.org/2001/XMLSchema-instance">
         <RunSynchronous>
             <RunSynchronousCommand wcm:action="add">
                 <Description>Allow Insecure Guest Auth</Description>
                 <Order>1</Order>
                 <Path>cmd /c  reg add HKLM\SYSTEM\CurrentControlSet\Services\LanmanWorkstation\Parameters /v AllowInsecureGuestAuth /t REG_DWORD /d 1 /f</Path>
             </RunSynchronousCommand>
             <RunSynchronousCommand wcm:action="add">
                 <Description>Disable Reserves</Description>
                 <Order>2</Order>
                 <Path>cmd /c  reg add HKLM\SOFTWARE\Microsoft\Windows\CurrentVersion\ReserveManager /v ShippedWithReserves /t REG_DWORD /d 0 /f</Path>
             </RunSynchronousCommand>
             <RunSynchronousCommand wcm:action="add">
                 <Description>Disable Acrylic Background On Logon</Description>
                 <Order>3</Order>
                 <Path>cmd /c  reg add HKLM\SOFTWARE\Policies\Microsoft\Windows\System /v DisableAcrylicBackgroundOnLogon /t REG_DWORD /d 1 /f</Path>
             </RunSynchronousCommand>
             <RunSynchronousCommand wcm:action="add">
                 <Description>Copy To folder</Description>
                 <Order>4</Order>
                 <Path>cmd /c  reg add HKCR\AllFilesystemObjects\shellex\ContextMenuHandlers\{C2FBB630-2971-11D1-A18C-00C04FD75D13} /f</Path>
             </RunSynchronousCommand>
             <RunSynchronousCommand wcm:action="add">
                 <Description>Move To folder</Description>
                 <Order>5</Order>
                 <Path>cmd /c  reg add HKCR\AllFilesystemObjects\shellex\ContextMenuHandlers\{C2FBB631-2971-11D1-A18C-00C04FD75D13} /f</Path>
             </RunSynchronousCommand>
             <RunSynchronousCommand wcm:action="add">
                 <Description>Add This PC Desktop Icon 1</Description>
                 <Order>6</Order>
                 <Path>cmd /c  reg add HKLM\SOFTWARE\Microsoft\Windows\CurrentVersion\Explorer\HideDesktopIcons\ClassicStartMenu /v {871C5380-42A0-1069-A2EA-08002B30309D}.default /t REG_DWORD /d 0 /f</Path>
             </RunSynchronousCommand>
             <RunSynchronousCommand wcm:action="add">
                 <Description>Add This PC Desktop Icon 2</Description>
                 <Order>7</Order>
                 <Path>cmd /c  reg add HKLM\SOFTWARE\Microsoft\Windows\CurrentVersion\Explorer\HideDesktopIcons\NewStartPanel /v {20D04FE0-3AEA-1069-A2D8-08002B30309D} /t REG_DWORD /d 0 /f</Path>
             </RunSynchronousCommand>
             <RunSynchronousCommand wcm:action="add">
                 <Description>Support URL</Description>
                 <Order>8</Order>
                 <Path>cmd /c  reg add HKLM\SOFTWARE\Microsoft\Windows\CurrentVersion\OEMInformation /v Manufacturer /t REG_SZ /d MANHPC /f</Path>
             </RunSynchronousCommand>
             <RunSynchronousCommand wcm:action="add">
                 <Description>Support URL</Description>
                 <Order>9</Order>
                 <Path>cmd /c  reg add HKLM\SOFTWARE\Microsoft\Windows\CurrentVersion\OEMInformation /v SupportURL /t REG_SZ /d https://manhpc.com /f</Path>
             </RunSynchronousCommand>
             <RunSynchronousCommand wcm:action="add">
                 <Description>Support URL</Description>
                 <Order>10</Order>
                 <Path>cmd /c  reg add HKLM\SOFTWARE\Microsoft\Windows\CurrentVersion\OEMInformation /v SupportHours /t REG_SZ /d 24/7 /f</Path>
             </RunSynchronousCommand>
             <RunSynchronousCommand wcm:action="add">
                 <Description>Support URL</Description>
                 <Order>11</Order>
                 <Path>cmd /c  reg add HKLM\SOFTWARE\Microsoft\Windows\CurrentVersion\OEMInformation /v SupportPhone /t REG_SZ /d "+84 91 664 8537" /f</Path>
             </RunSynchronousCommand>
         </RunSynchronous>
     </component>
     <component name="Microsoft-Windows-Deployment" processorArchitecture="x86" publicKeyToken="31bf3856ad364e35" language="neutral" versionScope="nonSxS" xmlns:wcm="http://schemas.microsoft.com/WMIConfig/2002/State" xmlns:xsi="http://www.w3.org/2001/XMLSchema-instance">
         <RunSynchronous>
             <RunSynchronousCommand wcm:action="add">
                 <Description>Allow Insecure Guest Auth</Description>
                 <Order>1</Order>
                 <Path>cmd /c  reg add HKLM\SYSTEM\CurrentControlSet\Services\LanmanWorkstation\Parameters /v AllowInsecureGuestAuth /t REG_DWORD /d 1 /f</Path>
             </RunSynchronousCommand>
             <RunSynchronousCommand wcm:action="add">
                 <Description>Disable Reserves</Description>
                 <Order>2</Order>
                 <Path>cmd /c  reg add HKLM\SOFTWARE\Microsoft\Windows\CurrentVersion\ReserveManager /v ShippedWithReserves /t REG_DWORD /d 0 /f</Path>
             </RunSynchronousCommand>
             <RunSynchronousCommand wcm:action="add">
                 <Description>Disable Acrylic Background On Logon</Description>
                 <Order>3</Order>
                 <Path>cmd /c  reg add HKLM\SOFTWARE\Policies\Microsoft\Windows\System /v DisableAcrylicBackgroundOnLogon /t REG_DWORD /d 1 /f</Path>
             </RunSynchronousCommand>
             <RunSynchronousCommand wcm:action="add">
                 <Description>Copy To folder</Description>
                 <Order>4</Order>
                 <Path>cmd /c  reg add HKCR\AllFilesystemObjects\shellex\ContextMenuHandlers\{C2FBB630-2971-11D1-A18C-00C04FD75D13} /f</Path>
             </RunSynchronousCommand>
             <RunSynchronousCommand wcm:action="add">
                 <Description>Move To folder</Description>
                 <Order>5</Order>
                 <Path>cmd /c  reg add HKCR\AllFilesystemObjects\shellex\ContextMenuHandlers\{C2FBB631-2971-11D1-A18C-00C04FD75D13} /f</Path>
             </RunSynchronousCommand>
             <RunSynchronousCommand wcm:action="add">
                 <Description>Add This PC Desktop Icon 1</Description>
                 <Order>6</Order>
                 <Path>cmd /c  reg add HKLM\SOFTWARE\Microsoft\Windows\CurrentVersion\Explorer\HideDesktopIcons\ClassicStartMenu /v {871C5380-42A0-1069-A2EA-08002B30309D}.default /t REG_DWORD /d 0 /f</Path>
             </RunSynchronousCommand>
             <RunSynchronousCommand wcm:action="add">
                 <Description>Add This PC Desktop Icon 2</Description>
                 <Order>7</Order>
                 <Path>cmd /c  reg add HKLM\SOFTWARE\Microsoft\Windows\CurrentVersion\Explorer\HideDesktopIcons\NewStartPanel /v {20D04FE0-3AEA-1069-A2D8-08002B30309D} /t REG_DWORD /d 0 /f</Path>
             </RunSynchronousCommand>
             <RunSynchronousCommand wcm:action="add">
                 <Description>Support URL</Description>
                 <Order>8</Order>
                 <Path>cmd /c  reg add HKLM\SOFTWARE\Microsoft\Windows\CurrentVersion\OEMInformation /v Manufacturer /t REG_SZ /d MANHPC /f</Path>
             </RunSynchronousCommand>
             <RunSynchronousCommand wcm:action="add">
                 <Description>Support URL</Description>
                 <Order>9</Order>
                 <Path>cmd /c  reg add HKLM\SOFTWARE\Microsoft\Windows\CurrentVersion\OEMInformation /v SupportURL /t REG_SZ /d https://manhpc.com /f</Path>
             </RunSynchronousCommand>
             <RunSynchronousCommand wcm:action="add">
                 <Description>Support URL</Description>
                 <Order>10</Order>
                 <Path>cmd /c  reg add HKLM\SOFTWARE\Microsoft\Windows\CurrentVersion\OEMInformation /v SupportHours /t REG_SZ /d 24/7 /f</Path>
             </RunSynchronousCommand>
             <RunSynchronousCommand wcm:action="add">
                 <Description>Support URL</Description>
                 <Order>11</Order>
                 <Path>cmd /c  reg add HKLM\SOFTWARE\Microsoft\Windows\CurrentVersion\OEMInformation /v SupportPhone /t REG_SZ /d "+84 91 664 8537" /f</Path>
             </RunSynchronousCommand>
         </RunSynchronous>
     </component>
     <component name="Microsoft-Windows-Shell-Setup" processorArchitecture="amd64" publicKeyToken="31bf3856ad364e35" language="neutral" versionScope="nonSxS" xmlns:wcm="http://schemas.microsoft.com/WMIConfig/2002/State" xmlns:xsi="http://www.w3.org/2001/XMLSchema-instance">
         <copyprofile>true</copyprofile>
     </component>
     <component name="Microsoft-Windows-Shell-Setup" processorArchitecture="x86" publicKeyToken="31bf3856ad364e35" language="neutral" versionScope="nonSxS" xmlns:wcm="http://schemas.microsoft.com/WMIConfig/2002/State" xmlns:xsi="http://www.w3.org/2001/XMLSchema-instance">
         <copyprofile>true</copyprofile>
     </component>
 </settings>
Trong các đoạn file .xml ở bên trên các bạn cần lưu ý một số đoạn sau:
1. <copyprofile>true</copyprofile>: Chỉ dùng setting này khi bạn muốn copy các thiết lập từ tài khoản Administrator sang tài khoản mới khi cài Windows.
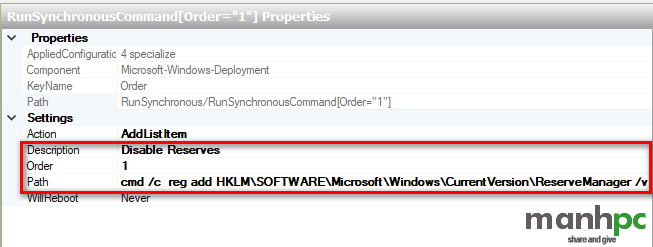
2. RunSynchronous: Lệnh này dùng để thêm các thiết lập registry vào file unattend.xml. Lệnh này chỉ thêm các thiết lập từ HKEY_LOCAL_MACHINE và HKEY_CLASSES_ROOT.
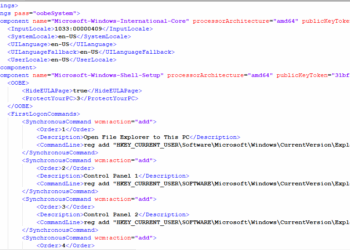
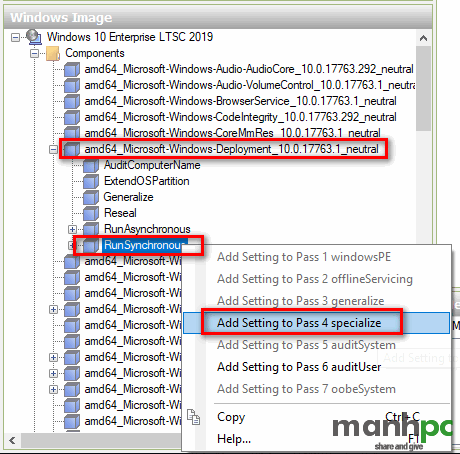
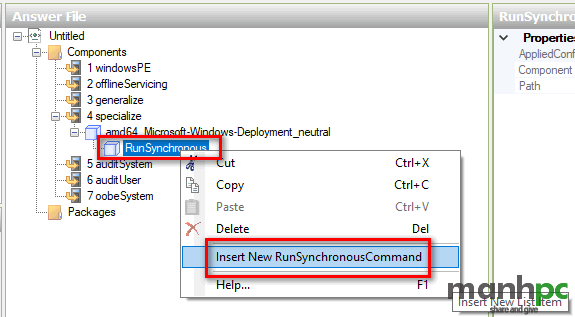
Một số hình mình họa khi bạn sử dụng Windows System Image Manager:
Kết luận
Trong bài viết vừa rồi tôi vừa giới thiệu với các bạn file trả lời tự động cho các quá trình pass 2 offlineServicing, pass 3 generalize, pass 4 specialize. Trong bài viết này tôi chủ yếu cung cấp cho bạn các file .xml có sẵn. Bạn có thể copy các lệnh bên trên tại đây. Bạn có thể sửa trực tiếp file này bằng các công cụ soạn thảo (nên dùng Notepad++) mà không cần phải sử dụng đến công cụ như ở phần 2. Chỉ sửa xong bạn lưu lại và có thể dùng ngay. Trong quá trình thao tác thực tế nếu còn vướng mắc điều gì bạn hãy để lại bình luận phía bên dưới nhé. Cảm ơn các bạn đã đọc bài!
Chúc bạn thành công!
Xem thêm: