
Tiếp theo, trong phần 2 này tôi sẽ hướng dẫn các bạn cách tạo file trả lời tự động (autounattend.xml) cho quá trình Windows Setup. Trong phần này tôi hướng dẫn bằng hai cách: một là dùng giao diện và hai là dùng trực tiếp file mẫu từ Microsoft.
Quá trình cài đặt Windows được thực hiện trong ba giai đoạn:
- Thứ nhất là khởi động từ phương tiện cài đặt (USB, HDD, Box, Network), sau đó chạy Windows Setup (sau khi hoàn tất bắt buộc phải khởi động lại).
- Thứ hai là cấu hình thiết bị phần cứng (hai lần khởi động lại).
- Thứ ba là quá trình Windows Welcome (OOBE).
Trong quá trình cài đặt sạch thông thường, thì cần có sự tương tác của người dùng trong giai đoạn 1 và 3, giai đoạn 2 được chạy tự động mà không cần sự tương tác của người cài đặt. Trong giai đoạn 1, người dùng chọn cấu hình ngôn ngữ, định dạng thời gian và đơn vị, bố cục bàn phím cho quá trình cài, nhập key cho phiên bản cụ thể hoặc chọn phiên bản theo cách thủ công và chấp nhận giấy phép nếu key không được nhập ở giai đoạn này, đồng thời chọn đĩa và phân vùng để cài đặt Windows. Khi giai đoạn 1 hoàn tất, Windows khởi động lại sang giai đoạn 2 được thực hiện mà không cần có sự tương tác của người dùng và khi sẵn sàng sẽ tự động khởi động lại giai đoạn 3.
Trong giai đoạn 3, chúng ta chọn cài đặt khu vực và ngôn ngữ cho tài khoản người dùng, tạo tài khoản người dùng quản trị ban đầu, cài đặt quyền riêng tư và cuối cùng khởi động vào máy tính để bắt đầu sử dụng.
Để hoàn toàn tự động cài đặt Windows 10 chúng ta cần chuẩn bị các tệp trả lời được gọi là tệp trả lời tự động cho cả Windows Setup (giai đoạn 1) và Windows Welcome (OOBE, giai đoạn 3). Để tìm hiểu chi tiết về file trả lời tự động bạn đọc thêm tại đây.
Trong bài này, tôi sẽ tạo một file trả lời có tên autounattend.xml, khi được thêm vào thư mục gốc của file ISO, ổ USB và ổ DVD thì nó sẽ tự động xử lý vùng tài khoản hệ thống Windows, lựa chọn bàn phím, chấp nhận giấy phép, xóa sạch đĩa cứng, phân vùng lại theo ý muốn của người dùng và cuối cùng bắt đầu Thiết lập Windows. Bài viết này khá dài và có thể trông phức tạp nếu bạn chưa từng làm việc này, nhưng bạn có thể thao tác rất nhanh chóng và dễ dàng.
Sử dụng giao diện để tạo file autounattend.xml
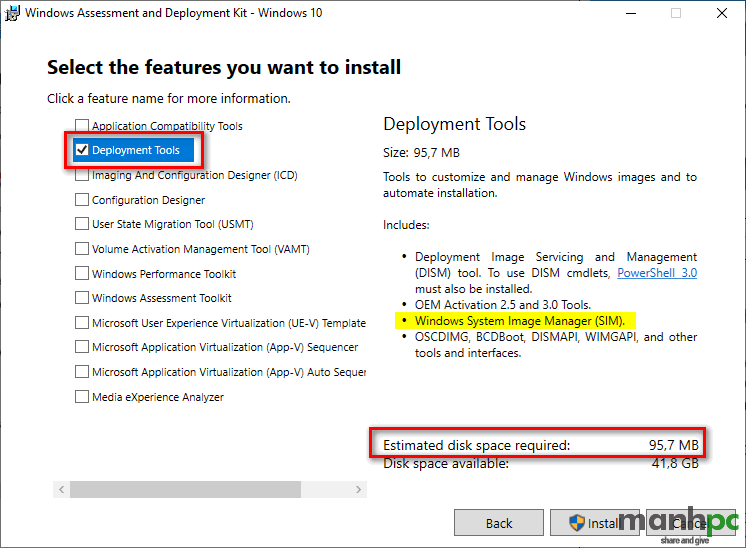
Để bắt đầu bạn cần cài Windows 10 ADK (Assesment and Deployment Kit) để tạo file autounattend.xml. Trong bài hướng dẫn này tôi sử dụng bộ ADK for Windows 10, version 1809: https://docs.microsoft.com/en-us/windows-hardware/get-started/adk-install
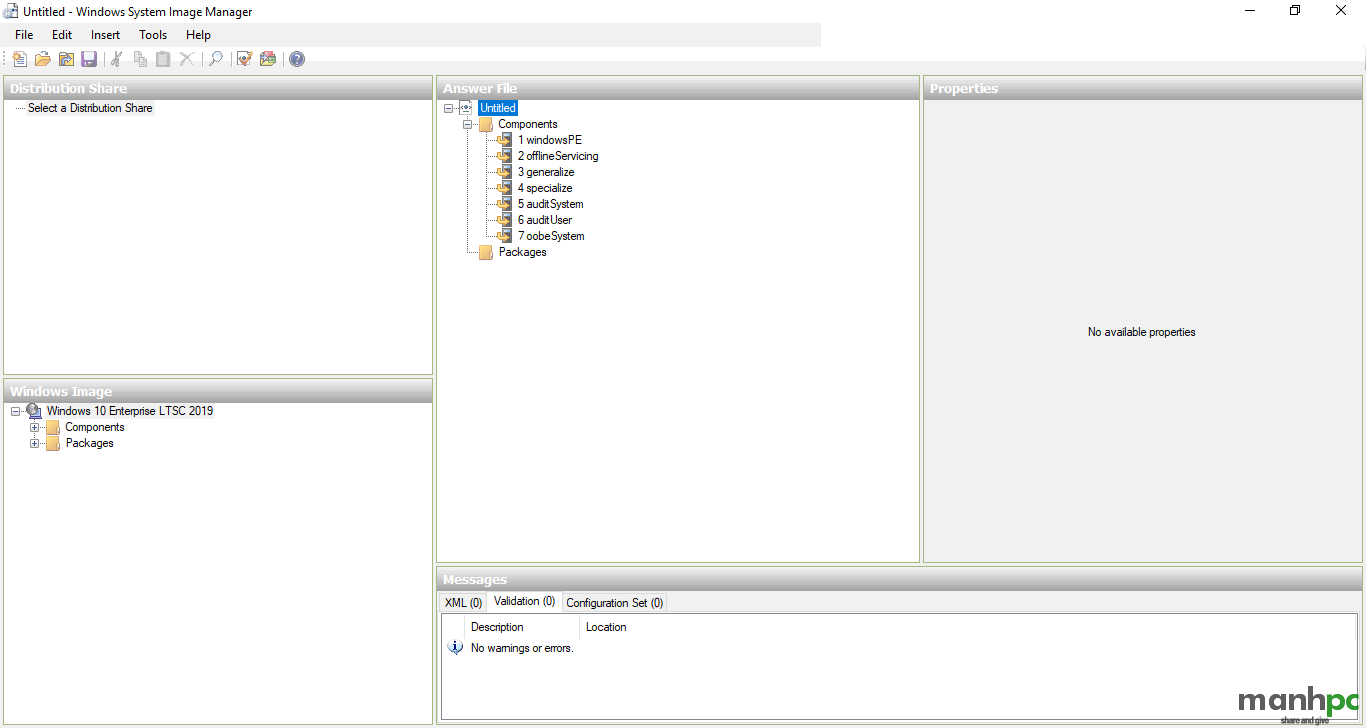
Trong bộ Windows 10 ADK này có rất nhiều công cụ nhưng công cụ chúng ta cần để tạo file là Windows SIM (System Image Manager):
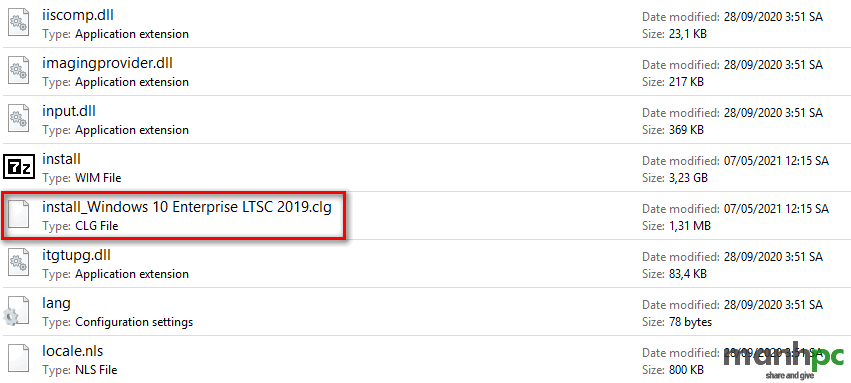
Sau khi cài đặt bạn mở nó lên bằng cách: Start > Windows Kits > Windows System Image Manager.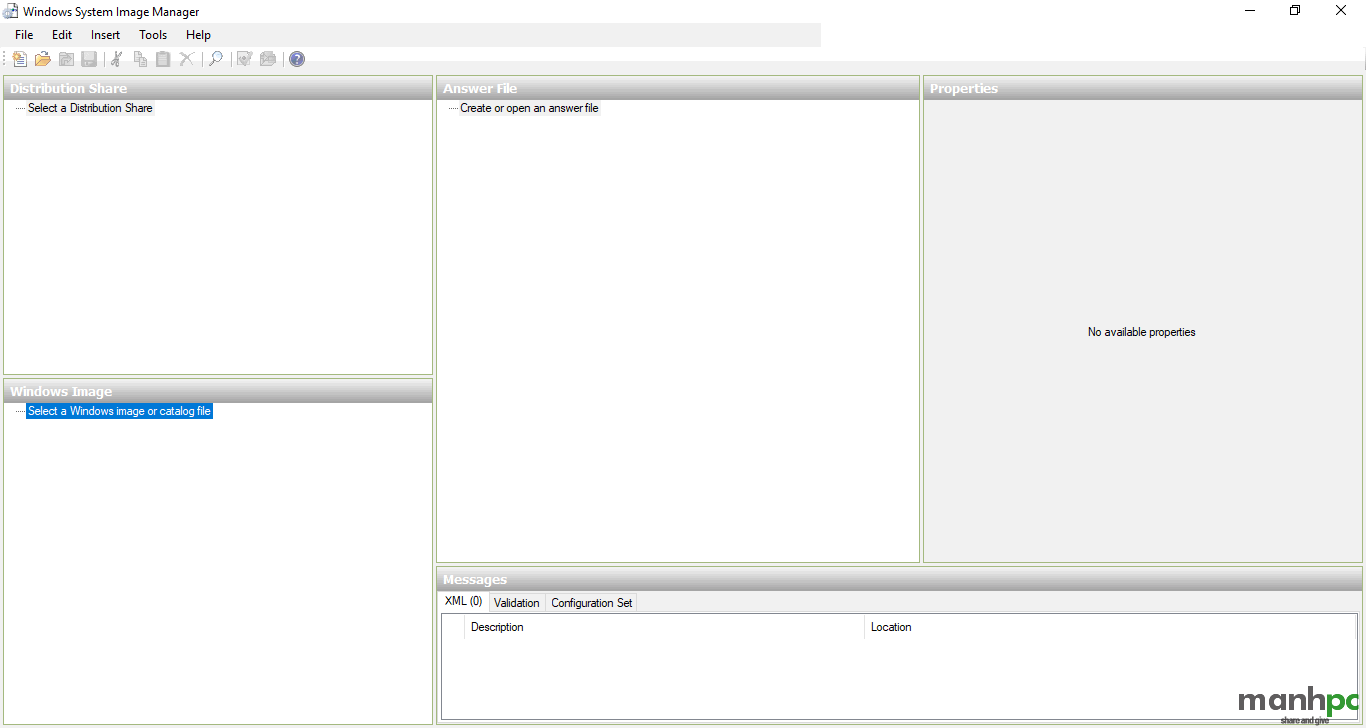 Trong bài viết này, chúng ta sẽ làm việc với tất cả các ô trừ ô Distribution Share. Đầu tiên, chúng ta cần tạo một catalog file. Catalog file là tệp nhị phân có phần mở rộng .clg, bên trong có chứa các cài đặt cho một phiên bản Windows cụ thể. Catalog file không bắt buộc để cài đặt Windows, nhưng chúng rất cần thiết khi tạo tệp trả lời. Catalog file có thể được tạo bằng tệp install.wim của Windows 10.
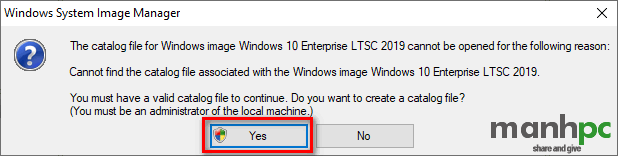
Để tạo catalog file, bạn copy file install.wim từ phương tiện cài đặt Windows 10 vào đĩa cứng. Sau đó, chọn File > New Answer File, Click Yes và tìm đến file install.wim file:
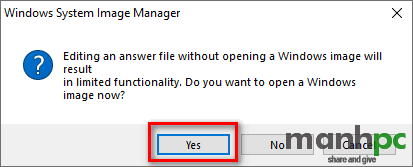
Click Yes
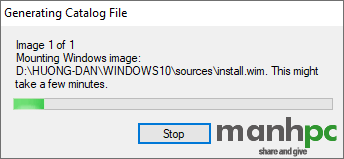
File .clg sau khi tạo xong nó sẽ nằm ngang hàng với file install.wim trong folder sources. Bạn chỉ cần tạo catalog file một lần và khi bạn cần tạo các file trả lời khác cho image này bạn chỉ cần chọn lại catalog file vừa tạo mà không cần phải tạo file mới từ file install.wim.
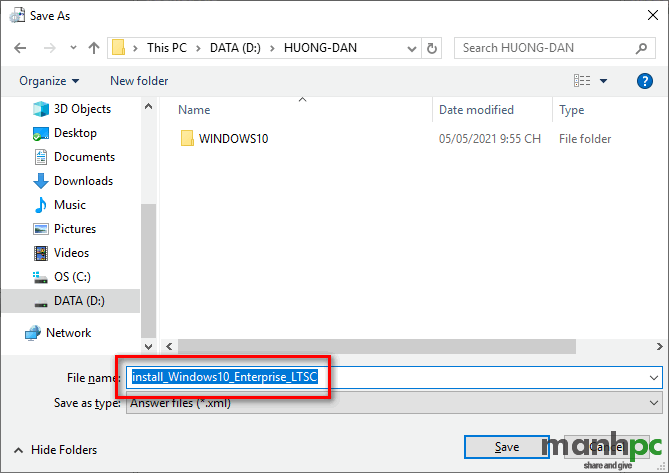
Tiếp theo chúng ta vào File > Save Answer File để save ra một file .xml
Thêm components vào file trả lời autounattend.xml
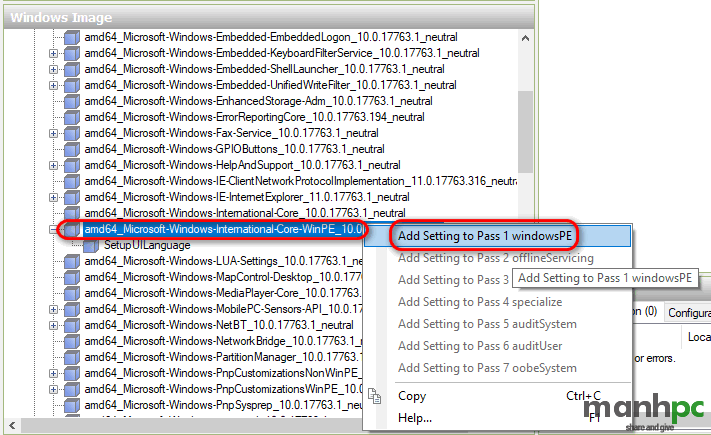
Trên Windows Image dưới cùng bên trái, mở rộng Components. Click phải chuột lên Microsoft-Windows-International-Core-WinPE, thêm nó vào configuration Pass 1 WindowsPE:
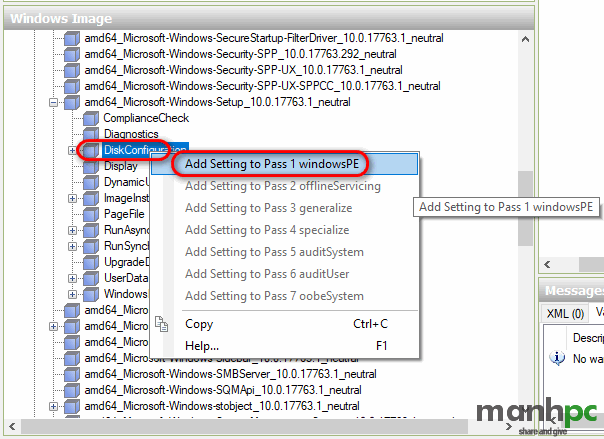
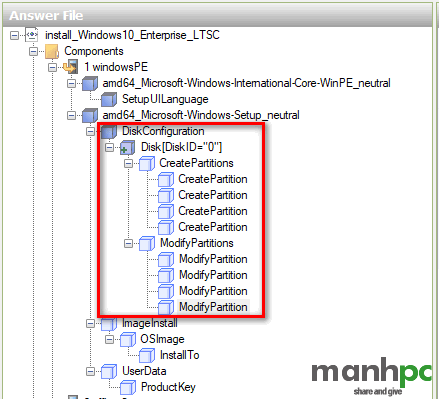
Tiếp theo, mở rộng Microsoft-Windows-Setup trên Windows Image pane. Thêm thành phần DiskConfiguration vào Pass 1 bằng cách click phải chuột DiskConfiguration và lựa chọn Add Setting to Pass 1.
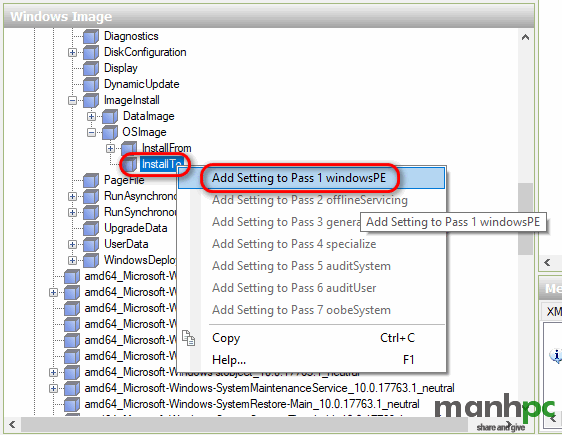
Mở rộng ImageInstall > OSImage và thêm InstallTo vào Pass 1.
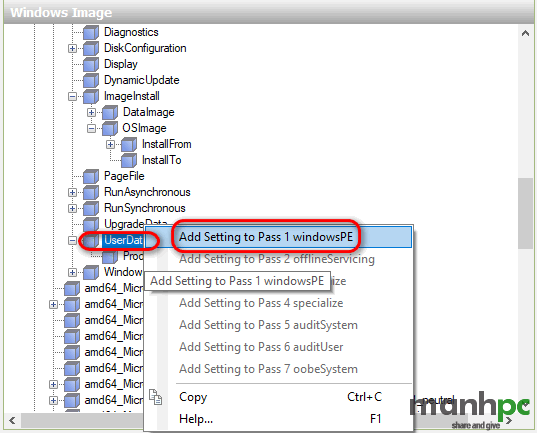
Thêm thành phần UserData vào Pass 1.
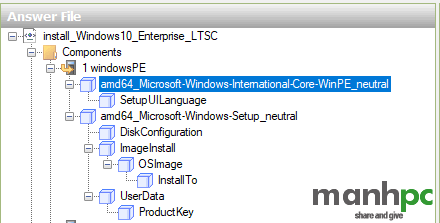
Ô Answer File ở trên cùng bây giờ sẽ trông như thế này khi tất cả các thành phần đã được mở rộng.
Thiết lập vùng và ngôn ngữ
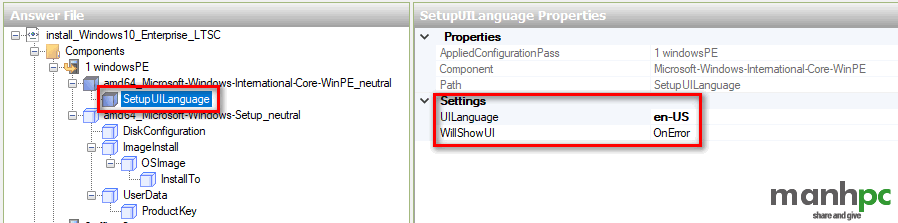
Trước tiên, chúng ta sẽ thêm ngôn ngữ hiển thị Windows UI bao gồm ngôn ngữ cài đặt và bố cục bàn phím. Lựa chọn Microsoft-Windows-International-Core-WinPE trên ô Answer File, chỉnh sửa các thuộc tính của nó ở panel trên cùng bên phải.

Brazil – Portuguese > 0416:00000416, pt-BR
Canada – English > 1009:00000409, en-CA
Canada – French > 0c0c:00011009, fr-CA
France – French > 040c:0000040c, fr-FR
Germany – German > 0407:00000407, de-DE
UK – English > 0809:00000809, en-GB
USA – English > 0409:00000409, en-US
Default Input Profiles: https://docs.microsoft.com/en-gb/windows-hardware/manufacture/desktop/default-input-locales-for-windows-language-packs
Tiếp theo, chúng ta mở rộng Microsoft-Windows-International-Core-WinPE bên trong ô Answer File, chọn SetupUILanguage, và thiết lập thuộc tính properties cho UILanguage.
Phân vùng đĩa cứng
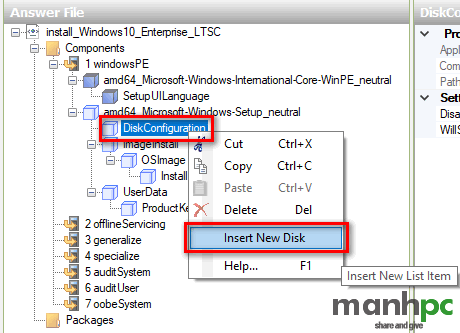
Click phải chuột lên DiskConfiguration bên dưới Microsoft-Windows-Setup trong ô Answer File, sau đó chọn Insert New Disk.
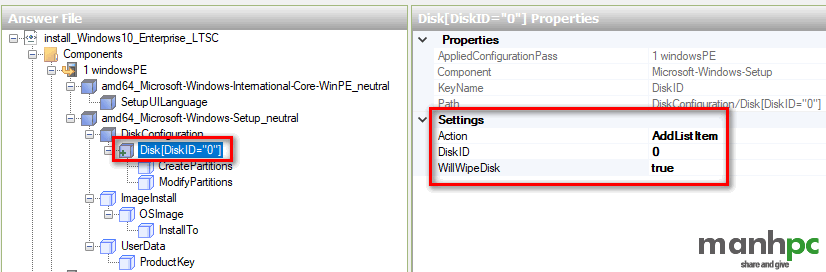
Tiếp theo, chọn đĩa mới trong ô Answer File và chỉnh sửa các thuộc tính của nó. DiskID cho biết đĩa cứng nào sẽ được Windows Setup sử dụng để cài Windows, trong đó DiskID 0 là primary disk (DiskID 1 = ổ cứng thứ 2, ….). Đặt giá trị WillWipeDisk thành TRUE để xóa toàn bộ đĩa cứng khi cài Windows. Việc này cũng tương tự bạn thức hiện lệnh DISKPART > SEL DISK 0 > CLEAN.
Tiếp theo chúng ta sẽ phân vùng đĩa cứng. Khi bạn cài Windows trên hệ thống GPT partitioned / UEFI system thì chúng ta cần 4 phân vùng: WinRE, EFI, MSR, Windows. Còn khi cài trên MBR / BIOS system thi cần duy nhất 2 phân vùng là: System Reserved và Windows. Nhấn phải chuột lên CreatePartitions, sau đó chọn Insert New CreatePartition.
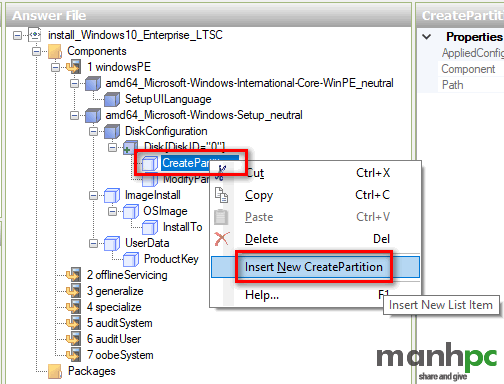
Lặp lại các bước này để tạo bốn phân vùng khi bạn cài đặt GPT / UEFI hoặc hai phân vùng khi cài đặt MBR / BIOS.
Thao tác bên trên chỉ tạo mới các phân vùng. Còn để cho Windows Setup biết định dạng mỗi phân vùng là gì thì chúng ta phải định dạng nó bằng cách thêm ModifyPartition vào mỗi phân vùng đã được thêm ở trên. Nhấn phải chuột vào Modify Partitions bên trong ô Answer File chọn Insert New ModifyPartition.
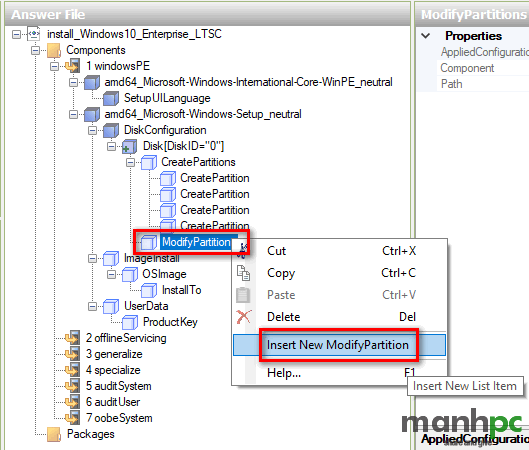
Lặp lại bước này cho đến khi mỗi 1 ModifyPartition tương ứng với 1 CreatePartition.
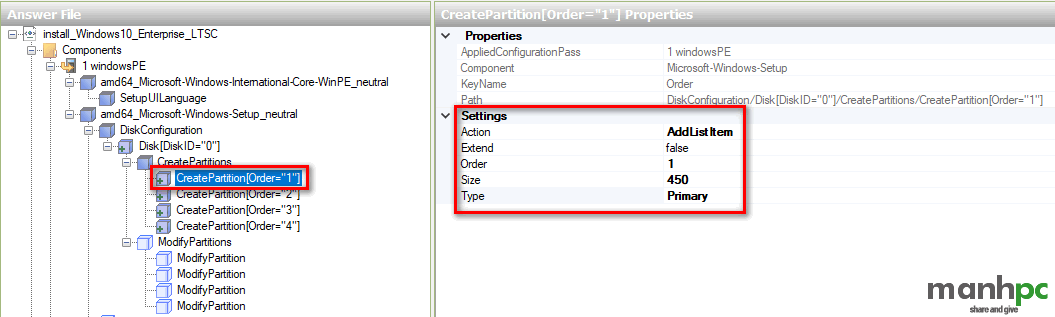
Bây giờ lần lượt lựa chọn từng CreatePartition bên trong ô Answer File và chỉnh sửa các thuộc tính của nó như bảng bên dưới.
PARTITION | EXTEND | ORDER | SIZE | TYPE |
CreatePartition 1 | False | 1 | 450 MB | Primary |
CreatePartition 2 | False | 2 | 100 MB | EFI |
CreatePartition 3 | False | 3 | 16 MB | MSR |
CreatePartition 4 | True | 4 | Leave | Primary |
Chỉnh sửa giá trị CreatePartition trên MBR disk.
PARTITION | EXTEND | ORDER | SIZE | TYPE |
CreatePartition 1 | False | 1 | 450 MB | Primary |
CreatePartition 2 | True | 2 | Leave empty | Primary |
Giá trị Extend = TRUE cho partition 4 (GPT disk) hoặc partition 2 (MBR disk) (Windows partition), có nghĩa là hệ thống sẽ sử dụng toàn bộ dung lượng ổ cứng còn lại để tạo phân vùng cài Windows sau khi các phân vùng hệ thống được tạo. Nếu bạn muốn tạo phân vùng dữ liệu, bạn sẽ cần phải đặt kích thước cụ thể cho phân vùng cài Windows và sau đó thêm phân vùng bổ sung (ngay bây giờ hoặc sau khi cài xong Windows). Chỉ duy nhất phân vùng cuối cùng hoặc ngoài cùng bên phải thì bạn có thể set được extend.
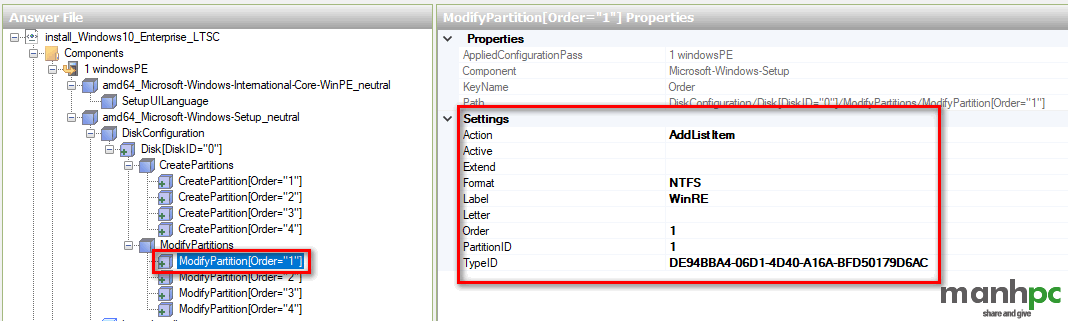
Tiếp theo chúng ta cần chỉnh sửa thuộc tính ModifyPartition cho mỗi CreatePartition như bảng bên dưới.
PARTITION | FORMAT | LABEL | ORDER | PARTITION ID | TYPE ID |
ModifyPartition 1 | NTFS | WinRE | 1 | 1 | DE94BBA4-06D1-4D40-A16A-BFD50179D6AC |
ModifyPartition 2 | FAT32 | System | 2 | 2 | required |
ModifyPartition 3 | Not required | Not required | 3 | 3 | required |
ModifyPartition 4 | NTFS | Windows | 4 | 4 | required |
Chú ý phân vùng 3 với dung lượng 16 MB (GPT disk), MSR hoặc Microsoft Reserved Partition bạn không định dạng hay đặt tên cho nó. Ví dụ bên dưới tôi chỉnh sửa một ModifyPartition mẫu và hiển thị các thuộc tính cho phân vùng WinRE
Giá trị ModifyPartition cho MBR disk
PARTITION | ACTIVE | FORMAT | LABEL | ORDER | PARTITION ID | TYPE ID |
ModifyPartition 1 | True | NTFS | System | 1 | 1 | Not required |
ModifyPartition 2 | False | NTFS | Windows | 2 | 2 | Not required |
Với ổ cứng MBR bạn cần phải active phân vùng 1: System Reserved partition. Để tạo thêm phân vùng dữ liệu bạn cần đặt giá trị EXTEND cho phân vùng Windows là FALSE, và đặt dung lượng cụ thể cho nó. Nếu bạn không muốn tạo phân vùng chứa data trên đĩa cứng này thì bạn set EXTEND = TRUE và khi đó Windows sẽ sử dụng toàn bộ phân vùng trống còn lại sau khi tạo xong phân vùng hệ thống.
Bên dưới là 1 ví dụ khi sử dụng answer file ổ cứng GPT. Chúng ta sẽ tạo tạo phân vùng Windows có dung lượng là 150 GB (153600 MB), phân vùng DATA1 là 500 GB (512000 MB), sau đó sử dụng phần còn lại của ổ cứng cho phân vùng DATA2. Trong trường hợp này chúng ta sẽ cần tạo 6 CreatePartitions và 6 ModifyPartitions và thiết lập thuộc tính như bảng bên dưới.
PARTITION | EXTEND | ORDER | SIZE | TYPE |
CreatePartition 1 | False | 1 | 450 MB | Primary |
CreatePartition 2 | False | 2 | 100 MB | EFI |
CreatePartition 3 | False | 3 | 16 MB | MSR |
CreatePartition 4 | False | 4 | 153600 MB | Primary |
CreatePartition 5 | False | 5 | 512000 MB | Primary |
CreatePartition 6 | True | 6 | Leave empty | Primary |
Giá trị ModifyPartition cho 6 phân vùng sẽ hiển thị như bảng bên dưới
PARTITION | FORMAT | LABEL | ORDER | PARTITION ID | TYPE ID |
ModifyPartition 1 | NTFS | WinRE | 1 | 1 | DE94BBA4-06D1-4D40-A16A-BFD50179D6AC |
ModifyPartition 2 | FAT32 | System | 2 | 2 | Not required |
ModifyPartition 3 | Not required | Not required | 3 | 3 | Not required |
ModifyPartition 4 | NTFS | WINDOWS | 4 | 4 | Not required |
ModifyPartition 5 | NTFS | DATA1 | 5 | 5 | Not required |
ModifyPartition 6 | NTFS | DATA2 | 6 | 6 | Not required |
Có một điều quan trọng mà bạn cần phải nhớ ở đây là ứng với mỗi CreatePartition được tạo thì bạn cần thiết lập thuộc tính ModifyPartition tương ứng.

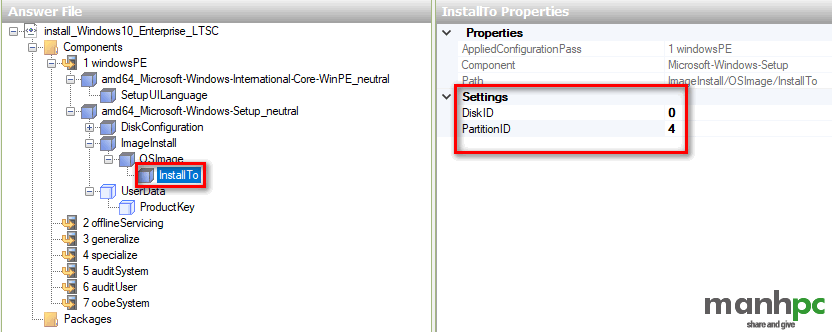
Cuối cùng là chúng ta báo cho Windows Setup biết nơi sẽ cài Windows. Mở rộng Microsoft-Windows-Setup > ImageInstall> OSImage trong ô Answer File, sau đó chọn InstallTo. Đặt thuộc tính cho nó là DiskID = 0 (nếu cài đặt vào đĩa cứng chính), PartitionID = 4 (GPT / UEFI) hoặc PartitionID = 2 (MBR / BIOS).
User Data & Product Key
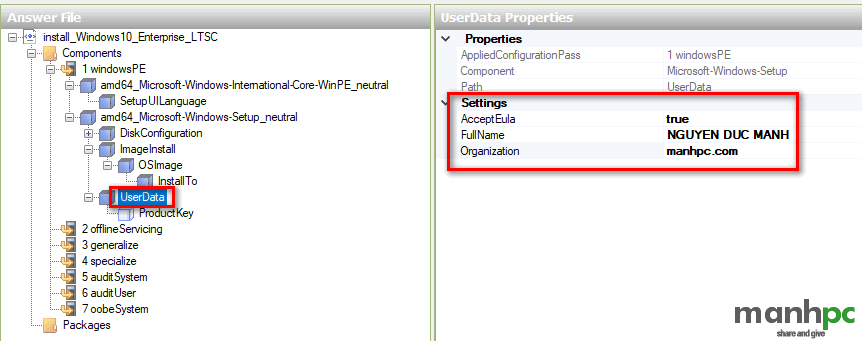
Để thiết lập thuộc tính này chúng ta vào Microsoft-Windows-Setup > UserData
- AcceptEula = TRUE
- FullName = Bạn đặt tên tùy ý và có thể để trống
- Organization = Bạn đặt tên tùy ý và có thể để trống
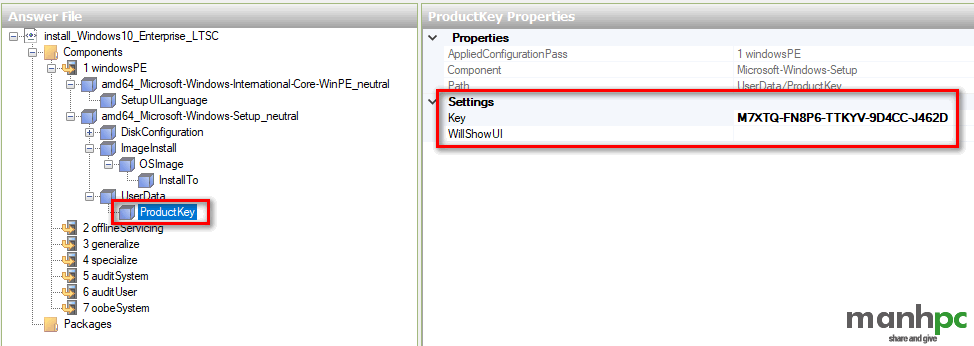
Điều cuối cùng mà file autounattend.xml cần là product key. Bạn có thể sử dụng bất kỳ product key số lượng lớn nào nếu có hoặc chỉ đơn giản là generic key. Nếu bạn sử dụng generic key, Windows sẽ tự động được kích hoạt khi được cài đặt nếu máy có giấy phép kỹ thuật số hợp lệ cho phiên bản Windows 10 đó. Nếu không, việc kích hoạt phải được thực hiện theo cách thủ công với product key hợp lệ sau khi cài xong.
Mở rộng Microsoft-Windows-Setup > UserData, chọn ProductKey. Nhập key.
Bên dưới là 1 số generic product keys mà bạn có thể thêm vào file autounattend.xml:
+ Windows 10 Home Single Language: 7HNRX-D7KGG-3K4RQ-4WPJ4-YTDFH
+ Windows 10 Home: TX9XD-98N7V-6WMQ6-BX7FG-H8Q99
+ Windows 10 Pro: VK7JG-NPHTM-C97JM-9MPGT-3V66T
Với các phiên bản Education, Enterprise và Server bạn xem tại đây.
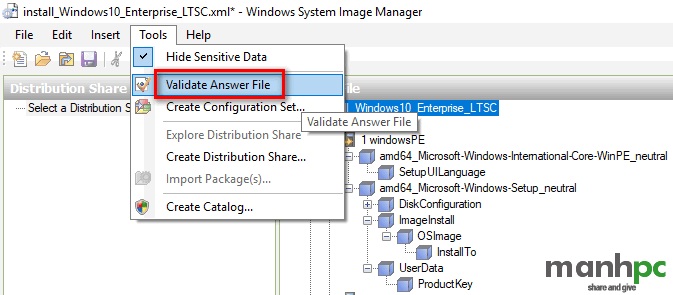
Tiếp theo, bạn phải xác thực nó để xem nó có bất kỳ lỗi nào không
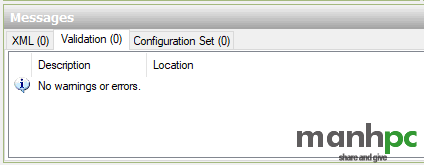
Kiểm tra Messages trong ô dưới cùng ở giữa. Nếu không có cảnh báo, bạn hãy lưu file trả lời dưới dạng autounattend.xml (File > Save As).
Bạn đưa file autounattend.xml vào ngang hàng với file setup.exe trong bộ cài để sử dụng nó.
Bên trên là tôi vừa hướng dẫn tại file autounattend.xml cho phiên bản x64. Với phiên bản x86 các bạn làm tương tự (Trên Windows Image tìm đến dòng có x86_)
Sử dụng file autounattend.xml mẫu từ Microsoft
Bên dưới đây là 3 file autounattend.xml gốc từ MS. Các bạn copy và save thành file autounattend.xml và sử dụng.
Autounattend_x64_BIOS_sample.xml
<?xml version="1.0" encoding="utf-8"?>
<unattend xmlns="urn:schemas-microsoft-com:unattend">

<!-- Autounattend_x64_BIOS_sample.xml

This file automates the Windows installation.

     Before using this file:
      * Replace ProductKey with a product key for the edition of Windows you are installing
        (example: Windows 8.1 Pro)
        Note:
           The product key used in Microsoft-Windows-Setup\UserData\ProductKey\Key
           can be used many times in different installations and is not used to activate Windows.
           It is only used to choose which edition of Windows to install.

           The individual product key is either specified by the user, or by setting
           Microsoft-Windows-Shell-Setup\ProductKey.
     * Set the default language to your own:
       Replace "en-US" with your language code in Microsoft-Windows-International-Core-WinPE\SetupUILanguage.
       For a list of languages, see http://go.microsoft.com/fwlink/?LinkId=206620.
     * OEMs: Replace OEMInformation with your support information

     To use this file:

        Save this file on the root of a USB flash drive with the filename: Autounattend.xml
        Put the Windows DVD and the USB key into a new x64-BIOS PC.

-->

    <settings pass="specialize">
        <component name="Microsoft-Windows-Shell-Setup" processorArchitecture="amd64" publicKeyToken="31bf3856ad364e35" language="neutral" versionScope="nonSxS" xmlns:wcm="http://schemas.microsoft.com/WMIConfig/2002/State" xmlns:xsi="http://www.w3.org/2001/XMLSchema-instance">
            <OEMInformation>
                <Manufacturer>[ REPLACE WITH COMPANY NAME ]</Manufacturer>
                <SupportURL>[ REPLACE WITH SUPPORT WEBSITE ]</SupportURL>
            </OEMInformation>
        </component>
    </settings>
    <settings pass="windowsPE">
        <component name="Microsoft-Windows-International-Core-WinPE" processorArchitecture="amd64" publicKeyToken="31bf3856ad364e35" language="neutral" versionScope="nonSxS" xmlns:wcm="http://schemas.microsoft.com/WMIConfig/2002/State" xmlns:xsi="http://www.w3.org/2001/XMLSchema-instance">
            <SetupUILanguage>
                <UILanguage>en-US</UILanguage>
            </SetupUILanguage>
            <InputLocale>en-US</InputLocale>
            <SystemLocale>en-US</SystemLocale>
            <UILanguage>en-US</UILanguage>
            <UserLocale>en-US</UserLocale>
        </component>
        <component name="Microsoft-Windows-Setup" processorArchitecture="amd64" publicKeyToken="31bf3856ad364e35" language="neutral" versionScope="nonSxS" xmlns:wcm="http://schemas.microsoft.com/WMIConfig/2002/State" xmlns:xsi="http://www.w3.org/2001/XMLSchema-instance">
            <DiskConfiguration>
                <Disk wcm:action="add">
                    <CreatePartitions>

                        <!-- System partition -->
                        <CreatePartition wcm:action="add">
                            <Order>1</Order>
                            <Size>350</Size>
                            <Type>Primary</Type>
                        </CreatePartition>

                        <!-- Windows partition -->
                        <CreatePartition wcm:action="add">
                            <Order>2</Order>
                            <Extend>true</Extend>
                            <Type>Primary</Type>
                        </CreatePartition>
                    </CreatePartitions>

                    <ModifyPartitions>
                        <ModifyPartition wcm:action="add">
                            <Order>1</Order>
                            <PartitionID>1</PartitionID>
                            <Label>System</Label>
                            <Format>NTFS</Format>
                            <Active>true</Active>
                        </ModifyPartition>
                        <ModifyPartition wcm:action="add">
                            <Order>2</Order>
                            <PartitionID>2</PartitionID>
                            <Format>NTFS</Format>
                            <Label>Windows</Label>
                        </ModifyPartition>
                    </ModifyPartitions>
                    <DiskID>0</DiskID>
                    <WillWipeDisk>true</WillWipeDisk>
                </Disk>
                <WillShowUI>OnError</WillShowUI>
            </DiskConfiguration>
            <ImageInstall>
                <OSImage>
                    <InstallTo>
                        <DiskID>0</DiskID>
                        <PartitionID>2</PartitionID>
                    </InstallTo>
                </OSImage>
            </ImageInstall>
            <UserData>
                <ProductKey>
                    <WillShowUI>OnError</WillShowUI>
                    <Key>[ REPLACE WITH PRODUCT KEY ]</Key>
                </ProductKey>
                <AcceptEula>true</AcceptEula>
            </UserData>
        </component>
    </settings>
</unattend>
Autounattend_x64-UEFI_sample.xml
<?xml version="1.0" encoding="utf-8"?>
<unattend xmlns="urn:schemas-microsoft-com:unattend">

<!-- Autounattend_x64-UEFI_sample.xml

This file automates the Windows installation.

     Before using this file:
      * Replace ProductKey with a product key for the edition of Windows you are installing
        (example: Windows 8.1 Pro)
        Note:
           The product key used in Microsoft-Windows-Setup\UserData\ProductKey\Key
           can be used many times in different installations and is not used to activate Windows.
           It is only used to choose which edition of Windows to install.

           The individual product key is either specified by the user, or by setting
           Microsoft-Windows-Shell-Setup\ProductKey.
     * Set the default language to your own:
       Replace "en-US" with your language code in Microsoft-Windows-International-Core-WinPE\SetupUILanguage.
       For a list of languages, see http://go.microsoft.com/fwlink/?LinkId=206620.
     * OEMs: Replace OEMInformation with your support information

     To use this file:
        Save this file on the root of a USB flash drive with the filename: Autounattend.xml
        Put the Windows DVD and the USB key into a new x64-UEFI PC.

-->

    <settings pass="specialize">
        <component name="Microsoft-Windows-Shell-Setup" processorArchitecture="amd64" publicKeyToken="31bf3856ad364e35" language="neutral" versionScope="nonSxS" xmlns:wcm="http://schemas.microsoft.com/WMIConfig/2002/State" xmlns:xsi="http://www.w3.org/2001/XMLSchema-instance">
            <OEMInformation>
                <Manufacturer>[ REPLACE WITH COMPANY NAME ]</Manufacturer>
                <SupportURL>[ REPLACE WITH SUPPORT WEBSITE ]</SupportURL>
            </OEMInformation>
        </component>
    </settings>
    <settings pass="windowsPE">
        <component name="Microsoft-Windows-International-Core-WinPE" processorArchitecture="amd64" publicKeyToken="31bf3856ad364e35" language="neutral" versionScope="nonSxS" xmlns:wcm="http://schemas.microsoft.com/WMIConfig/2002/State" xmlns:xsi="http://www.w3.org/2001/XMLSchema-instance">
            <SetupUILanguage>
                <UILanguage>en-US</UILanguage>
            </SetupUILanguage>
            <InputLocale>en-US</InputLocale>
            <SystemLocale>en-US</SystemLocale>
            <UILanguage>en-US</UILanguage>
            <UserLocale>en-US</UserLocale>
        </component>
        <component name="Microsoft-Windows-Setup" processorArchitecture="amd64" publicKeyToken="31bf3856ad364e35" language="neutral" versionScope="nonSxS" xmlns:wcm="http://schemas.microsoft.com/WMIConfig/2002/State" xmlns:xsi="http://www.w3.org/2001/XMLSchema-instance">

            <DiskConfiguration>
                <Disk wcm:action="add">
                    <CreatePartitions>
                        <!-- Windows RE Tools partition -->
                        <CreatePartition wcm:action="add">
                            <Order>1</Order>
                            <Size>300</Size>
                            <Type>Primary</Type>
                        </CreatePartition>

                        <!-- System partition (ESP) -->
                        <CreatePartition wcm:action="add">
                            <Order>2</Order>
                            <Size>100</Size>
                            <Type>EFI</Type>
                        </CreatePartition>

                        <!-- Microsoft reserved partition (MSR) -->
                        <CreatePartition wcm:action="add">
                            <Order>3</Order>
                            <Size>128</Size>
                            <Type>MSR</Type>
                        </CreatePartition>

                        <!-- Windows partition -->
                        <CreatePartition wcm:action="add">
                            <Order>4</Order>
                            <Extend>true</Extend>
                            <Type>Primary</Type>
                        </CreatePartition>
                    </CreatePartitions>

                    <ModifyPartitions>
                        <!-- Windows RE Tools partition -->
                        <ModifyPartition wcm:action="add">
                            <Order>1</Order>
                            <PartitionID>1</PartitionID>
                            <Label>WINRE</Label>
                            <Format>NTFS</Format>
                            <TypeID>de94bba4-06d1-4d40-a16a-bfd50179d6ac</TypeID>
                        </ModifyPartition>

                        <!-- System partition (ESP) -->
                        <ModifyPartition wcm:action="add">
                            <Order>2</Order>
                            <PartitionID>2</PartitionID>
                            <Label>System</Label>
                            <Format>FAT32</Format>
                        </ModifyPartition>

                        <!-- Microsoft reserved partition (MSR) -->
                        <ModifyPartition wcm:action="add">
                            <Order>3</Order>
                            <PartitionID>3</PartitionID>
                        </ModifyPartition>

                        <!-- Windows partition -->
                        <ModifyPartition wcm:action="add">
                            <Order>4</Order>
                            <PartitionID>4</PartitionID>
                            <Label>Windows</Label>
                            <Format>NTFS</Format>
                        </ModifyPartition>
                    </ModifyPartitions>
                    <DiskID>0</DiskID>
                    <WillWipeDisk>true</WillWipeDisk>
                </Disk>
                <WillShowUI>OnError</WillShowUI>
            </DiskConfiguration>
            <ImageInstall>
                <OSImage>
                    <InstallTo>
                        <DiskID>0</DiskID>
                        <PartitionID>4</PartitionID>
                    </InstallTo>
                </OSImage>
            </ImageInstall>
            <UserData>
                <ProductKey>
                    <WillShowUI>OnError</WillShowUI>
                    <Key>[ REPLACE WITH PRODUCT KEY ]</Key>
                </ProductKey>
                <AcceptEula>true</AcceptEula>
            </UserData>
        </component>
    </settings>
</unattend>
Autounattend_x86_BIOS_sample.xml
<?xml version="1.0" encoding="utf-8"?>
<unattend xmlns="urn:schemas-microsoft-com:unattend">

<!-- Autounattend_x86_BIOS_sample.xml

This file automates the Windows installation.

     Before using this file:
      * Replace ProductKey with a product key for the edition of Windows you are installing
        (example: Windows 8.1 Pro)
        Note:
           The product key used in Microsoft-Windows-Setup\UserData\ProductKey\Key
           can be used many times in different installations and is not used to activate Windows.
           It is only used to choose which edition of Windows to install.

           The individual product key is either specified by the user, or by setting
           Microsoft-Windows-Shell-Setup\ProductKey.
     * Set the default language to your own:
       Replace "en-US" with your language code in Microsoft-Windows-International-Core-WinPE\SetupUILanguage.
       For a list of languages, see http://go.microsoft.com/fwlink/?LinkId=206620.
     * OEMs: Replace OEMInformation with your support information

     To use this file:
        Save this file on the root of a USB flash drive with the filename: Autounattend.xml
        Put the Windows DVD and the USB key into a new x86-BIOS PC.

-->

    <settings pass="specialize">
        <component name="Microsoft-Windows-Shell-Setup" processorArchitecture="x86" publicKeyToken="31bf3856ad364e35" language="neutral" versionScope="nonSxS" xmlns:wcm="http://schemas.microsoft.com/WMIConfig/2002/State" xmlns:xsi="http://www.w3.org/2001/XMLSchema-instance">
            <OEMInformation>
                <Manufacturer>[ REPLACE WITH COMPANY NAME ]</Manufacturer>
                <SupportURL>[ REPLACE WITH SUPPORT WEBSITE ]</SupportURL>
            </OEMInformation>
        </component>
    </settings>
    <settings pass="windowsPE">
        <component name="Microsoft-Windows-International-Core-WinPE" processorArchitecture="x86" publicKeyToken="31bf3856ad364e35" language="neutral" versionScope="nonSxS" xmlns:wcm="http://schemas.microsoft.com/WMIConfig/2002/State" xmlns:xsi="http://www.w3.org/2001/XMLSchema-instance">
            <SetupUILanguage>
                <UILanguage>en-US</UILanguage>
            </SetupUILanguage>
            <InputLocale>en-US</InputLocale>
            <SystemLocale>en-US</SystemLocale>
            <UILanguage>en-US</UILanguage>
            <UserLocale>en-US</UserLocale>
        </component>
        <component name="Microsoft-Windows-Setup" processorArchitecture="x86" publicKeyToken="31bf3856ad364e35" language="neutral" versionScope="nonSxS" xmlns:wcm="http://schemas.microsoft.com/WMIConfig/2002/State" xmlns:xsi="http://www.w3.org/2001/XMLSchema-instance">
            <DiskConfiguration>
                <Disk wcm:action="add">
                    <CreatePartitions>

                        <!-- System partition -->
                        <CreatePartition wcm:action="add">
                            <Order>1</Order>
                            <Size>350</Size>
                            <Type>Primary</Type>
                        </CreatePartition>

                        <!-- Windows partition -->
                        <CreatePartition wcm:action="add">
                            <Order>2</Order>
                            <Extend>true</Extend>
                            <Type>Primary</Type>
                        </CreatePartition>

                    </CreatePartitions>
                    <ModifyPartitions>
                        <ModifyPartition wcm:action="add">
                            <Order>1</Order>
                            <PartitionID>1</PartitionID>
                            <Label>System</Label>
                            <Format>NTFS</Format>
                            <Active>true</Active>
                        </ModifyPartition>
                        <ModifyPartition wcm:action="add">
                            <Order>2</Order>
                            <PartitionID>2</PartitionID>
                            <Format>NTFS</Format>
                            <Label>Windows</Label>
                        </ModifyPartition>
                    </ModifyPartitions>
                    <DiskID>0</DiskID>
                    <WillWipeDisk>true</WillWipeDisk>
                </Disk>
            </DiskConfiguration>
            <ImageInstall>
                <OSImage>
                    <InstallTo>
                        <DiskID>0</DiskID>
                        <PartitionID>2</PartitionID>
                    </InstallTo>
                </OSImage>
            </ImageInstall>
            <UserData>
                <ProductKey>
                    <Key>[ REPLACE WITH PRODUCT KEY ]</Key>
                </ProductKey>
                <AcceptEula>true</AcceptEula>
            </UserData>
        </component>
    </settings>
</unattend>
Link tải file Autounattend mẫu tại đây.
Kết luận
Trong bài viết vừa rồi tôi vừa giới thiệu với các bạn hai cách để tạo file trả lời tự động cho quá trình Windows Setup (pass 1 và 2). Tuy bài viết này hơi dài nhưng việc làm ra file này bạn sẽ không cần phải làm nhiều lần. Khi bạn xuất ra được file autounattend.xml rồi thì bạn có thể dùng các công cụ soạn thảo Text để chỉnh sửa. Trong quá trình thao tác thực tế nếu còn vướng mắc điều gì bạn hãy để lại bình luận phía bên dưới nhé. Cảm ơn các bạn đã đọc bài!
Chúc bạn thành công!
Xem thêm: