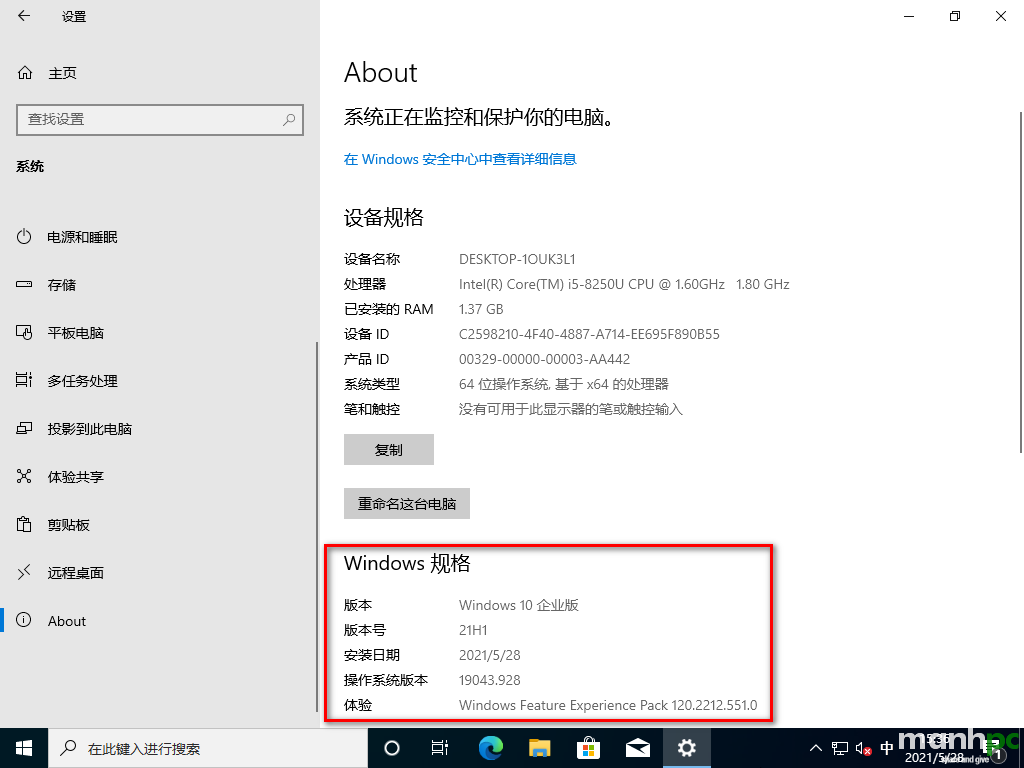
Đây là loạt bài hướng dẫn chi tiết cách rebuild bộ cài Windows. Trong bài hướng dẫn này bạn sẽ biết được cách dùng một trong những lệnh quan trọng nhất khi rebuild Windows là DISM Command.
Những bài hướng dẫn về rebuild Windows này sẽ giúp bạn có được những kiến thức sau:
- Cấu trúc file .wim và các công cụ quản lý.
- Cấu trúc bộ cài đặt Windows (từ Windows Vista trở lên)
- Cách thêm các drivers, các bản vá updates, language và tùy biến bộ cài windows.
- Cách build một bộ cài Windows theo ý muốn của bạn.
NỘI DUNG
Trong phần 2 của loạt bài rebuild hệ diều hành Windows chúng ta sẽ dùng các công cụ: DISM, NTLite, Dism++ và script để làm một số công việc sau:
- Tích hợp driver vào bộ cài Windows
- Tích hợp các bản cập nhật hàng tháng vào bộ cài Windows
- Tích hợp thêm một số ngôn ngữ
- Cách tùy biến và cấu hình một số dịch vụ của hệ điều hành
Tích hợp driver
Sử dụng DISM
Chuẩn bị
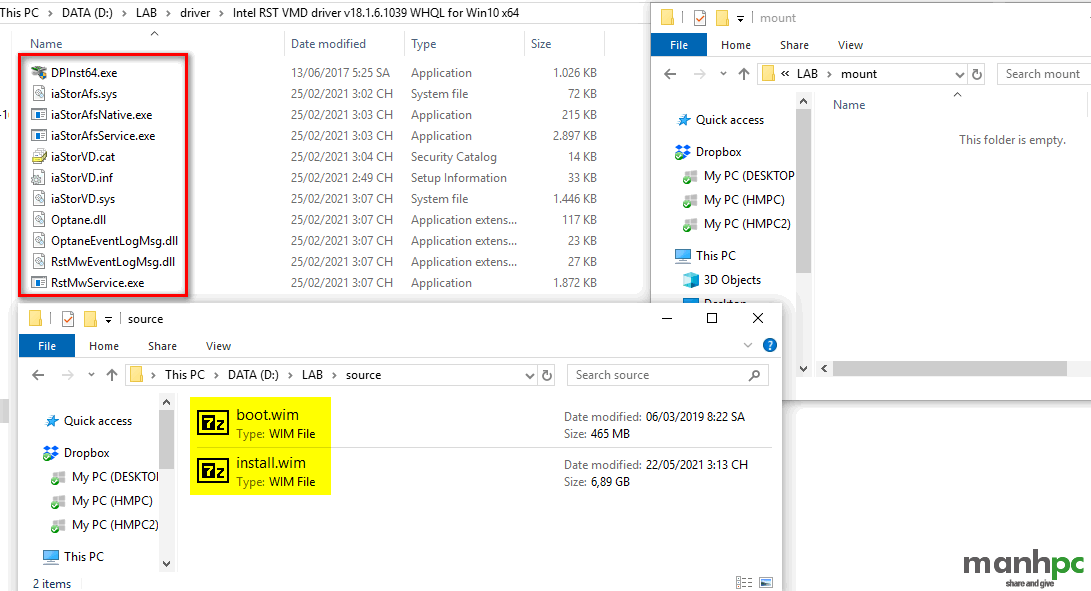
Bạn cần tạo ra các folder: driver, source và mount như trong hình bên dưới
- Folder driver: Chứa các driver mà chúng ta cần thêm vào. Bạn có thể tài nó về tại bài viết Tổng hợp Storage Drivers AHCI/RAID, NVMe và USB
- Folder source: Nơi lưu trữ các file .wim cần tích hợp. Trong ví dụ này tôi sử dụng hai file boot.wim và install.wim lấy từ bài viết Bộ cài Windows 10 Enterprise LTSC 2019 phiên bản x64
- Folder mount: Là nơi mount các file .wim ra để tích hợp driver
Lệnh tích hợp
Để tích hợp driver vào bộ cài chúng ta cần tích hợp vào hai file là boot.wim và install.wim. File boot.wim có hai image thì chúng ta tích hợp vào image thứ 2. File install.wim chúng ta cần tích hợp vào tất cả các image.
boot.wim
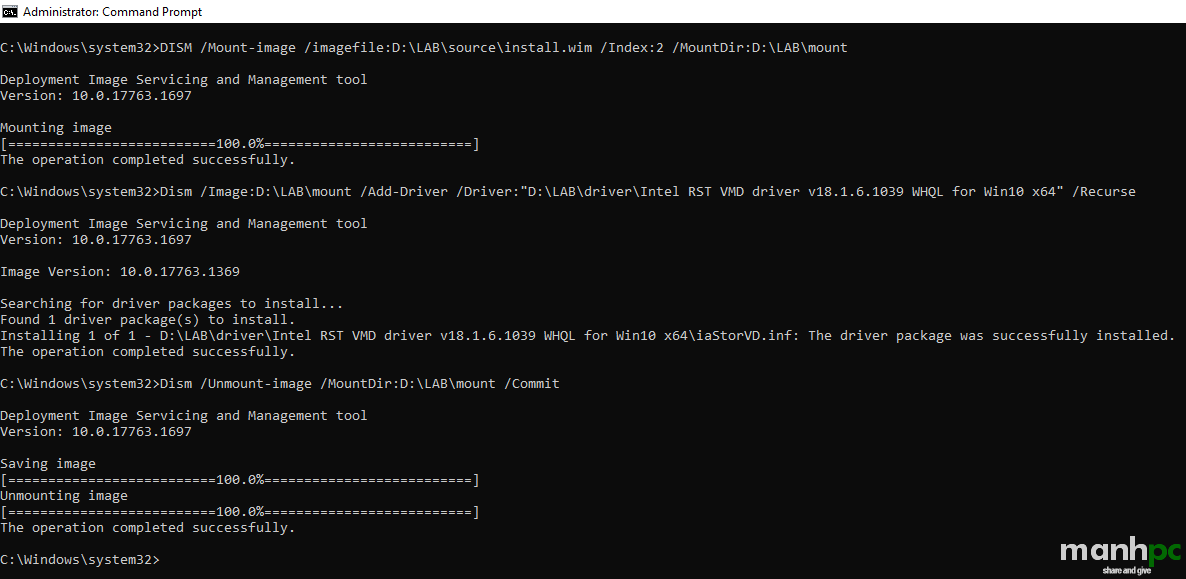
Lệnh mount
DISM /Mount-image /imagefile:D:\LAB\source\boot.wim /Index:2 /MountDir:D:\LAB\mountFolder mount
Lệnh Add-Driver
Dism /Image:D:\LAB\mount /Add-Driver /Driver:"D:\LAB\driver\Intel RST VMD driver v18.1.6.1039 WHQL for Win10 x64" /RecurseLệnh Unmount-image
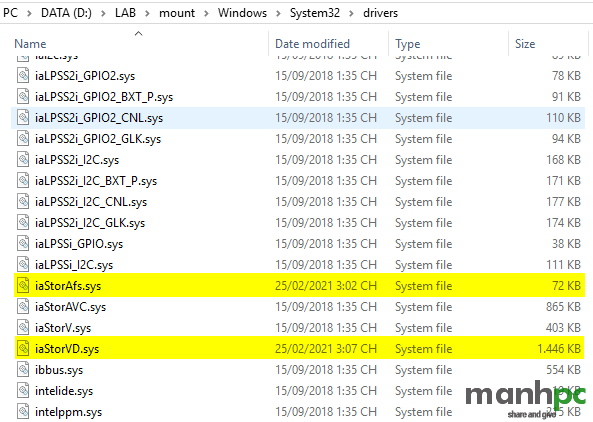
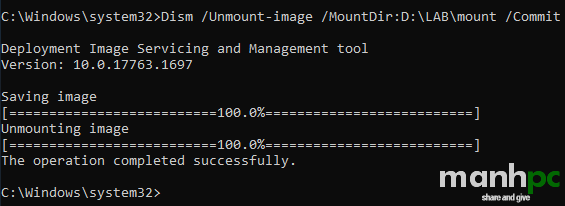
Lệnh này sẽ làm hai nhiệm vụ là lưu các thay đổi trong folder mount vào đúng số image trong file boot.wim và xóa toàn bộ file và folder trong folder mount. Chú ý khi thực hiện lệnh này thì bạn không được truy cập vào folder mount.
Dism /Unmount-image /MountDir:D:\LAB\mount /CommitNếu trường hợp sau khi bạn tích sử dụng lệnh Dism /Add-Driver xong mà vì một lý do nào đó bạn không muốn lưu lại các driver vào file wim thì bạn sử dụng lệnh sau:
Dism /Unmount-image /MountDir: /DiscardNhư vậy tôi đã hướng dẫn các bạn tích hợp xong driver vào file boot.wim sử dụng lệnh DISM. Tiếp theo tương tự các bạn lặp lại các lệnh DISM /Mount-image, Dism /Add-Driver và Dism /Unmount-image cho các image bên trong file install.wim
install.wim
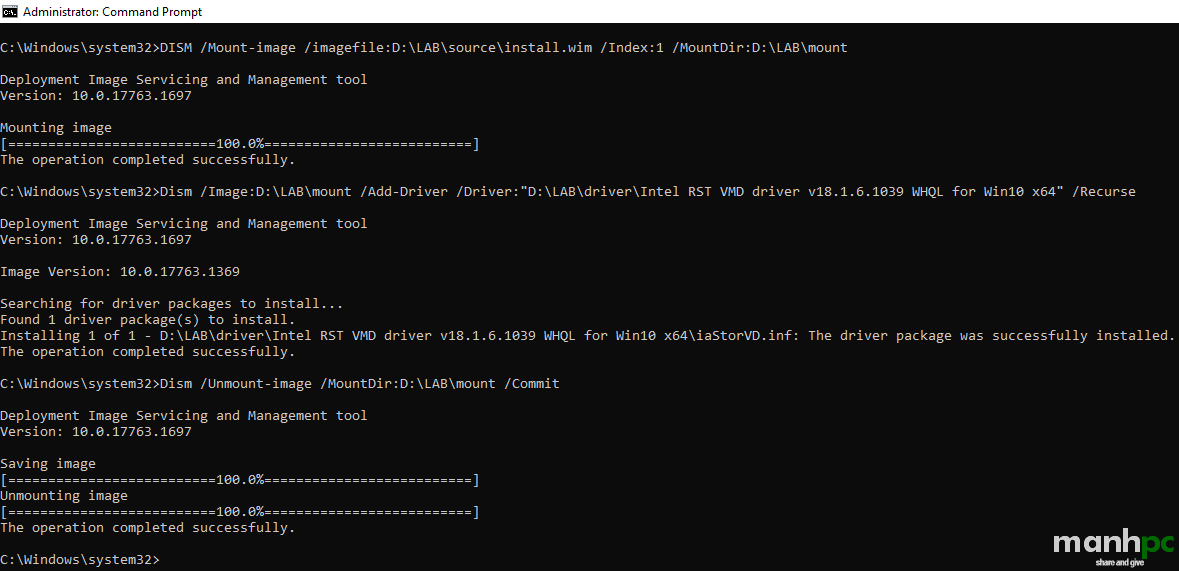
Sau khi bạn tích hợp xong driver thì bạn thay thế hai file boot.wim và install.wim đã tích hợp driver cho hai file tương ứng trong bộ cài và Save lại. Done!
Sử dụng NTLite
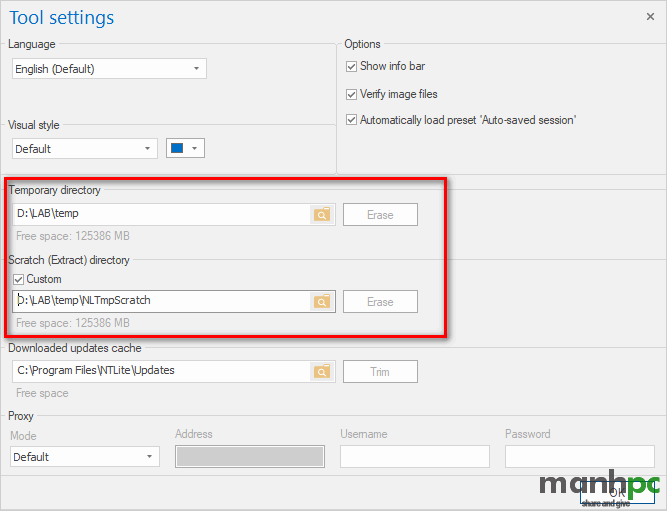
Bạn cần vào File -> Settings rồi thiết lập các thông số như hình bên dưới. Chỗ được khoanh đỏ chính là nơi mà những image sẽ được mount vào đó. Mặc định sẽ là trong ổ C. Nhưng để tiện cho việc quản lý và folder này cũng chiếm nhiều dung lượng nên ta cần di chuyển nó sang chỗ khác.
Giống như tích hợp driver vào bộ cài sử dụng lệnh DISM chúng ta cần tích hợp vào hai file là boot.wim và install.wim. File boot.wim có hai image thì chúng ta tích hợp vào image thứ 2. File install.wim chúng ta cần tích hợp vào tất cả các image.
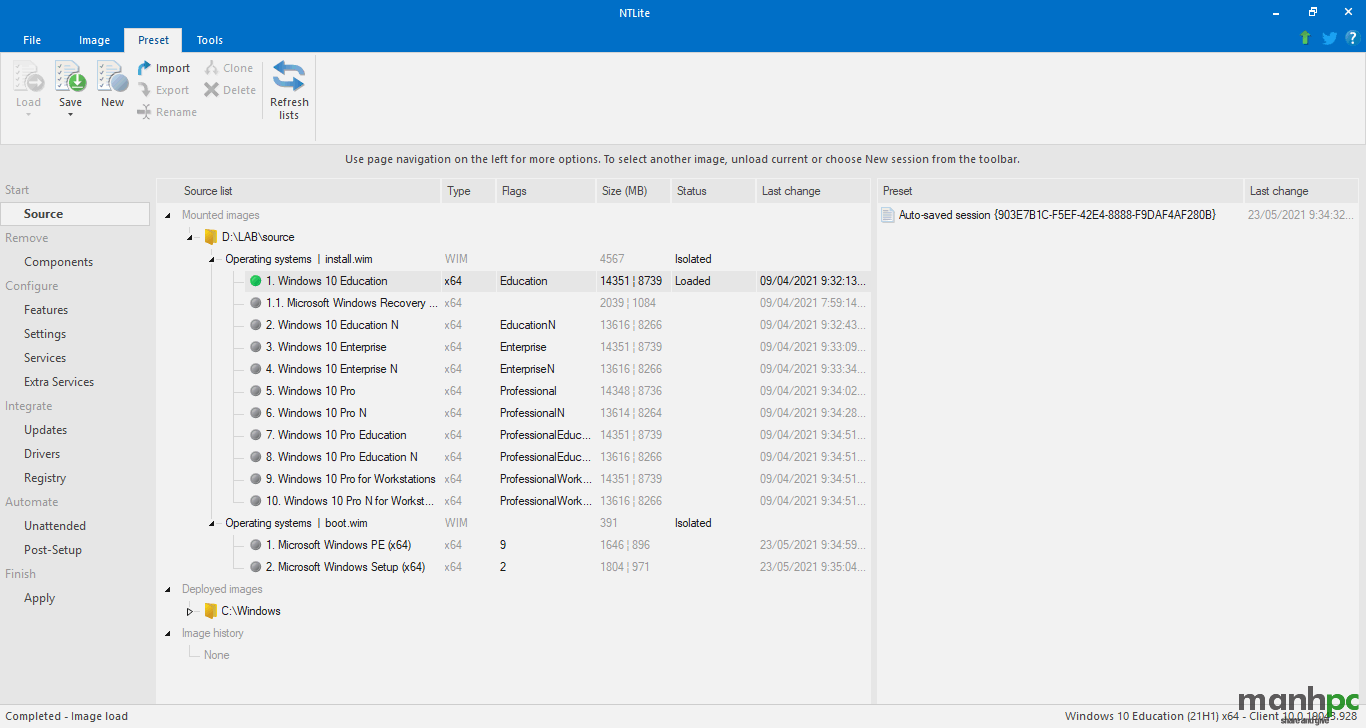
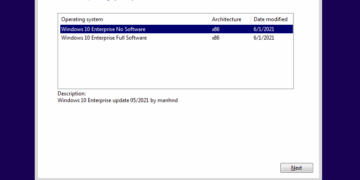
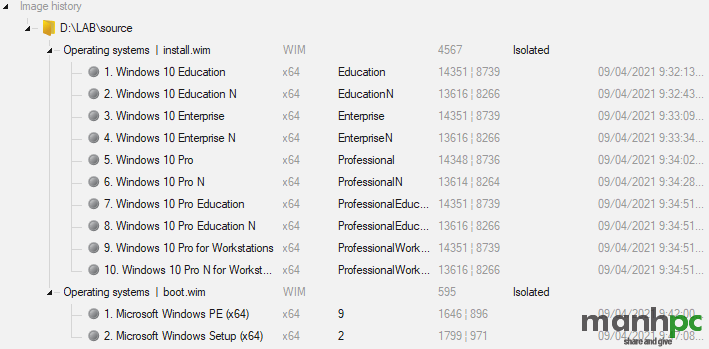
Đây là thông tin các image bên trong bản Windows 10 21H1 bussines x64
 Tích hợp vào file boot.wim
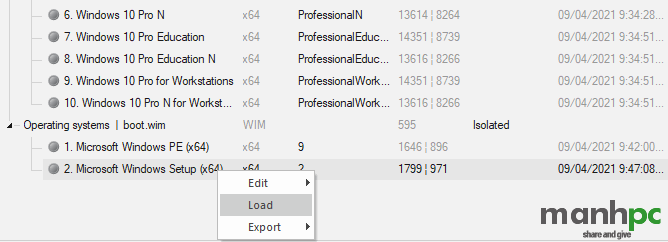
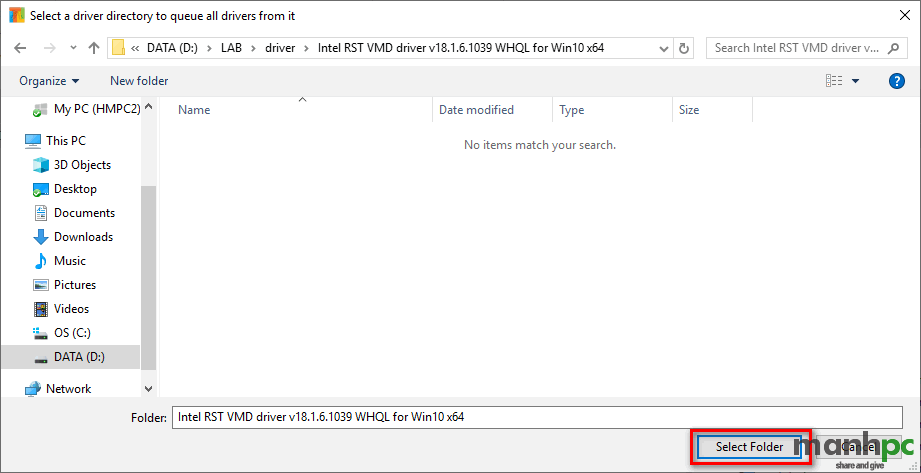
Click phải chuột lên image thứ 2 Microsoft Windows Setup (x64) -> Load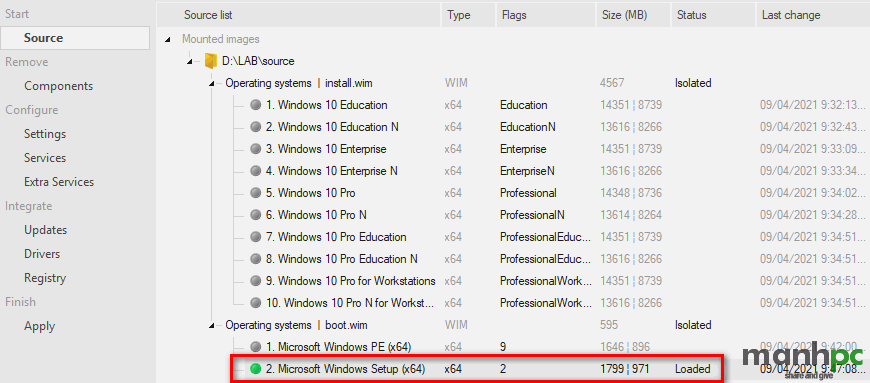
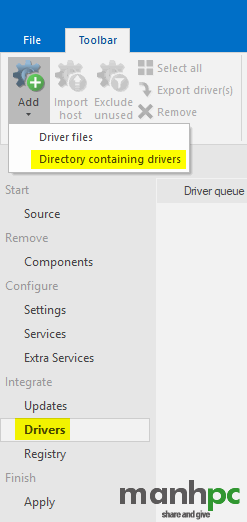
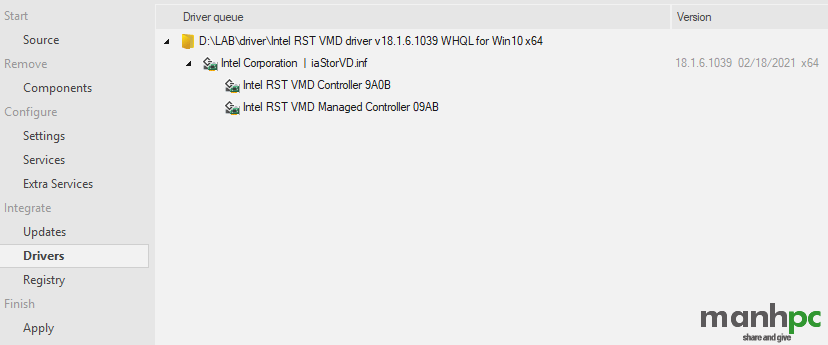
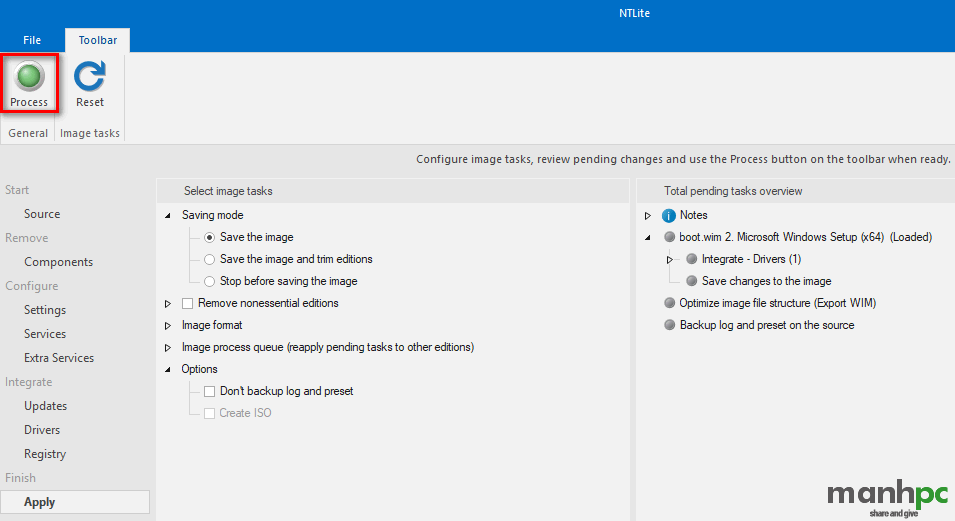
Tích hợp vào file install.wim
Sau khi tích hợp xong vào file boot.wim chúng ta click vào Source bên panel trái để quay trở về. Tiếp theo tương tự khi tích vào vào file boot.wim, chúng ta click phải chuột lên image 1 và chọn Load.
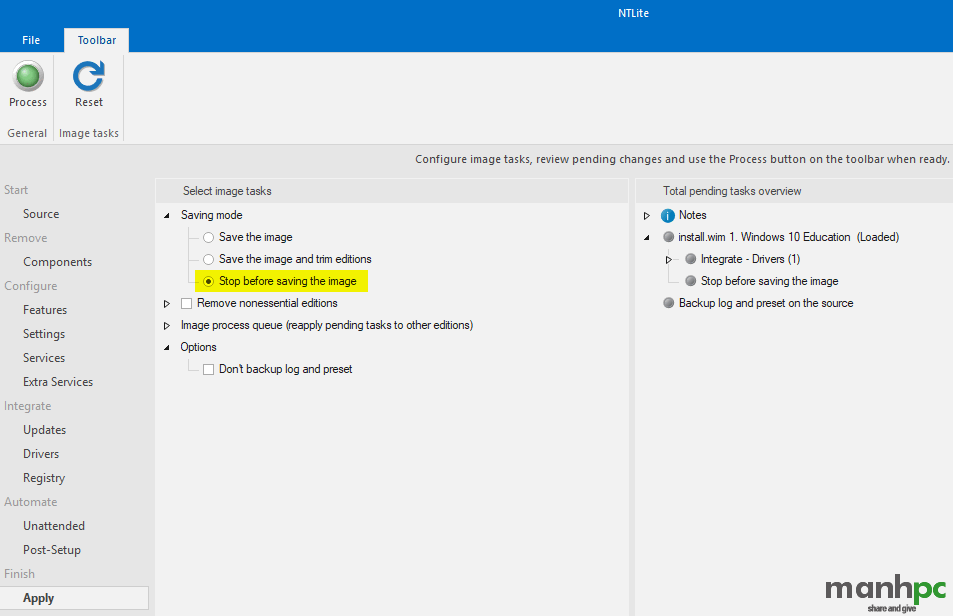
Click chọn Stop before saving the image. Nếu bạn chỉ tích hợp driver vào duy nhất image 1 này thôi thì bạn chọn Save the image (mặc định) để sau khi tích hợp xong NTLite save luôn vào image. Click Process.
Tiếp theo bạn làm tiếp cho image 1.1 Microsoft Windows Recovery Environment với các thao tác tương tự. Nhưng chú ý trong Saving mode -> Chọn Save the image để lưu vào image luôn. Bởi vì image 1.1 này nó nằm ở vị trí \Windows\System32\Recovery\Winre.wim bên trong image 1 nên phải save nó trước khi image 1 save.
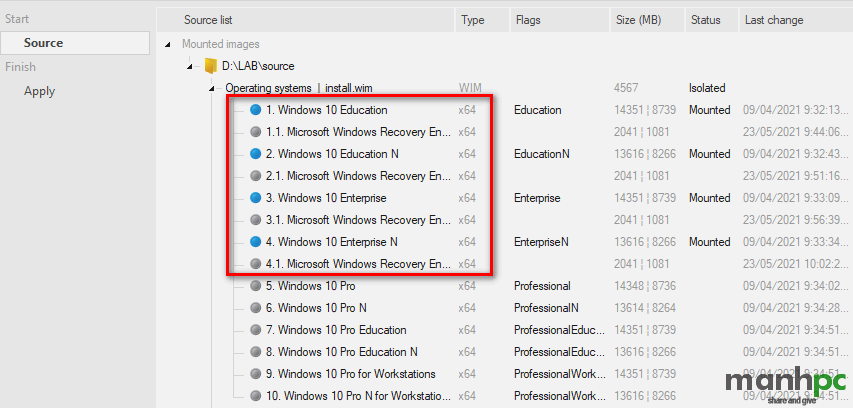
Lặp lại các thao tác tương tự cho các image 2, 2.1, 3, 3.1, 4 và 4.1 như hình bên dưới (ở ví dụ này tôi làm với 4 image)
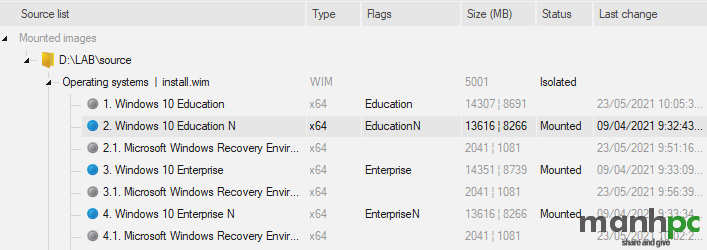
Bây giờ chúng ta sẽ Save Image 1 đang ở trạng thái Mounted bằng cách click phải chuột lên Image 1 và chọn Unload
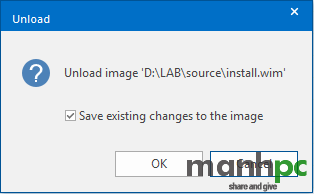
Tích chọn Save existing changes to the image -> OK
Lặp lại thao tác cho các image 2, 3 và 4
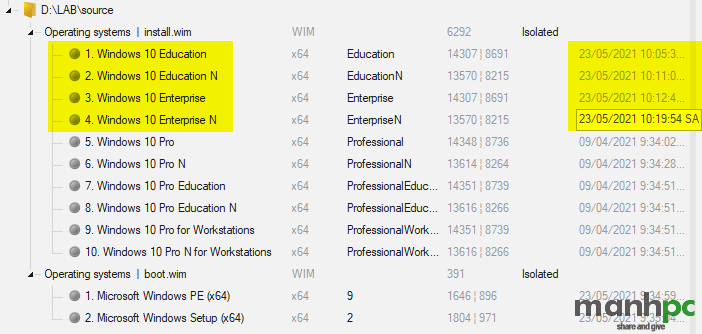
Sau khi bạn tích hợp xong driver thì bạn thay thế hai file boot.wim và install.wim đã tích hợp driver cho hai file tương ứng trong bộ cài và Save lại. Done!
Tích hợp các bản cập nhật hàng tháng
Sử dụng DISM
Chuẩn bị
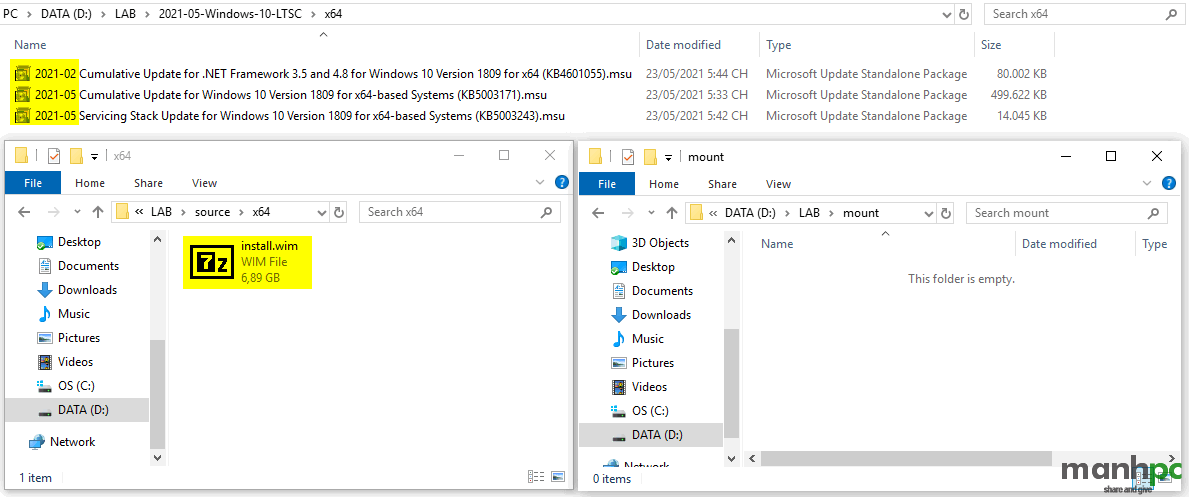
Bạn cần tạo ra các folder: 2021-05-Windows-10-LTSC, source và mount như trong hình bên dưới:
- Folder 2021-05-Windows-10-LTSC: Chứa các bản cập nhật hàng tháng (file .msu) mà chúng ta cần thêm vào. Bạn có thể tài nó về tại đây: Windows 10 and Windows Server 2019 update history
- Folder source: Nơi lưu trữ các file .wim cần tích hợp. Trong ví dụ này tôi sử dụng file install.wim lấy từ bài viết Bộ cài Windows 10 Enterprise LTSC 2019 phiên bản x64
- Folder mount: Là nơi mount file .wim ra để tích hợp các bản vá
Lệnh tích hợp
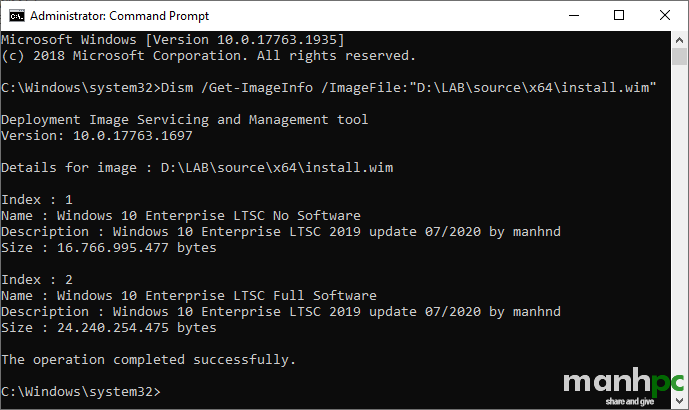
Để tích hợp các bản vá vào bộ cài chúng ta cần tích hợp vào tất cả các image trong file install.wim.
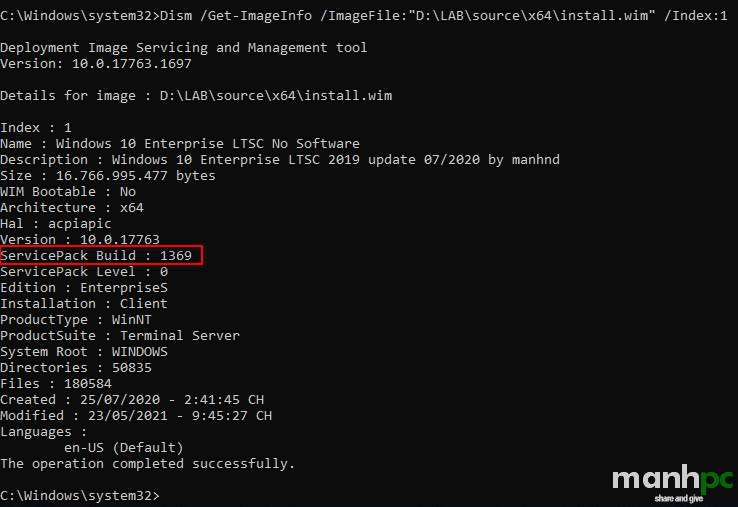
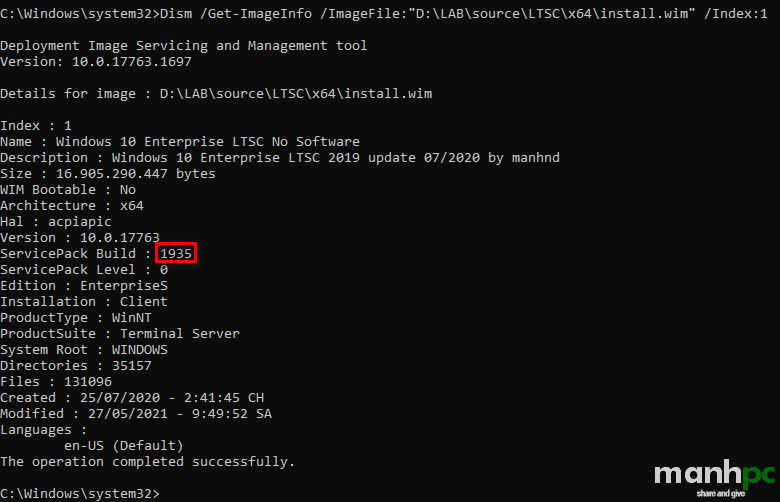
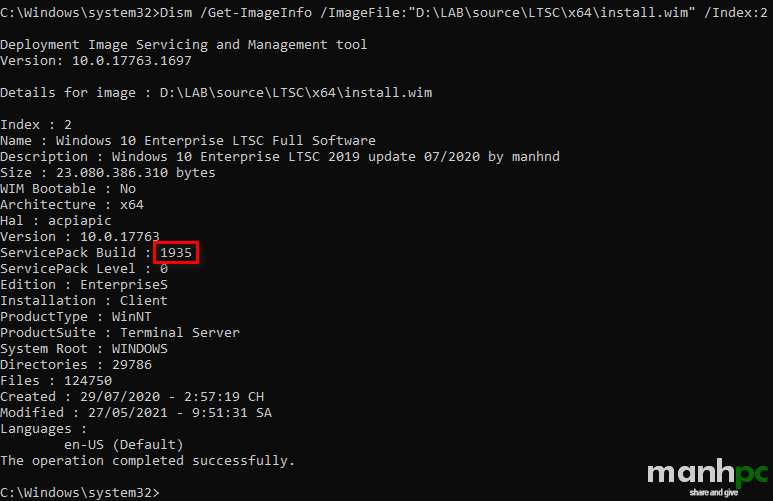
Thông tin số lượng các image:
Lệnh mount
DISM /Mount-image /imagefile:"D:\LAB\source\x64\install.wim" /Index:1 /MountDir:D:\LAB\mountLệnh Add-Package
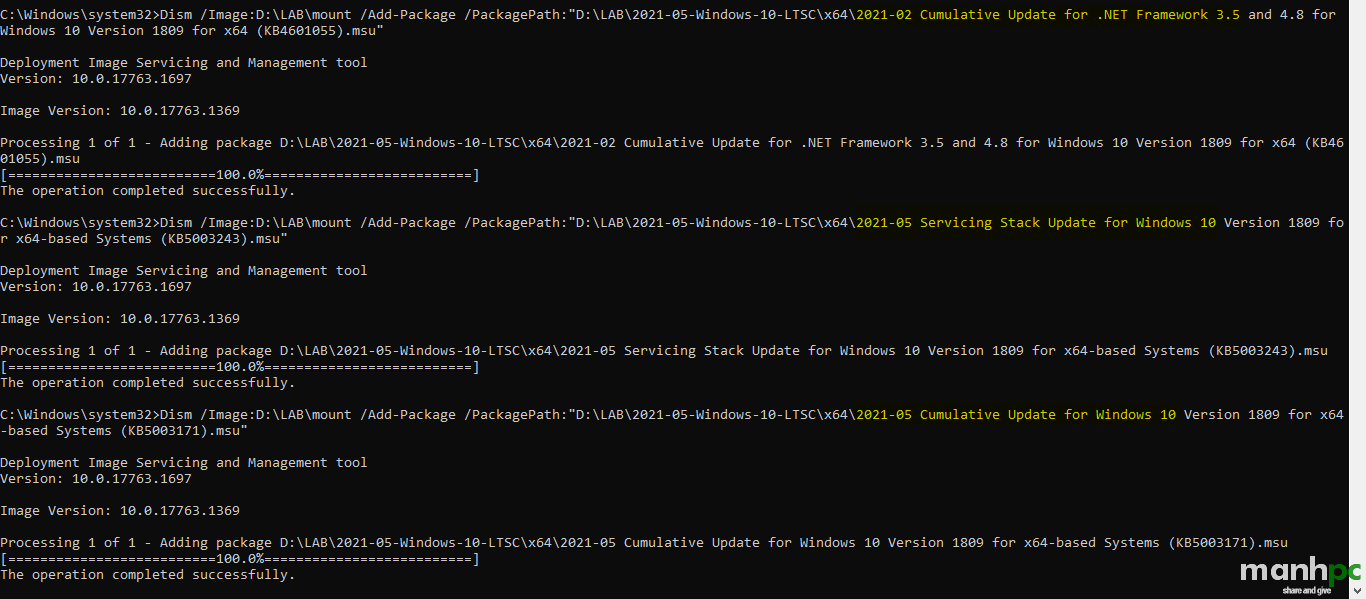
Chúng ta cần thực hiện lần lượt từng lệnh một. Việc add bản vá .Net các bạn làm trước hay sau đều được, nhưng với hai bản vá còn lại bạn bắt buộc phải add bản vá Servicing Stack trước sau đó mới đến bản vá Cumulative Update.
Dism /Image:D:\LAB\mount /Add-Package /PackagePath:"D:\LAB\2021-05-Windows-10-LTSC\x64\2021-02 Cumulative Update for .NET Framework 3.5 and 4.8 for Windows 10 Version 1809 for x64 (KB4601055).msu"
Dism /Image:D:\LAB\mount /Add-Package /PackagePath:"D:\LAB\2021-05-Windows-10-LTSC\x64\2021-05 Servicing Stack Update for Windows 10 Version 1809 for x64-based Systems (KB5003243).msu"
Dism /Image:D:\LAB\mount /Add-Package /PackagePath:"D:\LAB\2021-05-Windows-10-LTSC\x64\2021-05 Cumulative Update for Windows 10 Version 1809 for x64-based Systems (KB5003171).msu"
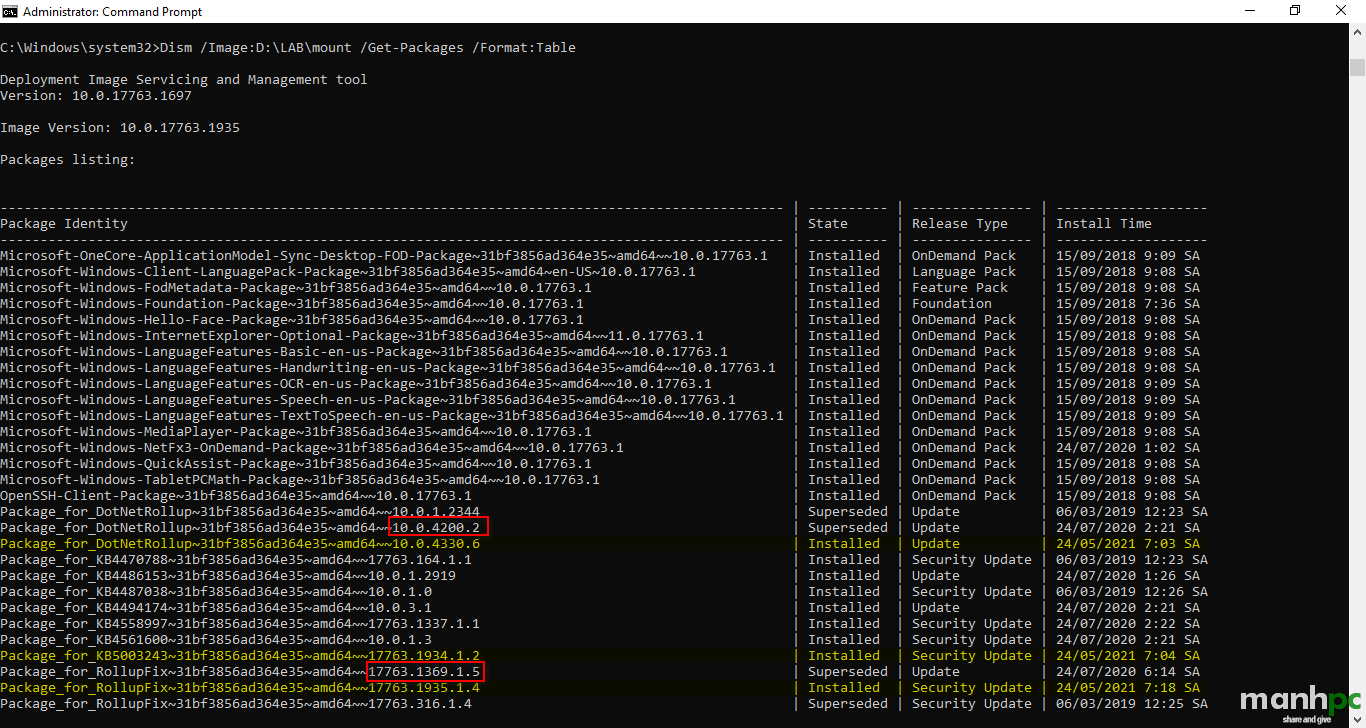
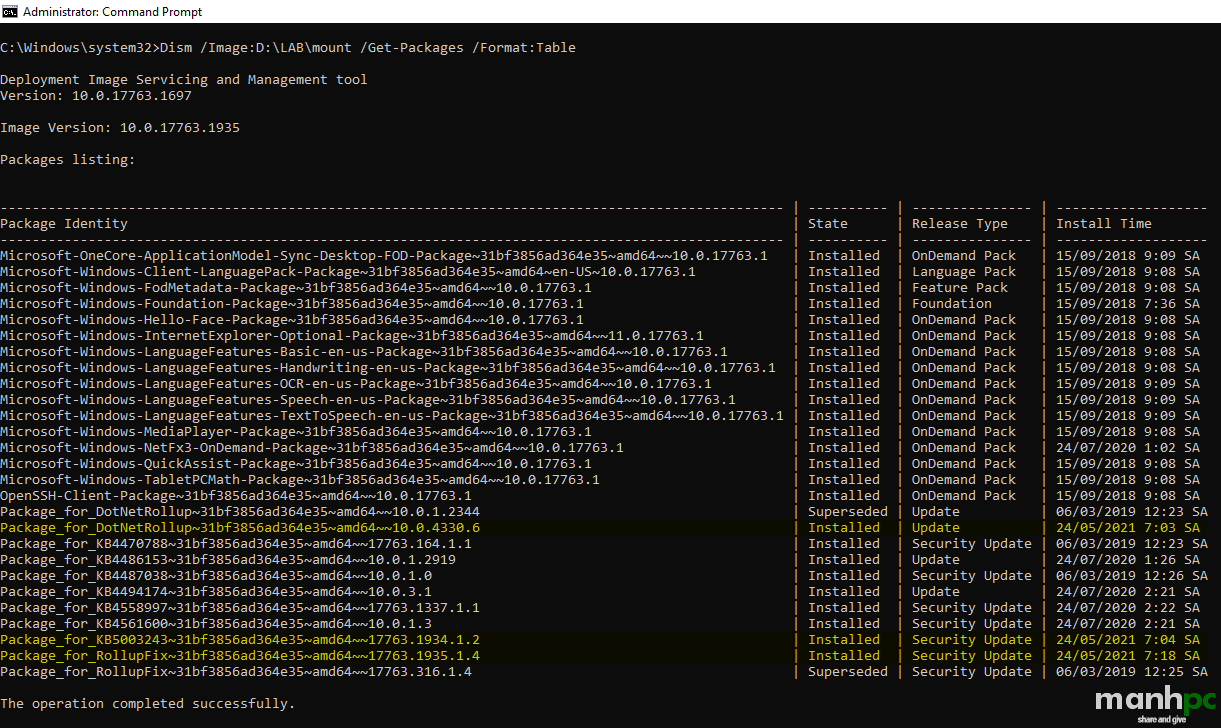
Kết quả
Những dòng tô vàng là những bản vá mới tôi vừa mới thêm vào. Chỗ khoanh đỏ là các bản cập nhật tháng 07/2020 mà tôi đã thêm vào từ trước. Dòng phiên bản .Net 10.0.1.2344 và dòng build 17763.316 là bản gốc từ microsoft.
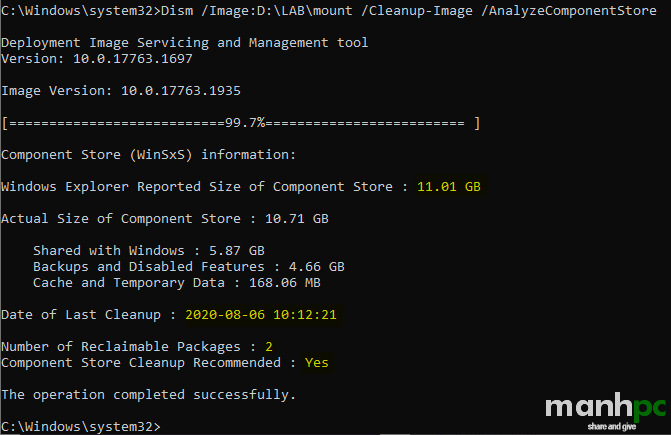
Tiếp theo chúng ta sẽ dọn dẹp các file temp và các build đã tích hợp trước đó
Kiểm tra dung lượng
Dism /Image:D:\LAB\mount /Cleanup-Image /AnalyzeComponentStoreLệnh Cleanup-Image
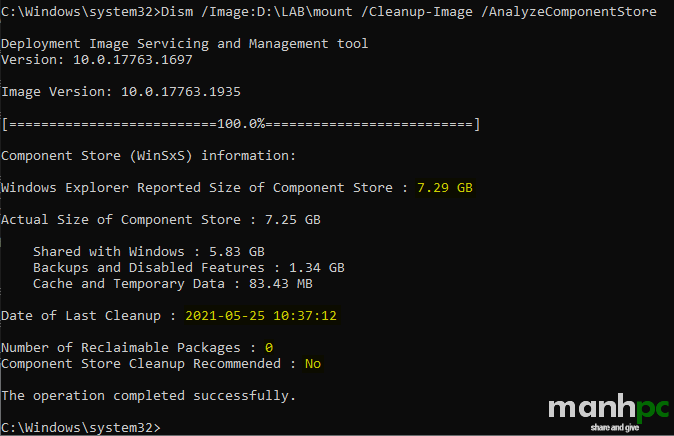
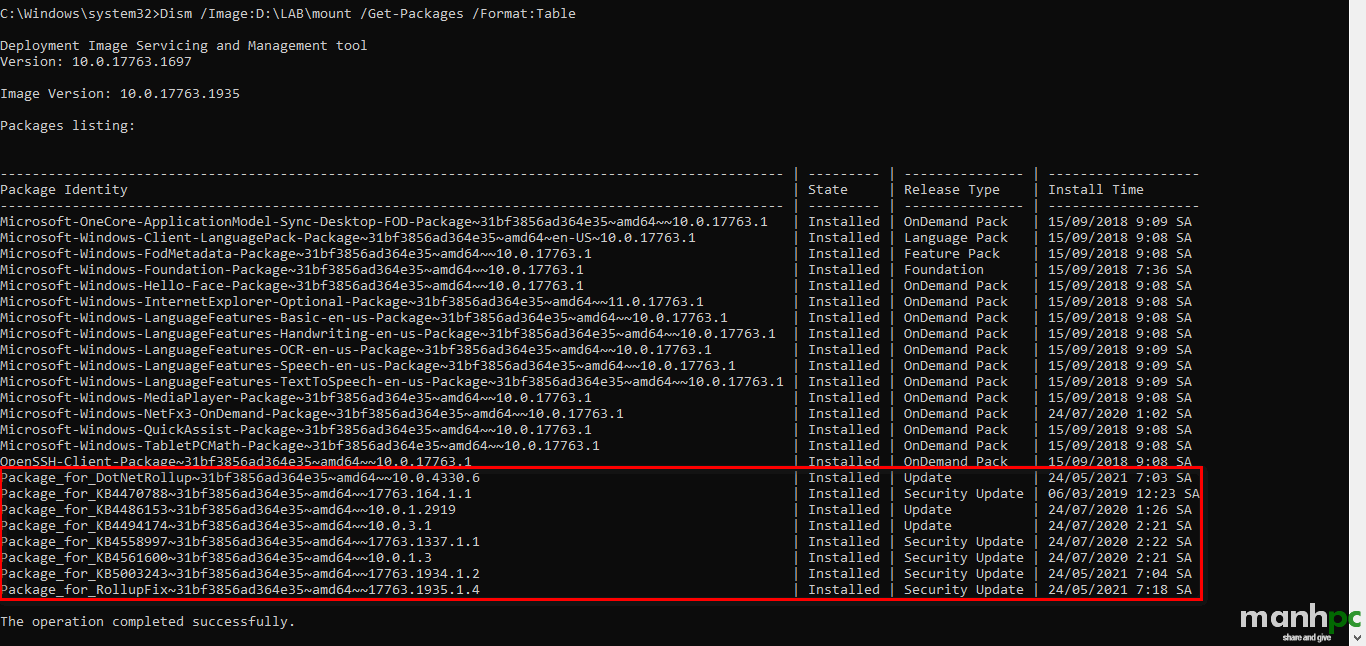
Dism /Image:D:\LAB\mount /Cleanup-Image /StartComponentCleanupKết quả
Hai dòng được khoanh đỏ như hình bên trên đã được xóa
Đến đây bạn chú ý là ở cột Stage vẫn có hai gói ở trạng thái Superseded. Đây là các gói cài đặt mà Microsoft đã cài lúc phát hành gói ISO. Bây giờ để gỡ bỏ nó chúng ta thực hiện lệnh sau:
Dism /Image:D:\LAB\mount /Cleanup-Image /StartComponentCleanup /ResetBaseLặp lại lệnh bên trên cho các Image còn lại
Kết quả:
Lệnh Unmount-image
Dism /Unmount-image /MountDir:D:\LAB\mount /CommitKiểm tra lại kết quả với Image 1
Lặp lại các thao tác với Image 2:
Tại dòng Description các bạn vẫn thấy dòng Windows 10 Enterprise LTSC 2019 update 07/2020 by manhnd. Bạn có thể thay dổi nó bằng lệnh dism /export-image với tham số /description:”Windows 10 Enterprise LTSC 2019 update 05/2021 by manhnd”. Hoặc bạn có thể sử dụng NTLite để thay đổi.
Sử dụng NTLite
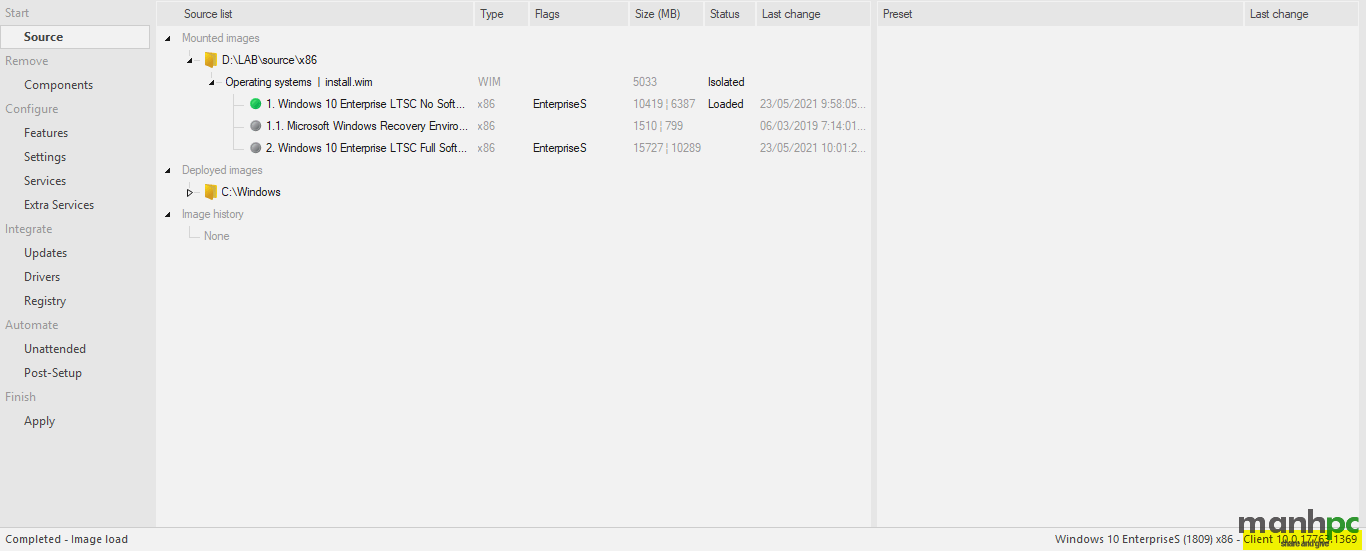
Ở phần bên trên tôi đã tích hợp vào bản Windows 10 Enterprise LTSC 2019 x64, ở trong phần này tôi dử dụng bản Windows 10 Enterprise LTSC 2019 x86. Tương tự như khi thao tác add driver, bạn cũng cần add vào cửa sổ làm việc của NTLite file install.wim
Click phải chuột lên Image 1 -> Load
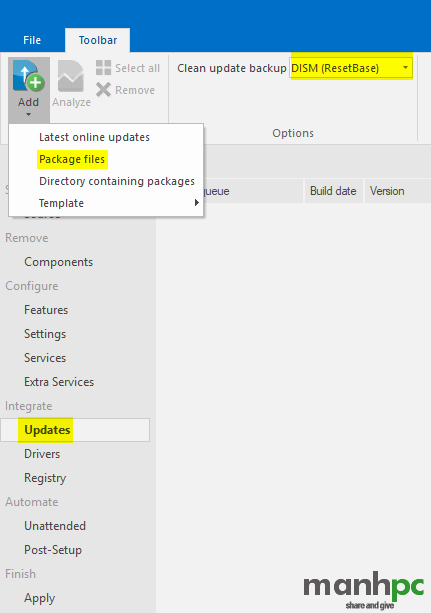
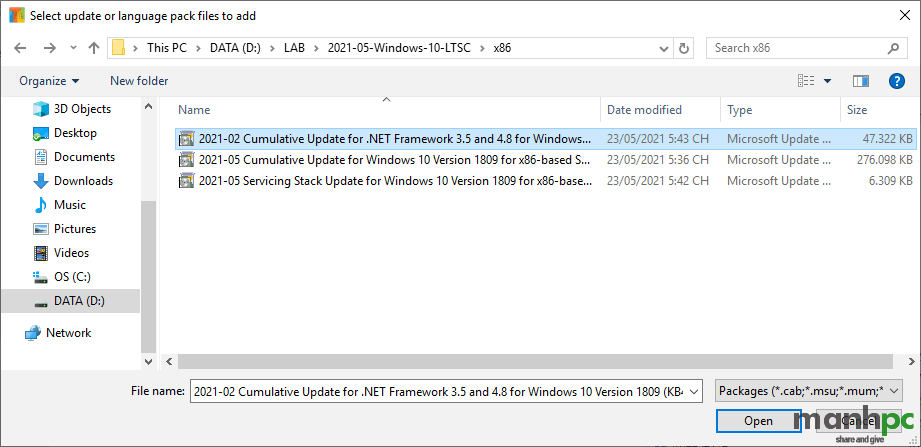
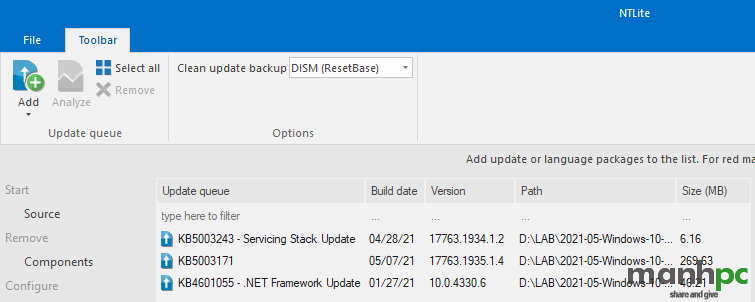
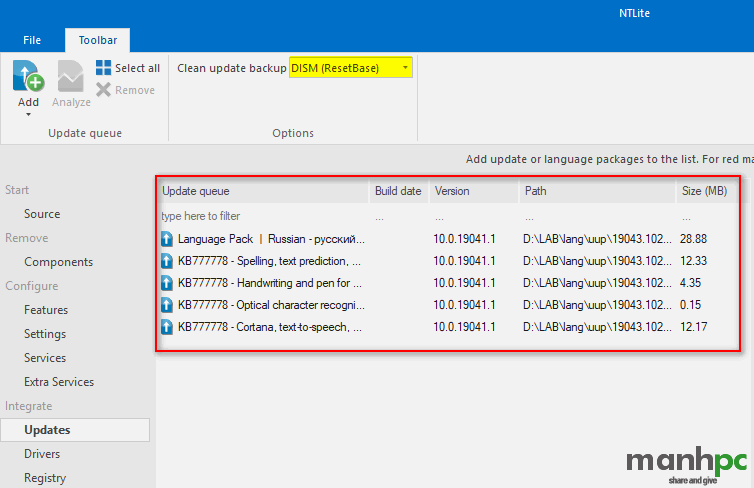
Click vào Updates bên panel phải -> Click Add -> Package files (hoặc Directory containing packages). Chú ý tại dòng Clean update backup chọn DISM (ResetBase)
Chú ý nếu chọn từng file một thì phải chọn 2021-05 Servicing Stack trước 2021-05 Cumulative.
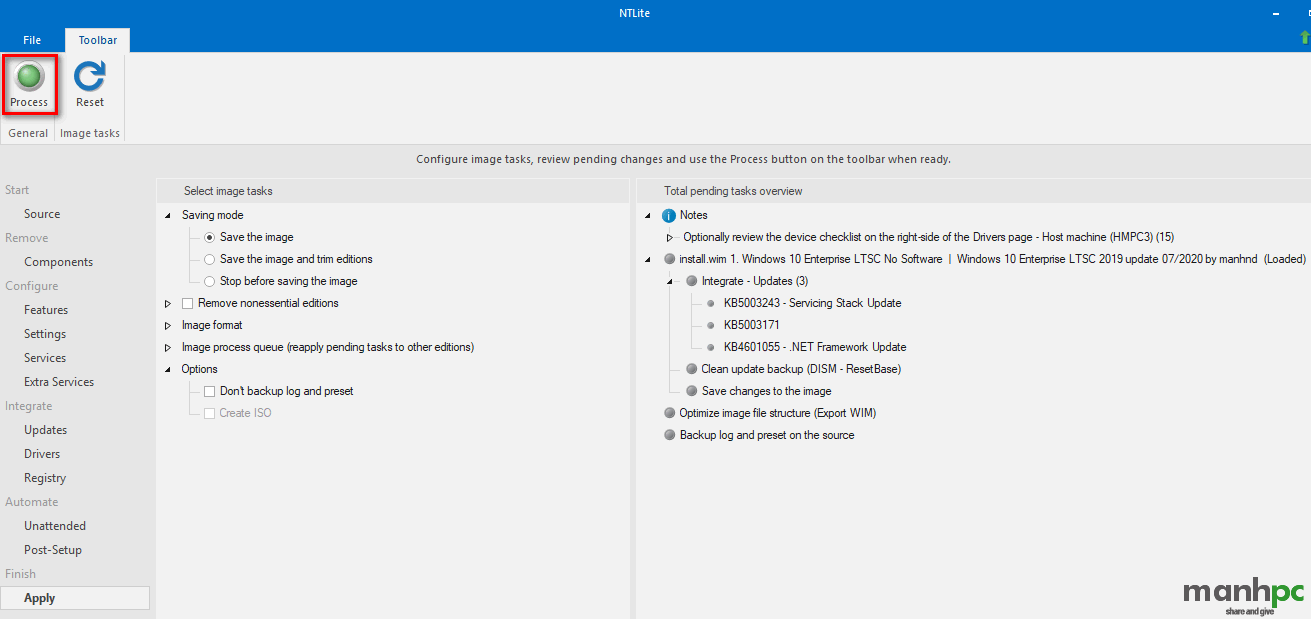
Click Apply và Process
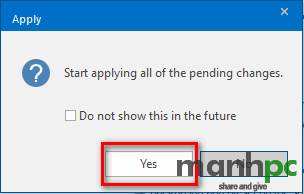
Click Yes
Kết quả:
Tương tự với Image 2
Tích hợp language
Trong phần này tôi dùng bộ cài Windows 10 business 21H1 (chỉ bao gồm duy nhất một image Enterprise). Trong phần hướng dẫn tích hợp ngôn ngữ sử dụng NTLite tôi làm trên bản x86 và tích hợp ngôn ngữ sử dụng script tôi làm trên bản x64.
Sử dụng NTLite
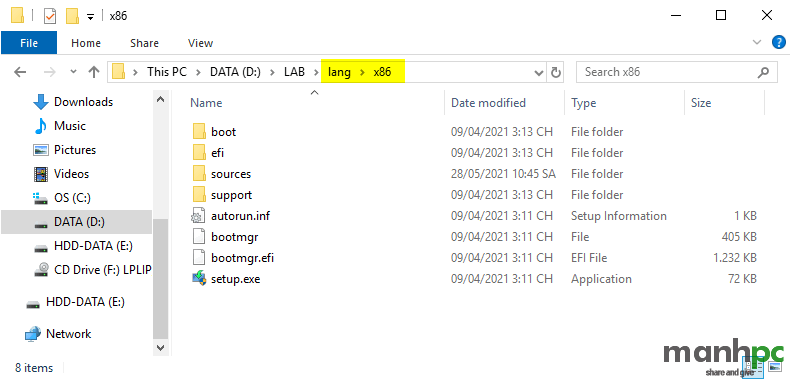
Xả nén bộ cài vào folder D:\LAB\lang\x86
Add image vào NTLite
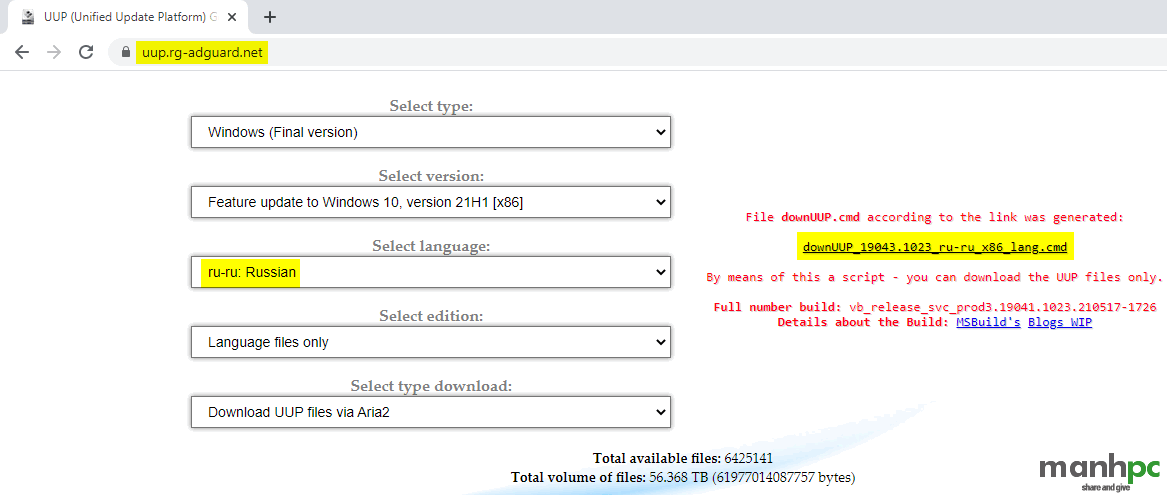
Tải về gói ngôn ngữ cần tích hợp
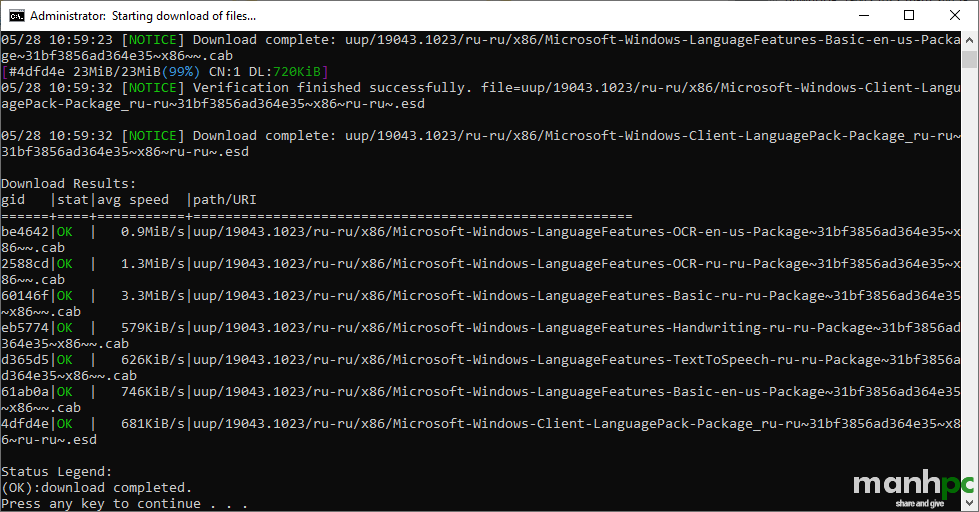
Bạn tải file downUUP_19043.1023_ru-ru_x86_lang.cmd về, copy vào D:\LAB\lang rồi chạy nó với quyền Administrator
Kết quả:
Bạn cần xóa hai dòng mà tôi đã tô vàng trong hình trên bởi vì gói này không thuộc ru-RU
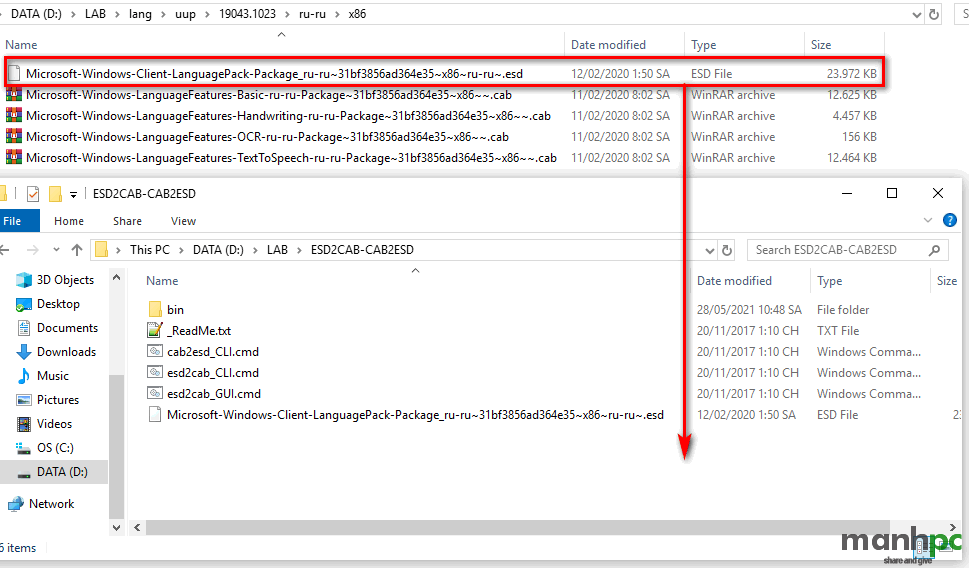
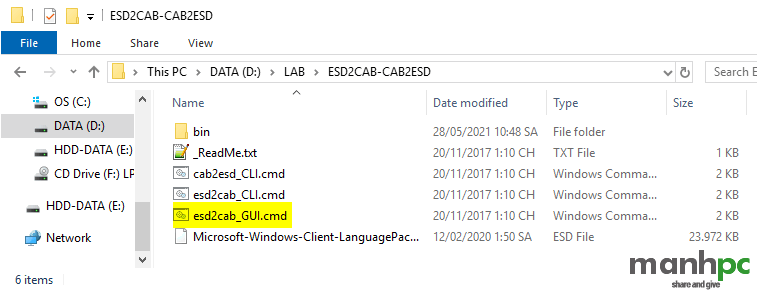
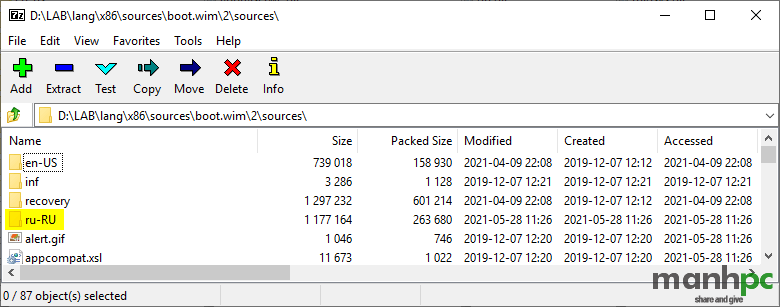
Tiếp theo bạn cần tải công cụ ESD2CAB-CAB2ESD về để convert file .esd trong hình bên trên sang file .cab. Bạn di chuyển file .esd từ D:\LAB\lang\uup\19043.1023\ru-ru\x86 sang folder D:\LAB\ESD2CAB-CAB2ESD
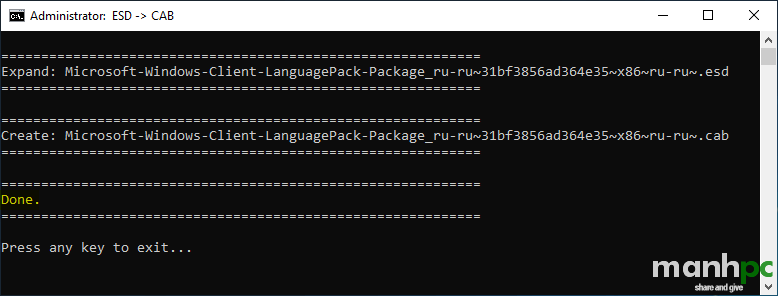
Chạy file esd2cab_GUI.cmd để tiến hành chuyển đổi
Done
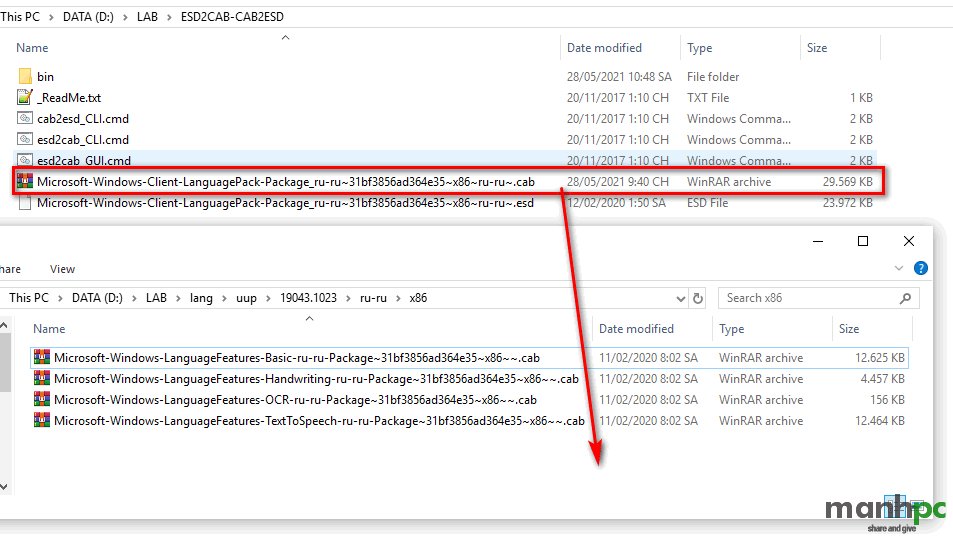
Di chuyển file .cab vừa chuyển đổi về folder D:\LAB\lang\uup\19043.1023\ru-ru\x86
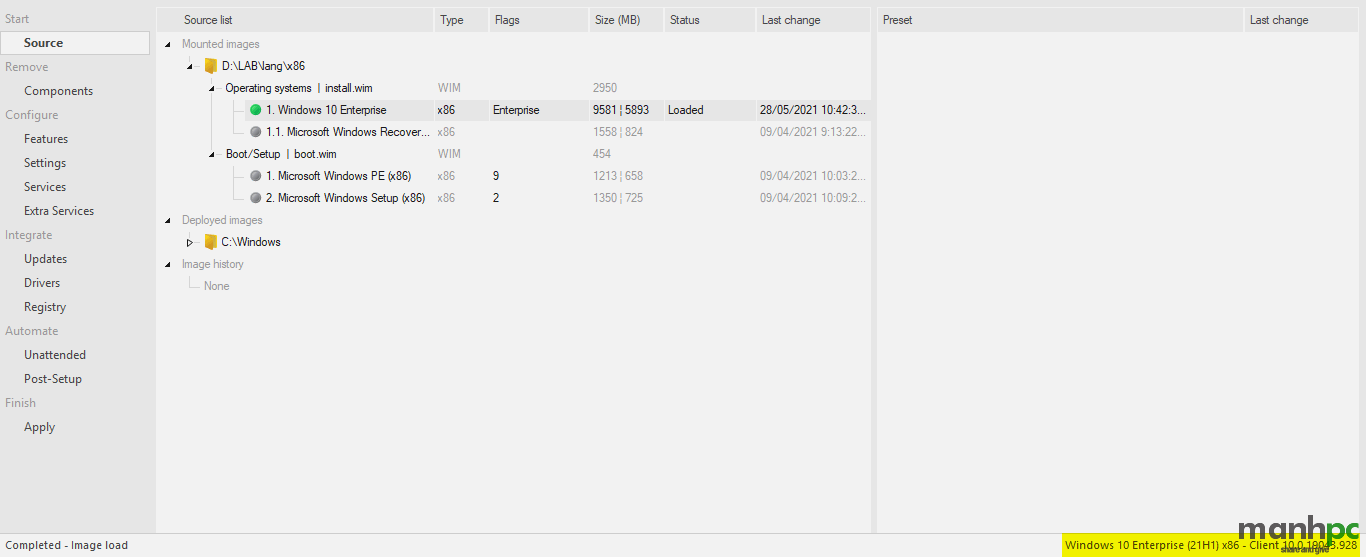
Quay trở lại giao diện của NTLite, click phải chuột lên image 1. Windows 10 Enterprise -> Load
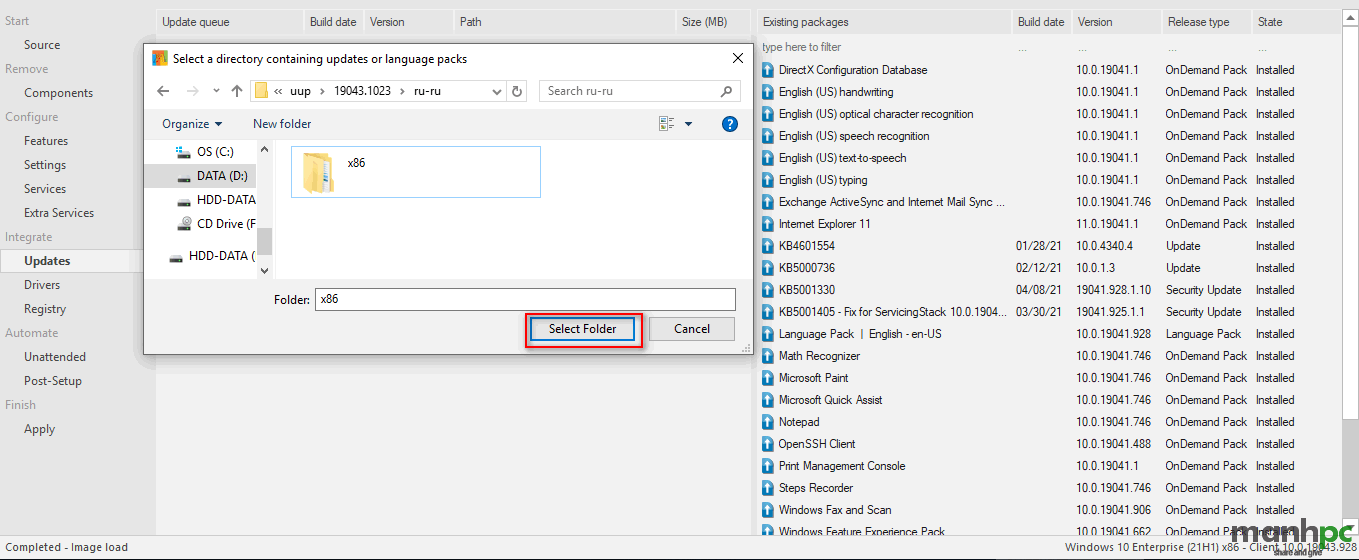
Click Updates ở panel trái rồi chọn Add ở góc trên bên trái để trỏ đến folder chứa các gói ngôn ngữ mà chúng ta đã tải về ở bên trên (D:\LAB\lang\uup\19043.1023\ru-ru\x86)
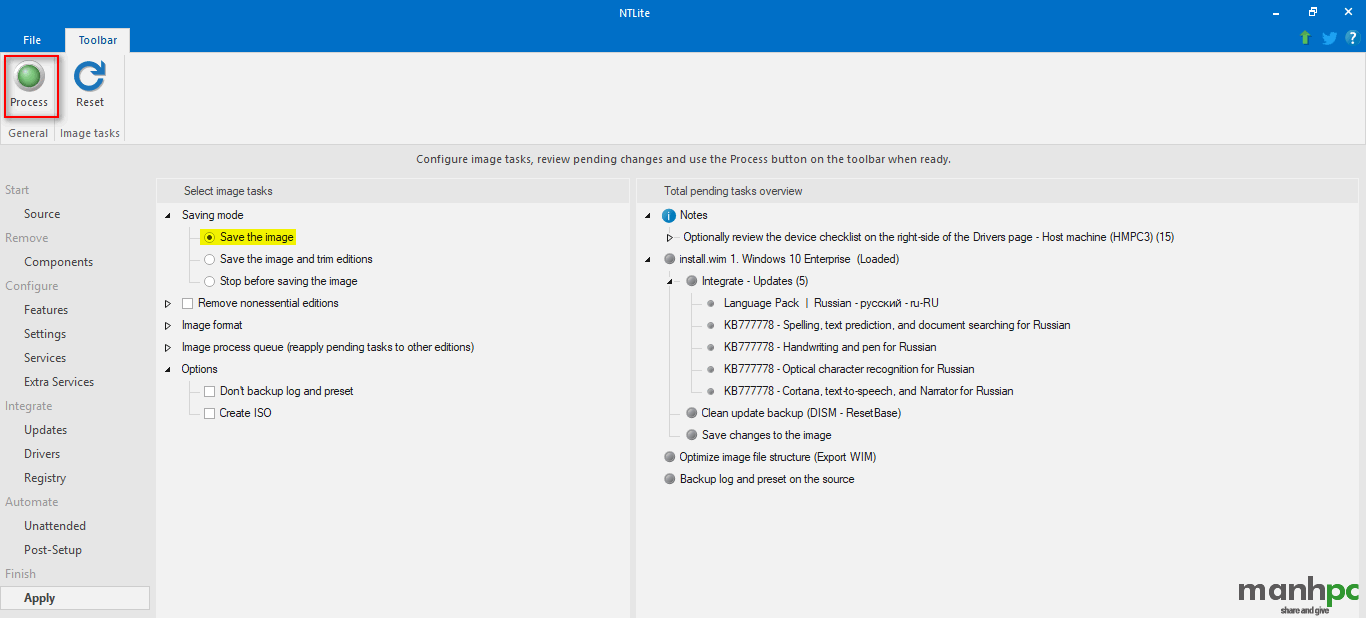
Click Apply và nhấn Process
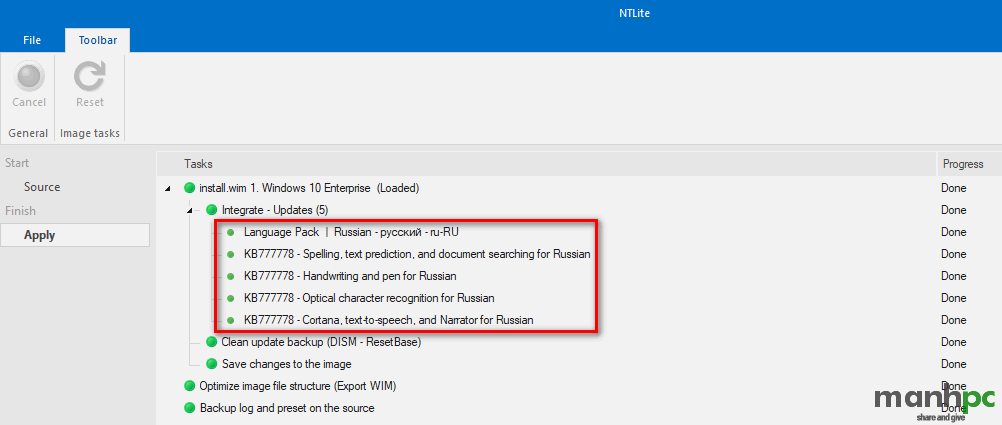
Kết quả:
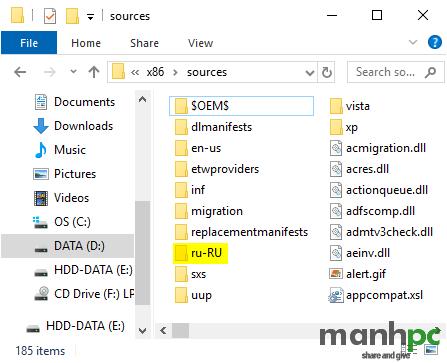
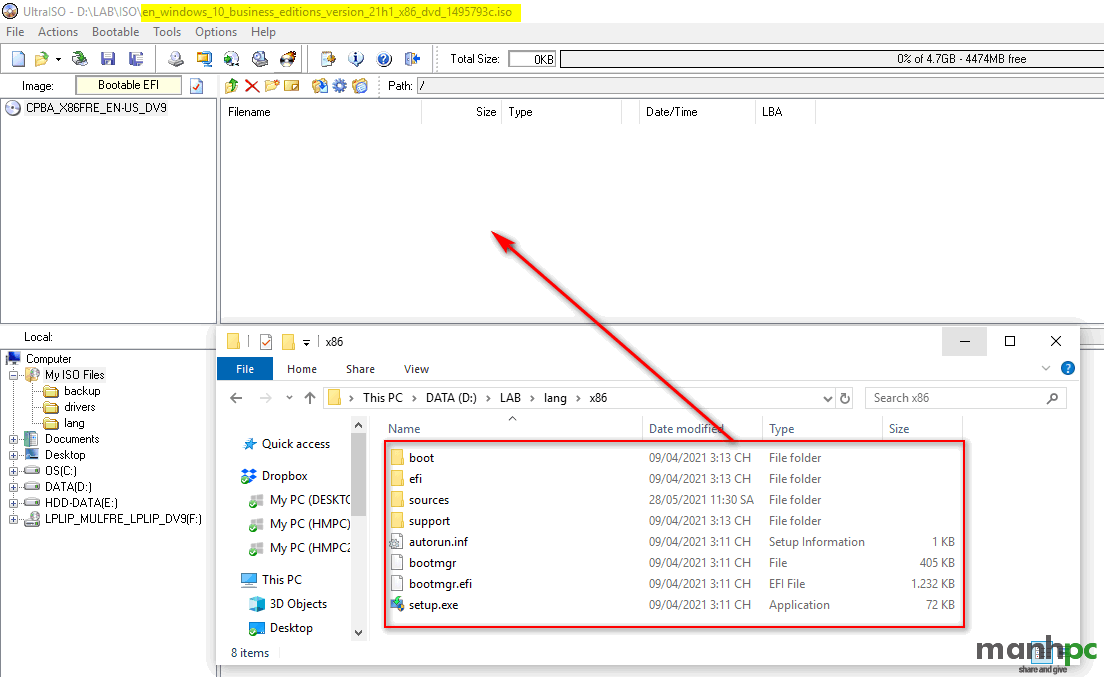
Mở file iso ban đầu bằng UltraISO rồi thay thế toàn bộ file và folder bên trong đó bằng toàn bộ file và folder trong D:\LAB\lang\x86. Chọn Save as để lưu ra một file mới.
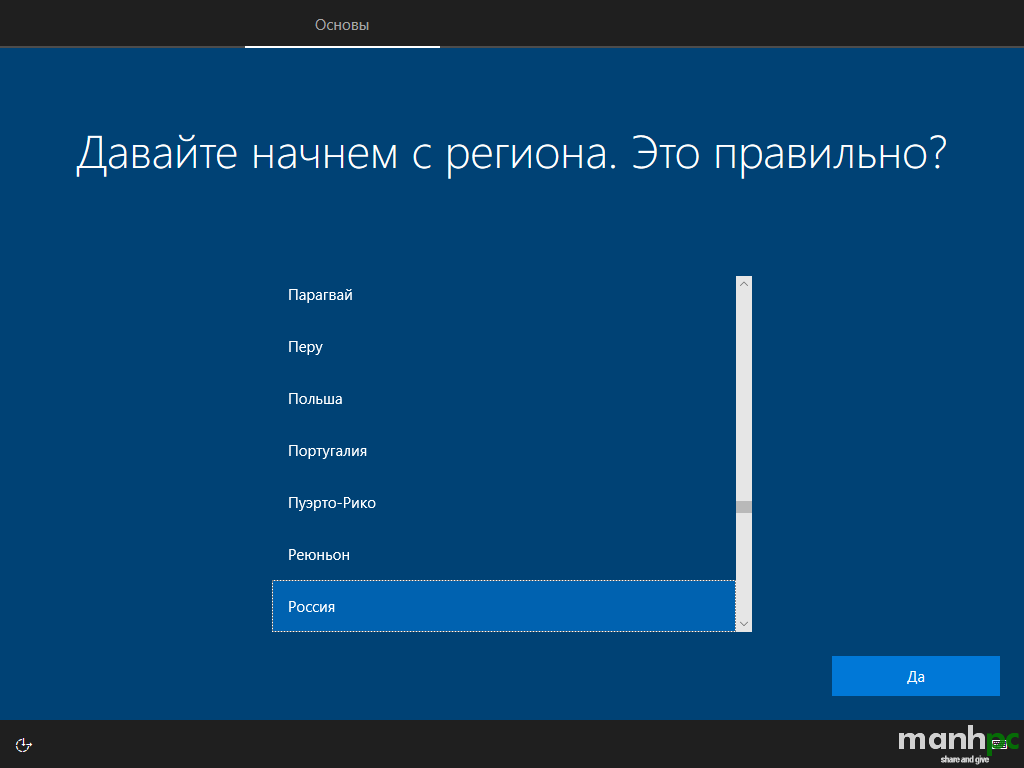
Test:
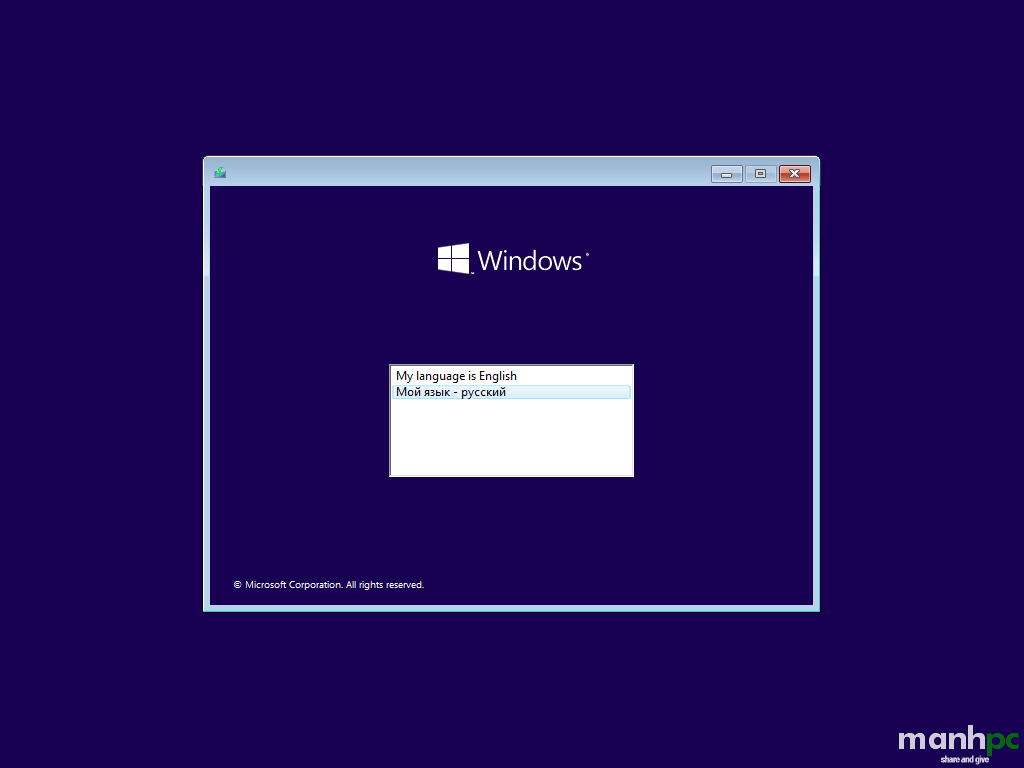
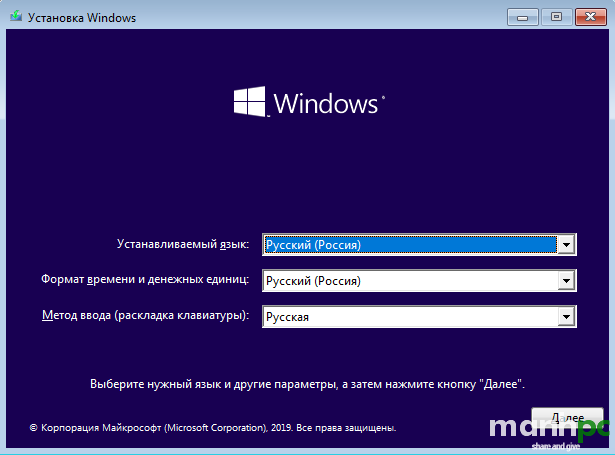
Sử dụng Script
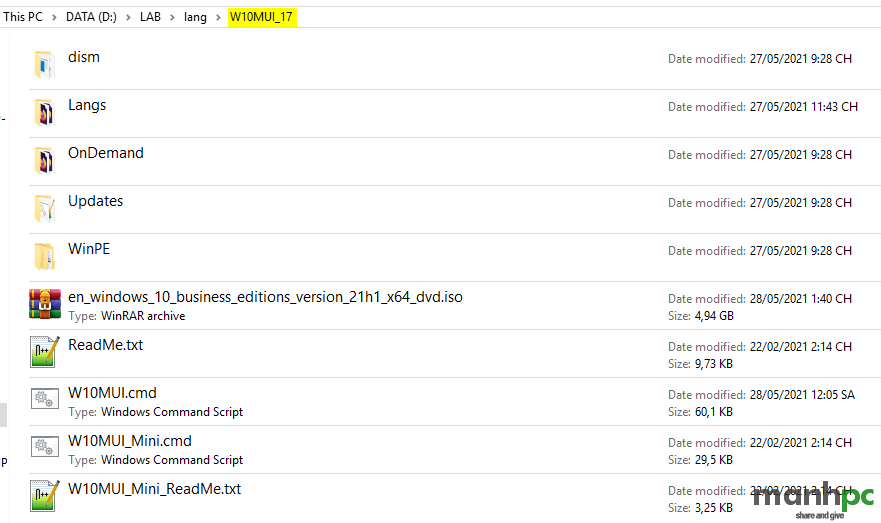
Trong phần này tôi hướng dẫn bạn sử dụng script W10MUI_17 mà tôi đã sưu tầm từ My Digital Life Forums. Bạn có thể tải nó về tại đây. Hoặc phiên bản mới hơn tại đây. Tải về xong bạn xả nén nó vào D:\LAB\lang\
Trong W10MUI_17 có một số folder và file quan trọng như sau:
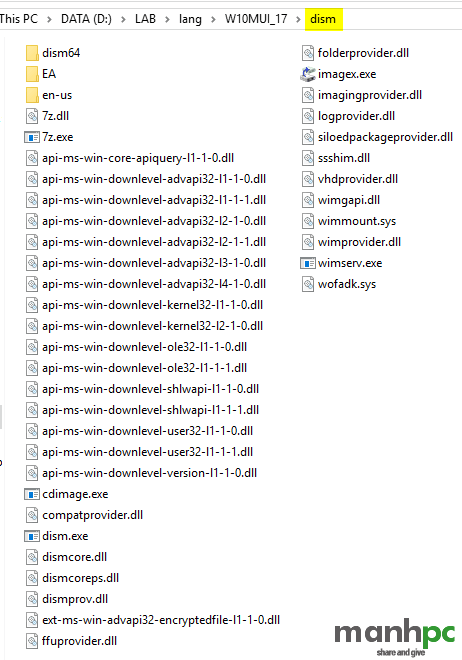
Folder dism chứa toàn bộ tập lệnh của Script
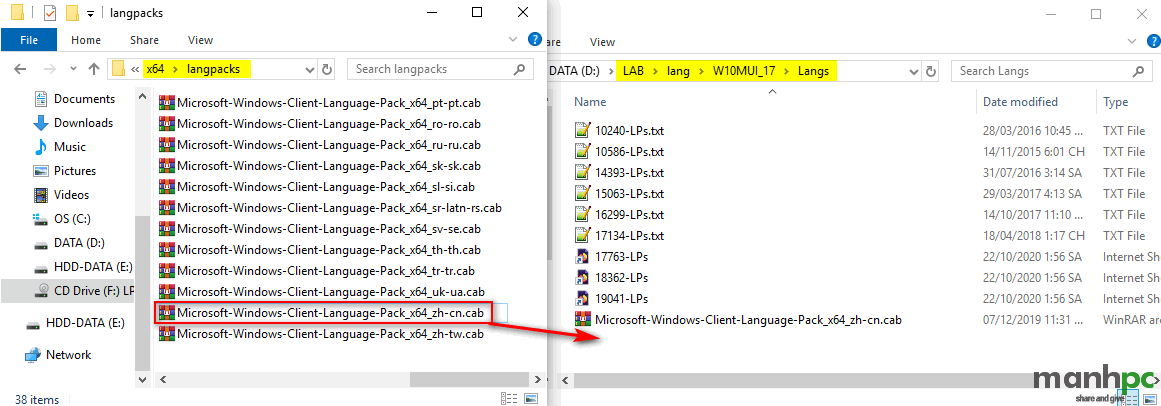
Folder Langs chứa toàn bộ các gói Client Language Pack của các ngôn ngữ. Để có được các file .cab này bạn tải file mu_windows_10_language_pack_version_2004_x86_arm64_x64_dvd_7729a9da.iso tại đây (mật khẩu: manhpc.com) về. Mount nó ra ổ đĩa ảo rồi vào folder \x64\langpacks hoặc \x86\langpacks copy các file .cab cần thiết tương ứng.
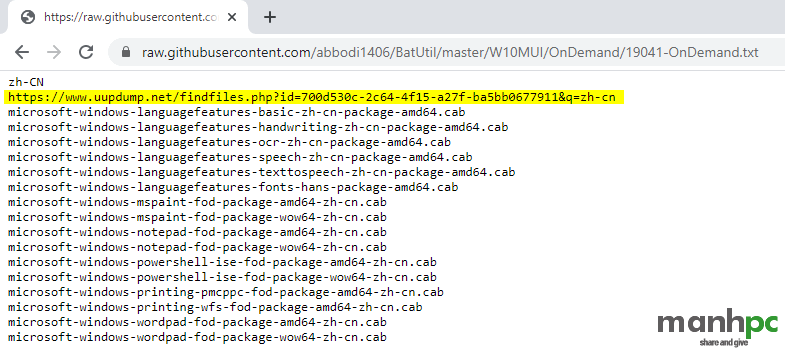
Tải languagefeatures và các file liên quan. Các bạn truy cập vào folder D:\LAB\lang\W10MUI_17\OnDemand sẽ thấy các file TXT và Internet Shortcut (.url). Bạn cần tải cho phiên bản nào thì bạn mở file đó. Với ba phiên bản gần đây tác giả cung cấp file Internet Shortcut để cho chúng ta tải về. Ở đây tôi làm cho phiên bản 19043 thì tôi sẽ mở file 19041-OnDemand (các phiên bản 19041, 19042 và 19043 dùng chung core).
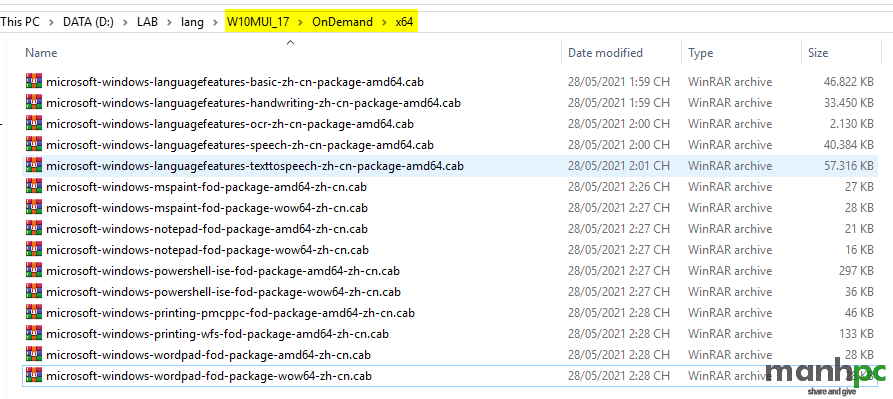
Sau khi mở lên bạn mở tiếp đường link được tô vàng và tải các file đã được liệt kê như hình bên trên về. Tải về bạn copy các file đó vào trong folder D:\LAB\lang\W10MUI_17\OnDemand\x64
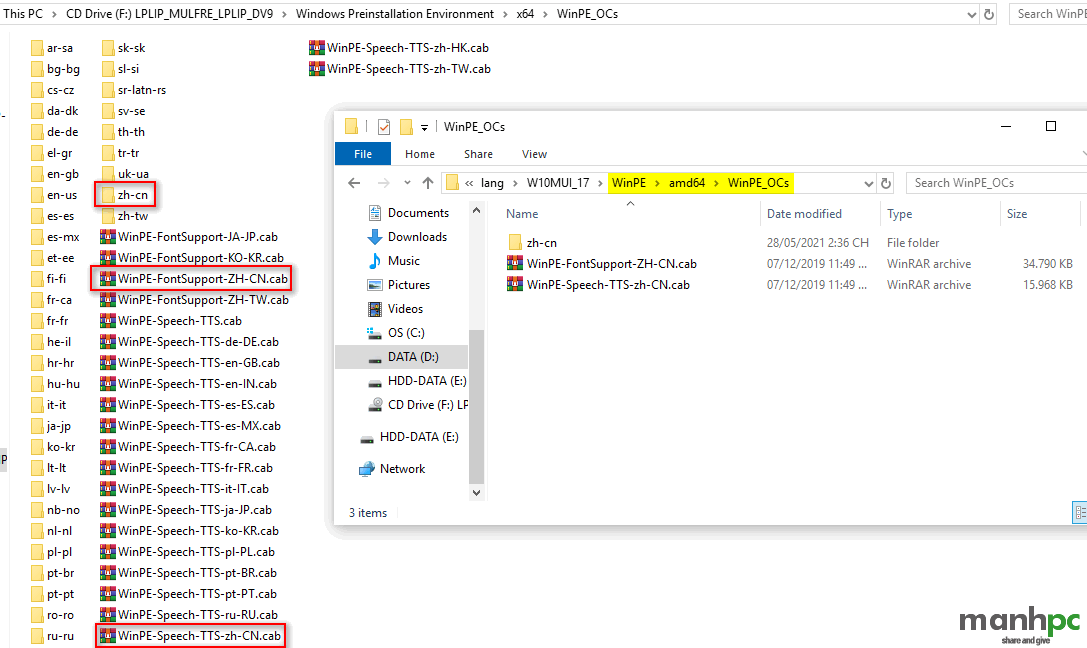
Folder WinPE chứa toàn bộ các gói ngôn ngữ cần thiết để chạy trong giai đoạn windowsPE. Bạn mở lại ổ đĩa ảo mà bạn đã mount ở trên, vào Windows Preinstallation Environment\x64\WinPE_OCs rồi copy những file và folder được khoanh đỏ vào folder D:\LAB\lang\W10MUI_17\WinPE\amd64\WinPE_OCs
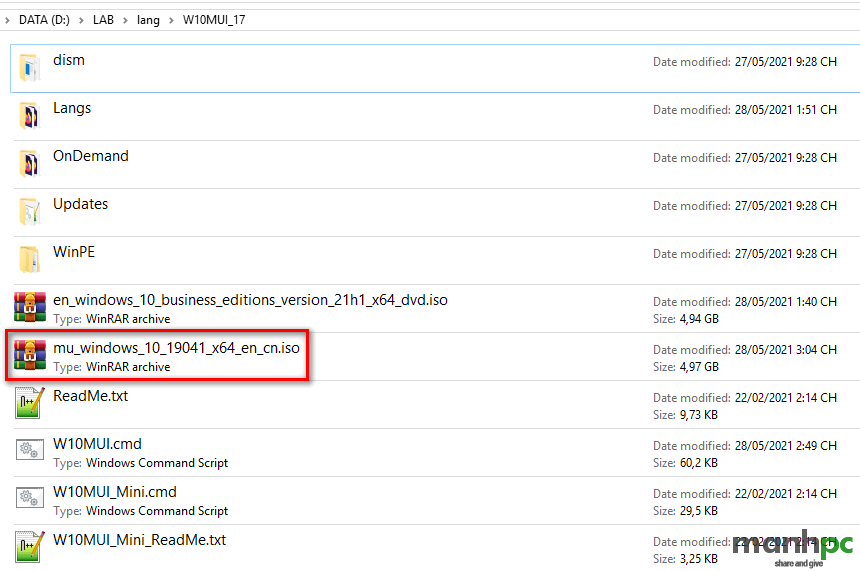
File en_windows_10_business_editions_version_21h1_x64_dvd.iso chính là file iso mà chúng ta cần tích hợp ngôn ngữ vào. File này tôi chỉ còn giữ lại một image là Windows 10 Enterprise.
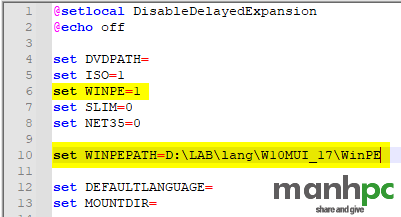
File W10MUI_Mini.cmd là file script chỉ tích hợp ngôn ngữ vào file install.wim và file W10MUI.cmd sẽ tích hợp vào cả giai đoạn windowsPE. File mà tôi sử dụng trong phần hướng dẫn này là W10MUI.cmd. Bạn mở file W10MUI.cmd bằng notepad++ và sửa giống như hai dòng được tô vàng trong hình dưới. Sửa xong bạn Save lại.
Chạy file W10MUI.cmd với quyền Administrator. Tất cả mọi việc tích hợp là hoàn toàn tự động. Bạn có thể tích hợp nhiều ngôn ngữ vào trong một bộ cài chỉ với một lần click file W10MUI.cmd ứng với x64 hoặc x86.
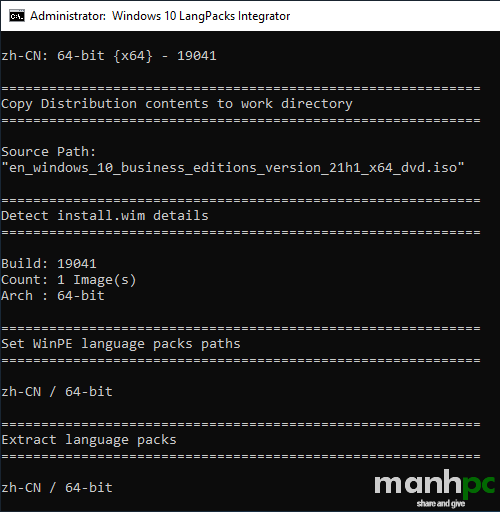
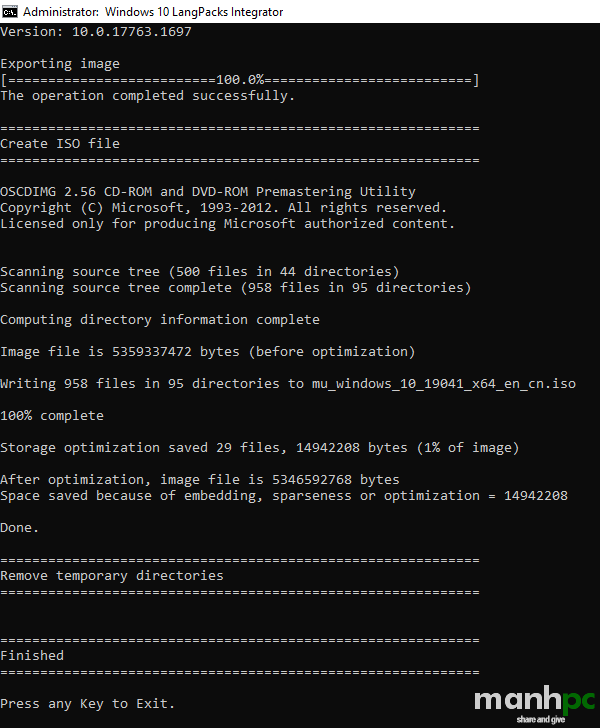
Toàn bộ output của lệnh bên trên:
============================================================
Prepare work directories
============================================================


============================================================
Detect language packs details
============================================================

zh-CN: 64-bit {x64} - 19041

============================================================
Copy Distribution contents to work directory
============================================================

Source Path:
"en_windows_10_business_editions_version_21h1_x64_dvd.iso"

============================================================
Detect install.wim details
============================================================

Build: 19041
Count: 1 Image(s)
Arch : 64-bit

============================================================
Set WinPE language packs paths
============================================================

zh-CN / 64-bit

============================================================
Extract language packs
============================================================

zh-CN / 64-bit

============================================================
Add language files to distribution
============================================================

zh-CN / 64-bit

============================================================
Mount install.wim - index 1/1
============================================================

Deployment Image Servicing and Management tool
Version: 10.0.17763.1697

Mounting image
[==========================100.0%==========================]
The operation completed successfully.

============================================================
Add LPs to install.wim - index 1/1
============================================================

Deployment Image Servicing and Management tool
Version: 10.0.17763.1697

Image Version: 10.0.19043.928

Processing 1 of 1 - Adding package Microsoft-Windows-Client-LanguagePack-Package~31bf3856ad364e35~amd64~zh-CN~10.0.19041.1
[==========================100.0%==========================]
The operation completed successfully.

Deployment Image Servicing and Management tool
Version: 10.0.17763.1697

Image Version: 10.0.19043.928

Processing 1 of 1 - Adding package Microsoft-Windows-LanguageFeatures-Basic-zh-cn-Package~31bf3856ad364e35~amd64~~10.0.19041.1
[==========================100.0%==========================]
The operation completed successfully.

Deployment Image Servicing and Management tool
Version: 10.0.17763.1697

Image Version: 10.0.19043.928

Processing 1 of 4 - Adding package Microsoft-Windows-LanguageFeatures-TextToSpeech-zh-cn-Package~31bf3856ad364e35~amd64~~10.0.19041.1
[==========================100.0%==========================]
Processing 2 of 4 - Adding package Microsoft-Windows-LanguageFeatures-Handwriting-zh-cn-Package~31bf3856ad364e35~amd64~~10.0.19041.1
[==========================100.0%==========================]
Processing 3 of 4 - Adding package Microsoft-Windows-LanguageFeatures-OCR-zh-cn-Package~31bf3856ad364e35~amd64~~10.0.19041.1
[==========================100.0%==========================]
Processing 4 of 4 - Adding package Microsoft-Windows-LanguageFeatures-Speech-zh-cn-Package~31bf3856ad364e35~amd64~~10.0.19041.1
[==========================100.0%==========================]
The operation completed successfully.

Deployment Image Servicing and Management tool
Version: 10.0.17763.1697

Image Version: 10.0.19043.928

Processing 1 of 10 - Adding package Microsoft-Windows-MSPaint-FoD-Package~31bf3856ad364e35~amd64~zh-CN~10.0.19041.1
[==========================100.0%==========================]
Processing 2 of 10 - Adding package Microsoft-Windows-MSPaint-FoD-Package~31bf3856ad364e35~wow64~zh-CN~10.0.19041.1
[==========================100.0%==========================]
Processing 3 of 10 - Adding package Microsoft-Windows-Notepad-FoD-Package~31bf3856ad364e35~amd64~zh-CN~10.0.19041.1
[==========================100.0%==========================]
Processing 4 of 10 - Adding package Microsoft-Windows-Notepad-FoD-Package~31bf3856ad364e35~wow64~zh-CN~10.0.19041.1
[==========================100.0%==========================]
Processing 5 of 10 - Adding package Microsoft-Windows-PowerShell-ISE-FOD-Package~31bf3856ad364e35~amd64~zh-CN~10.0.19041.1
[==========================100.0%==========================]
Processing 6 of 10 - Adding package Microsoft-Windows-PowerShell-ISE-FOD-Package~31bf3856ad364e35~wow64~zh-CN~10.0.19041.1
[==========================100.0%==========================]
Processing 7 of 10 - Adding package Microsoft-Windows-Printing-PMCPPC-FoD-Package~31bf3856ad364e35~amd64~zh-CN~10.0.19041.1
[==========================100.0%==========================]
Processing 8 of 10 - Adding package Microsoft-Windows-Printing-WFS-FoD-Package~31bf3856ad364e35~amd64~zh-CN~10.0.19041.1
[==========================100.0%==========================]
Processing 9 of 10 - Adding package Microsoft-Windows-WordPad-FoD-Package~31bf3856ad364e35~amd64~zh-CN~10.0.19041.1
[==========================100.0%==========================]
Processing 10 of 10 - Adding package Microsoft-Windows-WordPad-FoD-Package~31bf3856ad364e35~wow64~zh-CN~10.0.19041.1
[==========================100.0%==========================]
The operation completed successfully.

============================================================
Update language settings
============================================================


============================================================
Update winre.wim / amd64
============================================================

        1 file(s) copied.

============================================================
Mount winre.wim
============================================================

Deployment Image Servicing and Management tool
Version: 10.0.17763.1697

Mounting image
[==========================100.0%==========================]
The operation completed successfully.

============================================================
Add LPs to winre.wim
============================================================

Deployment Image Servicing and Management tool
Version: 10.0.17763.1697

Image Version: 10.0.19041.1

Processing 1 of 3 - Adding package Microsoft-Windows-WinPE-LanguagePack-Package~31bf3856ad364e35~amd64~zh-CN~10.0.19041.1
[==========================100.0%==========================]
Processing 2 of 3 - Adding package WinPE-SRT-Package~31bf3856ad364e35~amd64~zh-CN~10.0.19041.1
[==========================100.0%==========================]
Processing 3 of 3 - Adding package Microsoft-Windows-WinPE-FontSupport-ZH-CN-Package~31bf3856ad364e35~amd64~~10.0.19041.1
[==========================100.0%==========================]
The operation completed successfully.

Deployment Image Servicing and Management tool
Version: 10.0.17763.1697

Image Version: 10.0.19041.1

Processing 1 of 3 - Adding package WinPE-HTA-Package~31bf3856ad364e35~amd64~zh-CN~10.0.19041.1
[==========================100.0%==========================]
Processing 2 of 3 - Adding package WinPE-Rejuv-Package~31bf3856ad364e35~amd64~zh-CN~10.0.19041.1
[==========================100.0%==========================]
Processing 3 of 3 - Adding package WinPE-StorageWMI-Package~31bf3856ad364e35~amd64~zh-CN~10.0.19041.1
[==========================100.0%==========================]
The operation completed successfully.

Deployment Image Servicing and Management tool
Version: 10.0.17763.1697

Image Version: 10.0.19041.1

Processing 1 of 5 - Adding package WinPE-EnhancedStorage-Package~31bf3856ad364e35~amd64~zh-CN~10.0.19041.1
[==========================100.0%==========================]
Processing 2 of 5 - Adding package WinPE-Scripting-Package~31bf3856ad364e35~amd64~zh-CN~10.0.19041.1
[==========================100.0%==========================]
Processing 3 of 5 - Adding package WinPE-SecureStartup-Package~31bf3856ad364e35~amd64~zh-CN~10.0.19041.1
[==========================100.0%==========================]
Processing 4 of 5 - Adding package WinPE-WDS-Tools-Package~31bf3856ad364e35~amd64~zh-CN~10.0.19041.1
[==========================100.0%==========================]
Processing 5 of 5 - Adding package WinPE-WMI-Package~31bf3856ad364e35~amd64~zh-CN~10.0.19041.1
[==========================100.0%==========================]
The operation completed successfully.

============================================================
Update language settings
============================================================


============================================================
Unmount winre.wim
============================================================

Deployment Image Servicing and Management tool
Version: 10.0.17763.1697

Image File : D:\LAB\lang\W10MUI_17\TEMP\WR\amd64\winre.wim
Image Index : 1
Saving image
[==========================100.0%==========================]
Unmounting image
[==========================100.0%==========================]
The operation completed successfully.

============================================================
Rebuild winre.wim
============================================================

Deployment Image Servicing and Management tool
Version: 10.0.17763.1697

Exporting image
[==========================100.0%==========================]
The operation completed successfully.

============================================================
Add updated winre.wim to install.wim - index 1/1
============================================================

        1 file(s) copied.

============================================================
Unmount install.wim - index 1/1
============================================================

Deployment Image Servicing and Management tool
Version: 10.0.17763.1697

Image File : D:\LAB\lang\W10MUI_17\_DVD\sources\install.wim
Image Index : 1
Saving image
[==========================100.0%==========================]
Unmounting image
[==========================100.0%==========================]
The operation completed successfully.

============================================================
Mount boot.wim - index 1/2
============================================================

Deployment Image Servicing and Management tool
Version: 10.0.17763.1697

Mounting image
[==========================100.0%==========================]
The operation completed successfully.

============================================================
Add LPs to boot.wim - index 1/2
============================================================

Deployment Image Servicing and Management tool
Version: 10.0.17763.1697

Image Version: 10.0.19041.928

Processing 1 of 3 - Adding package Microsoft-Windows-WinPE-LanguagePack-Package~31bf3856ad364e35~amd64~zh-CN~10.0.19041.1
[==========================100.0%==========================]
Processing 2 of 3 - Adding package WinPE-SRT-Package~31bf3856ad364e35~amd64~zh-CN~10.0.19041.1
[==========================100.0%==========================]
Processing 3 of 3 - Adding package Microsoft-Windows-WinPE-FontSupport-ZH-CN-Package~31bf3856ad364e35~amd64~~10.0.19041.1
[==========================100.0%==========================]
The operation completed successfully.

Deployment Image Servicing and Management tool
Version: 10.0.17763.1697

Image Version: 10.0.19041.928

Processing 1 of 5 - Adding package WinPE-EnhancedStorage-Package~31bf3856ad364e35~amd64~zh-CN~10.0.19041.1
[==========================100.0%==========================]
Processing 2 of 5 - Adding package WinPE-Scripting-Package~31bf3856ad364e35~amd64~zh-CN~10.0.19041.1
[==========================100.0%==========================]
Processing 3 of 5 - Adding package WinPE-SecureStartup-Package~31bf3856ad364e35~amd64~zh-CN~10.0.19041.1
[==========================100.0%==========================]
Processing 4 of 5 - Adding package WinPE-WDS-Tools-Package~31bf3856ad364e35~amd64~zh-CN~10.0.19041.1
[==========================100.0%==========================]
Processing 5 of 5 - Adding package WinPE-WMI-Package~31bf3856ad364e35~amd64~zh-CN~10.0.19041.1
[==========================100.0%==========================]
The operation completed successfully.

============================================================
Update language settings
============================================================


============================================================
Unmount boot.wim - index 1/2
============================================================

Deployment Image Servicing and Management tool
Version: 10.0.17763.1697

Image File : D:\LAB\lang\W10MUI_17\_DVD\sources\boot.wim
Image Index : 1
Saving image
[==========================100.0%==========================]
Unmounting image
[==========================100.0%==========================]
The operation completed successfully.

============================================================
Mount boot.wim - index 2/2
============================================================

Deployment Image Servicing and Management tool
Version: 10.0.17763.1697

Mounting image
[==========================100.0%==========================]
The operation completed successfully.

============================================================
Add LPs to boot.wim - index 2/2
============================================================

Deployment Image Servicing and Management tool
Version: 10.0.17763.1697

Image Version: 10.0.19041.928

Processing 1 of 3 - Adding package Microsoft-Windows-WinPE-LanguagePack-Package~31bf3856ad364e35~amd64~zh-CN~10.0.19041.1
[==========================100.0%==========================]
Processing 2 of 3 - Adding package WinPE-SRT-Package~31bf3856ad364e35~amd64~zh-CN~10.0.19041.1
[==========================100.0%==========================]
Processing 3 of 3 - Adding package Microsoft-Windows-WinPE-FontSupport-ZH-CN-Package~31bf3856ad364e35~amd64~~10.0.19041.1
[==========================100.0%==========================]
The operation completed successfully.

Deployment Image Servicing and Management tool
Version: 10.0.17763.1697

Image Version: 10.0.19041.928

Processing 1 of 2 - Adding package WinPE-Setup-Package~31bf3856ad364e35~amd64~zh-CN~10.0.19041.1
[==========================100.0%==========================]
Processing 2 of 2 - Adding package WinPE-Setup-Client-Package~31bf3856ad364e35~amd64~zh-CN~10.0.19041.1
[==========================100.0%==========================]
The operation completed successfully.

Deployment Image Servicing and Management tool
Version: 10.0.17763.1697

Image Version: 10.0.19041.928

Processing 1 of 5 - Adding package WinPE-EnhancedStorage-Package~31bf3856ad364e35~amd64~zh-CN~10.0.19041.1
[==========================100.0%==========================]
Processing 2 of 5 - Adding package WinPE-Scripting-Package~31bf3856ad364e35~amd64~zh-CN~10.0.19041.1
[==========================100.0%==========================]
Processing 3 of 5 - Adding package WinPE-SecureStartup-Package~31bf3856ad364e35~amd64~zh-CN~10.0.19041.1
[==========================100.0%==========================]
Processing 4 of 5 - Adding package WinPE-WDS-Tools-Package~31bf3856ad364e35~amd64~zh-CN~10.0.19041.1
[==========================100.0%==========================]
Processing 5 of 5 - Adding package WinPE-WMI-Package~31bf3856ad364e35~amd64~zh-CN~10.0.19041.1
[==========================100.0%==========================]
The operation completed successfully.

============================================================
Update language settings
============================================================


============================================================
Unmount boot.wim - index 2/2
============================================================

Deployment Image Servicing and Management tool
Version: 10.0.17763.1697

Image File : D:\LAB\lang\W10MUI_17\_DVD\sources\boot.wim
Image Index : 2
Saving image
[==========================100.0%==========================]
Unmounting image
[==========================100.0%==========================]
The operation completed successfully.

============================================================
Rebuild boot.wim
============================================================

Deployment Image Servicing and Management tool
Version: 10.0.17763.1697

Exporting image
[==========================100.0%==========================]
Exporting image
[==========================100.0%==========================]
The operation completed successfully.

============================================================
Rebuild install.wim
============================================================

Deployment Image Servicing and Management tool
Version: 10.0.17763.1697

Exporting image
[==========================100.0%==========================]
The operation completed successfully.

============================================================
Create ISO file
============================================================

OSCDIMG 2.56 CD-ROM and DVD-ROM Premastering Utility
Copyright (C) Microsoft, 1993-2012. All rights reserved.
Licensed only for producing Microsoft authorized content.


Scanning source tree (500 files in 44 directories)
Scanning source tree complete (958 files in 95 directories)

Computing directory information complete

Image file is 5359337472 bytes (before optimization)

Writing 958 files in 95 directories to mu_windows_10_19041_x64_en_cn.iso

100% complete

Storage optimization saved 29 files, 14942208 bytes (1% of image)

After optimization, image file is 5346592768 bytes
Space saved because of embedding, sparseness or optimization = 14942208

Done.

============================================================
Remove temporary directories
============================================================


============================================================
Finished
============================================================

Press any Key to Exit.
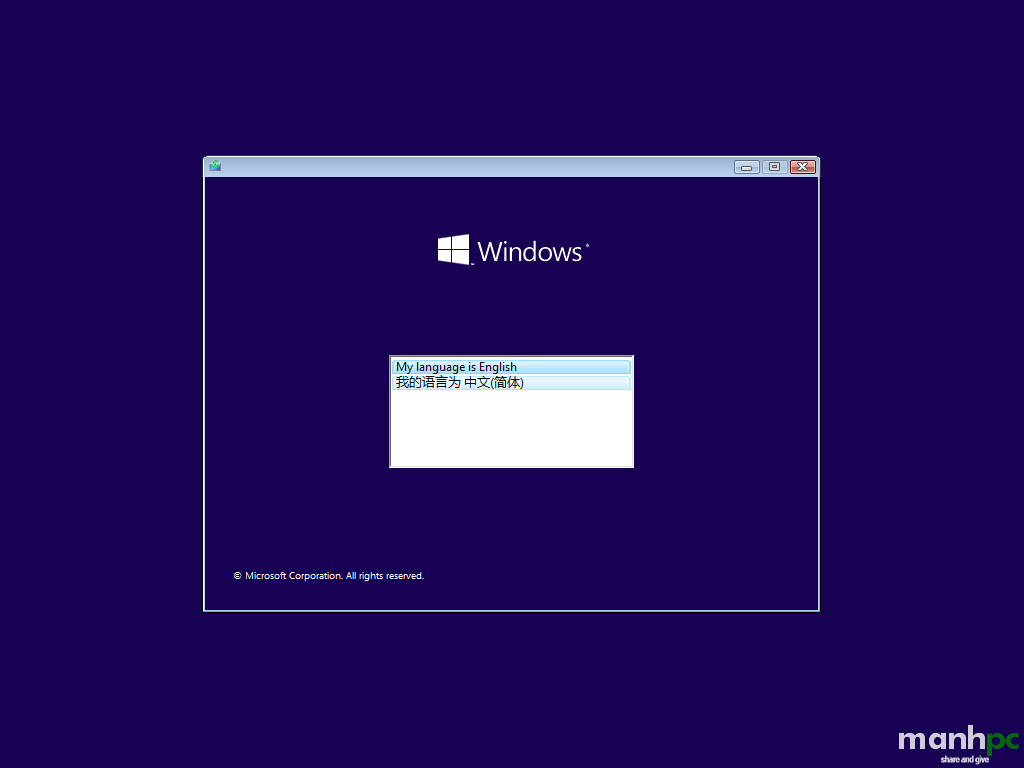
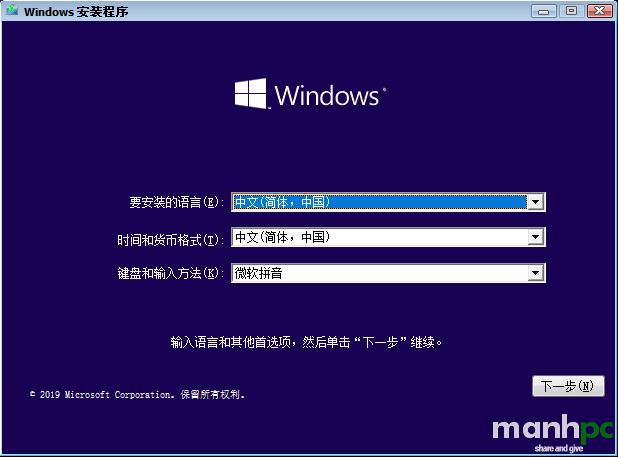
Kết quả:
Test:
Một số tùy chỉnh Windows
Trong phần này tôi sẽ hướng dẫn bạn thêm một số cách để gỡ bỏ một số gói tính năng mặc định, gỡ bỏ ứng dụng Windows Apps mặc định, cách bật tắt các Features, chỉnh sửa Registry và tắt bật các Services bằng các công cụ: DISM command, NTLite và Dism++.
Sử dụng DISM
Gỡ bỏ gói tính năng mặc định
Trong phần hướng dẫn này tôi sử dụng bộ cài Windows 10 business version 21h1 x64 với phiên bản Enterprise. Trong phần này để chỉnh sửa được image thì mặc định bạn phải mount image đó ra và lưu các thiết lập vào file install.wim bằng lệnh unmount. Chi tiết các lênh mount và unmount bạn thêm các phần hướng dẫn bên trên.
Lệnh xem các gói đã được cài đặt trong image
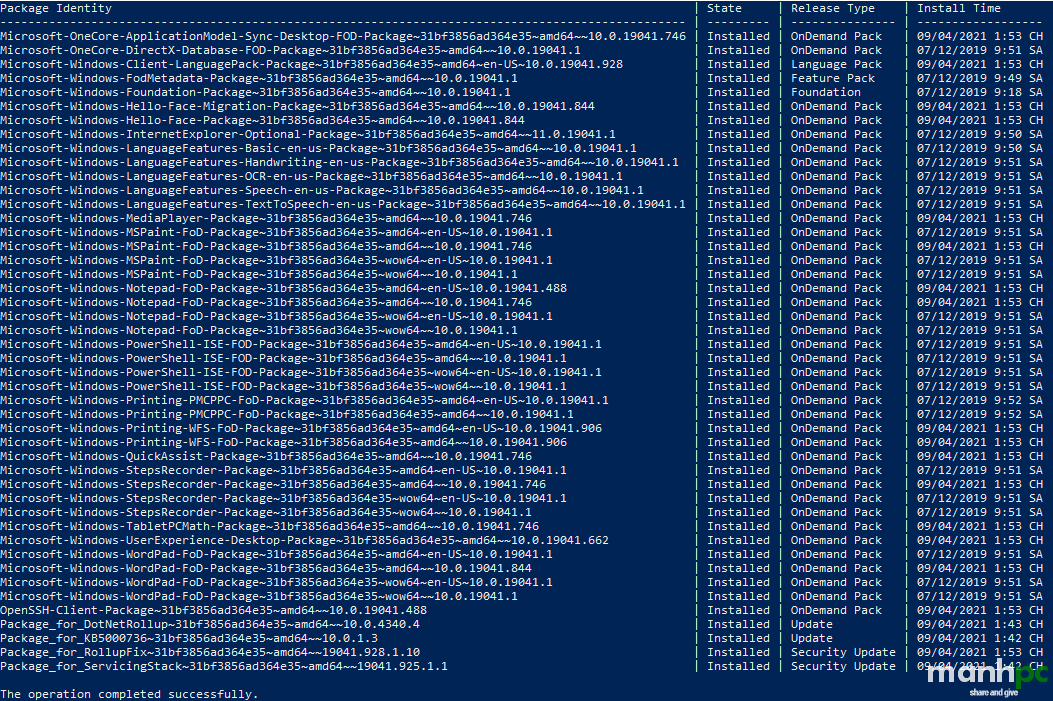
Dism /Image:D:\LAB\mount /Get-Packages /Format:TableLệnh xem chi tiết thông tin gói
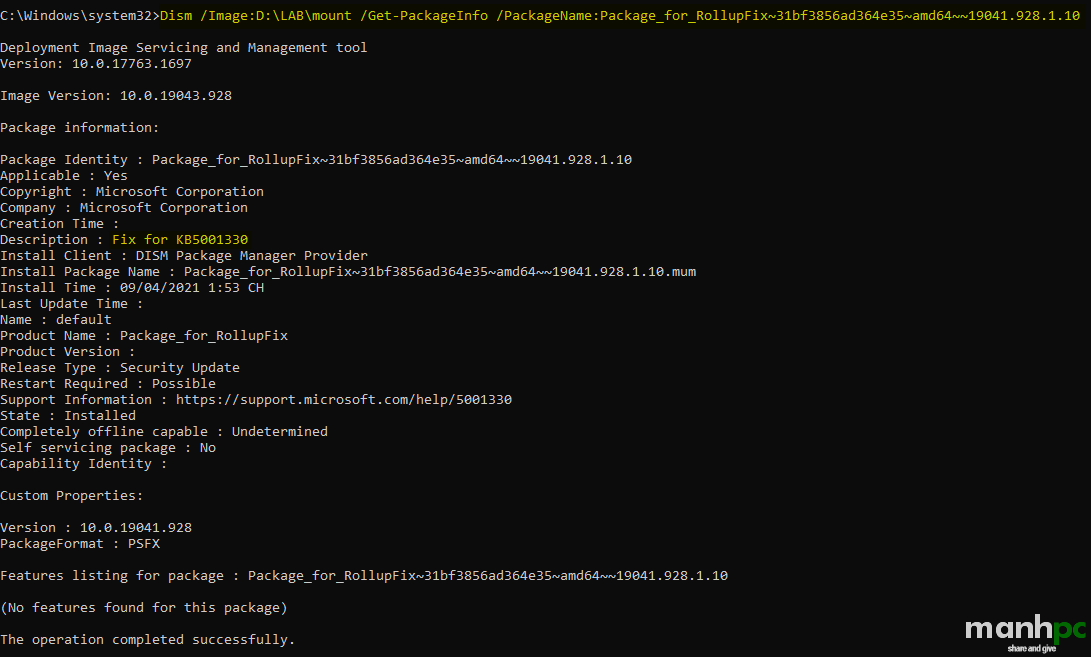
Dism /Image:D:\LAB\mount /Get-PackageInfo /PackageName:Package_for_RollupFix~31bf3856ad364e35~amd64~~19041.928.1.10Lệnh gỡ bỏ gói
Dism /Image:D:\LAB\mount /Remove-Package /PackageName:Microsoft-Windows-MediaPlayer-Package~31bf3856ad364e35~amd64~~10.0.19041.746 /PackageName:Microsoft-Windows-QuickAssist-Package~31bf3856ad364e35~amd64~~10.0.19041.746Gỡ bỏ ứng dụng Windows Apps mặc định
Lệnh xem các gói Windows Apps có trong image
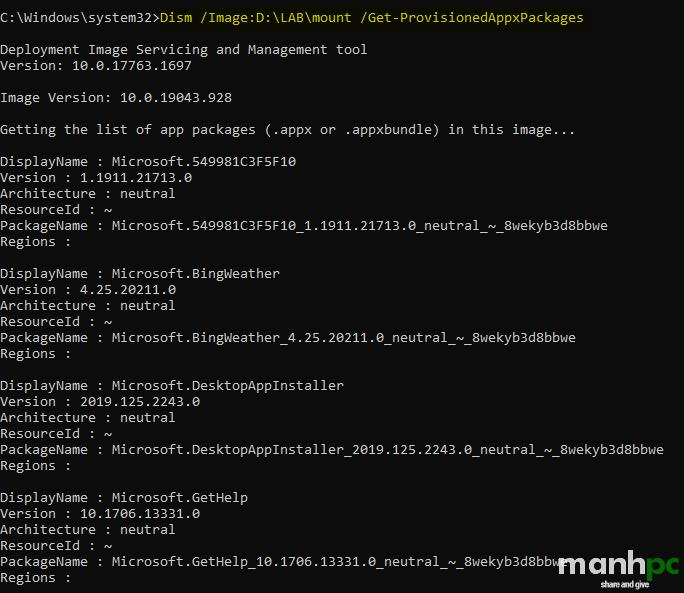
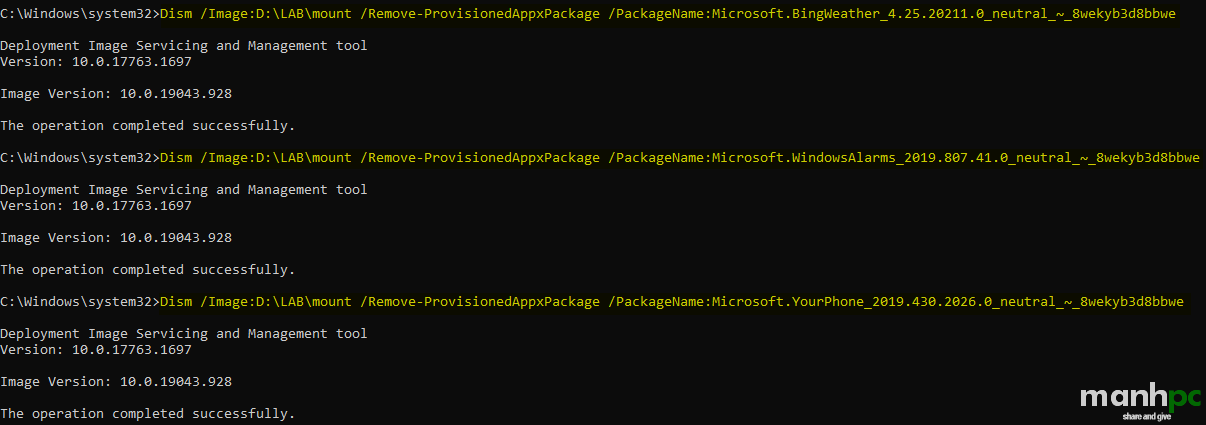
Dism /Image:D:\LAB\mount /Get-ProvisionedAppxPackagesLệnh gỡ bỏ gói Windows Apps
Dism /Image:D:\LAB\mount /Remove-ProvisionedAppxPackage /PackageName:Microsoft.BingWeather_4.25.20211.0_neutral_~_8wekyb3d8bbwe
Dism /Image:D:\LAB\mount /Remove-ProvisionedAppxPackage /PackageName:Microsoft.WindowsAlarms_2019.807.41.0_neutral_~_8wekyb3d8bbwe
Dism /Image:D:\LAB\mount /Remove-ProvisionedAppxPackage /PackageName:Microsoft.YourPhone_2019.430.2026.0_neutral_~_8wekyb3d8bbw
Lệnh tắt bật Windows Features
Lệnh xem các Feature
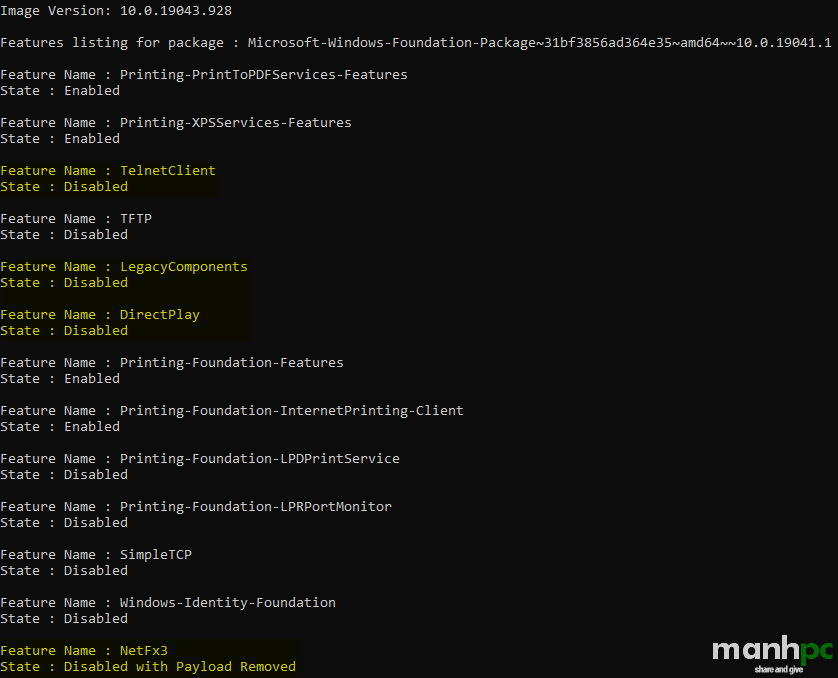
Dism /Image:D:\LAB\mount /Get-Features /Format:ListLệnh Enable Feature
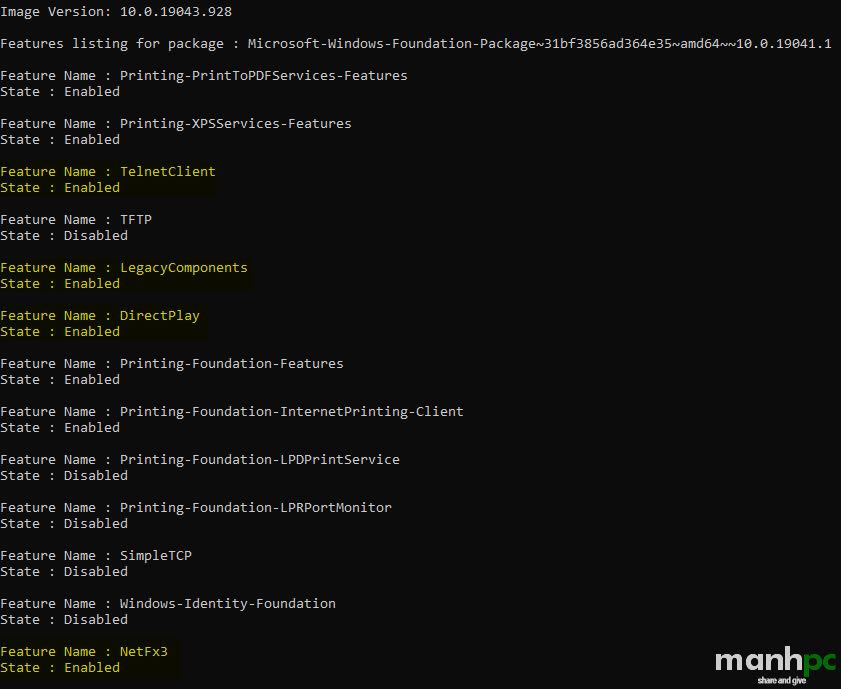
Dism /Image:D:\LAB\mount /Enable-Feature /FeatureName:TelnetClient /Source:D:\LAB\mount\Windows\WinSxS
Dism /Image:D:\LAB\mount /Enable-Feature /FeatureName:LegacyComponents /All /Source:D:\LAB\mount\Windows\WinSxS
Dism /Image:D:\LAB\mount /Enable-Feature /FeatureName:DirectPlay /Source:D:\LAB\mount\Windows\WinSxS
Dism /Image:D:\LAB\mount /Enable-Feature /FeatureName:NetFx3 /All /LimitAccess /Source:D:\LAB\NetFx3

Trong các lệnh có tham số /Source:D:\LAB\mount\Windows\WinSxS chính là nơi chứa các gói của Feature đó. Riêng với Feature NetFx3 bạn tải về tại đây và trỏ tham số /Source về folder đó hoặc bạn mount file ISO ra ổ đĩa ảo rồi trỏ đến folder E:\sources\sxs bên trong ổ đĩa đó (E: là ký tự ổ đĩa ảo)
Kết quả:
Để Disable Feature chúng ta dùng lệnh
Dism /Image:D:\LAB\mount /Disable-Feature /FeatureName:TelnetClientLệnh chỉnh sửa Offline Registry
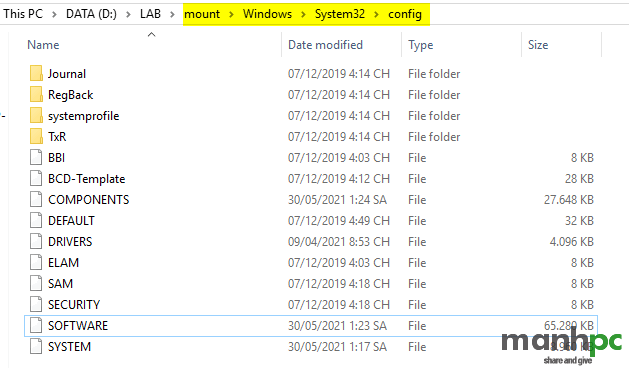
Toàn bộ cấu hình của khoá HKEY_LOCAL_MACHINE trong Registry được lưu trữ tại đây
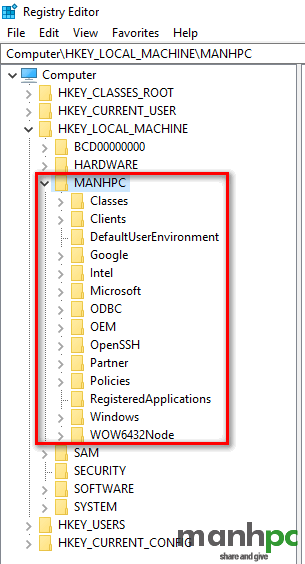
Để chỉnh sửa offline registry thì bạn cần phải import tổ hợp offline registry bạn muốn thay đổi vào một tổ hợp tạm thời trong registry tại máy của bạn. Trong phần hướng dẫn này tôi sẽ import từ tổ hợp offline registry HKLM\SOFTWARE vào tổ hợp tạm thời với tên MANHPC tại host registry là máy tính của tôi.
reg load HKLM\MANHPC D:\LAB\mount\Windows\System32\config\SOFTWARETương tự bạn có thể import các tổ hợp SOFTWARE, DEFAULT, DRIVERS, SAM hoặc SYSTEM.
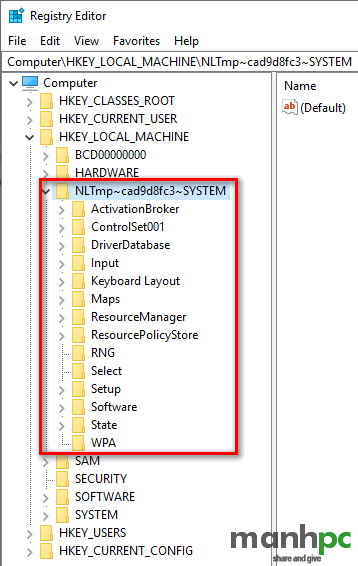
Mở Registry Editor (regedit) trên máy của bạn, bạn sẽ nhìn thấy tổ hợp tạm thời HKLM\MANHPC
Thêm thông tin OEMInfo
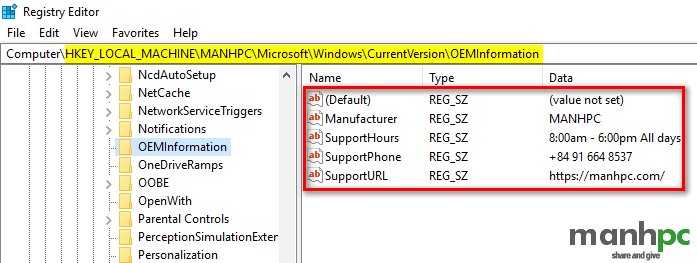
reg add HKLM\MANHPC\Microsoft\Windows\CurrentVersion\OEMInformation /v Manufacturer /t REG_SZ /d MANHPC /f
reg add HKLM\MANHPC\Microsoft\Windows\CurrentVersion\OEMInformation /v SupportURL /t REG_SZ /d https://manhpc.com/ /f
reg add HKLM\MANHPC\Microsoft\Windows\CurrentVersion\OEMInformation /v SupportHours /t REG_SZ /d "9:00am - 5:00pm Mon - Fri" /f
reg add HKLM\MANHPC\Microsoft\Windows\CurrentVersion\OEMInformation /v SupportPhone /t REG_SZ /d "+84 91 664 8537" /f
Sau khi chỉnh sửa xong sử dụng lệnh unload để đóng MANHPC lại
reg unload HKLM\MANHPCTắt bật các services
Tương tự như chỉnh sửa giá trị SOFTWARE, chúng ta sẽ chỉnh sửa tập tin SYSTEM trong thư mục config, gõ lệnh sau vào của sổ cmd:
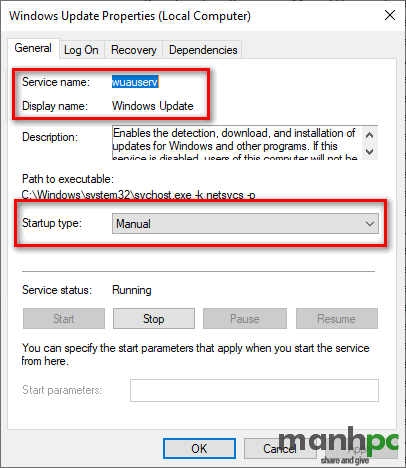
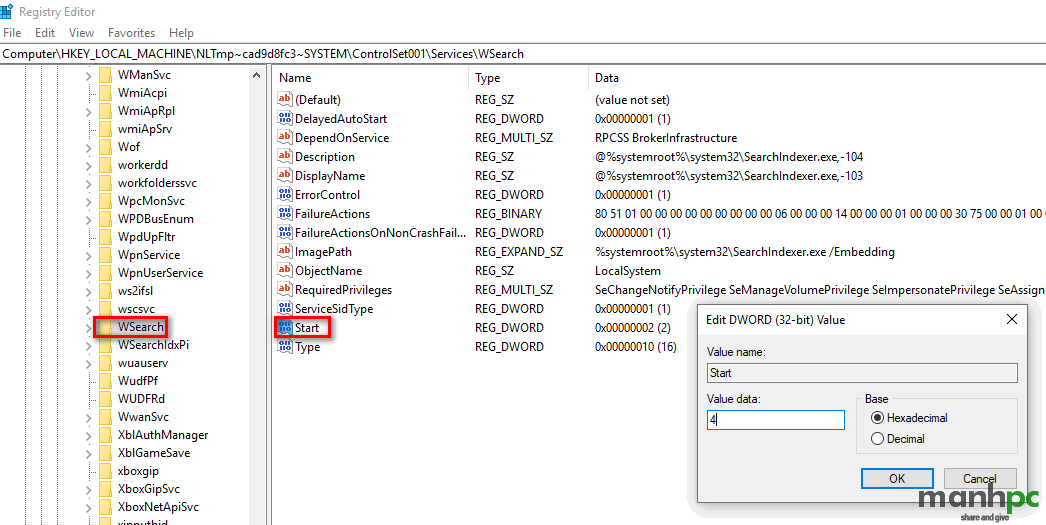
reg load HKLM\MANHPCSERVICE D:\LAB\mount\Windows\System32\config\SYSTEMMở Registry Editor bạn sẽ thấy giá trị MANHPCSERVICE nằm bên dưới HKLM. Tất cả các services trong windows đều nằm ở đường dẫn HKEY_LOCAL_MACHINE\MANHPCSERVICE\ControlSet001\Services. Trong ví dụ này tôi sẽ tắt dịch vụ Windows Update thì di chuyển đến khóa HKEY_LOCAL_MACHINE\MANHPCSERVICE\ControlSet001\Services\wuauserv. Trong khung bên phải bạn sửa giá trị khóa Start ứng với các con số được đặt từ 1 tới 4: 1: Automatic (Delay Start), 2: Automatic, 3: Manual, 4: Disabled. Ở đây tôi chọn 4 để tắt dịch vụ Windows Update.
Hình bên dưới đây sẽ cho bạn biết tên của service.
Bạn cũng có thể dùng trực tiếp lệnh sau:
reg add HKLM\MANHPCSERVICE\ControlSet001\services\wuauserv /v Start /t REG_DWORD /d 4 /fSau khi chỉnh sửa xong sử dụng lệnh unload để đóng MANHPCSERVICE lại
reg unload HKLM\MANHPCSERVICESử dụng NTLite
Trong phần hướng dẫn này tôi sử dụng bộ cài Windows 10 business version 21h1 x64 với phiên bản Enterprise. Tương tự như khi sử dụng lệnh DISM, để chỉnh sửa được các image thì việc đầu tiên là bạn phải mount image đó vào một folder. Sau khi cấu hình xong bạn cần phải Save và unmount image.
Gỡ gói tính năng mặc định
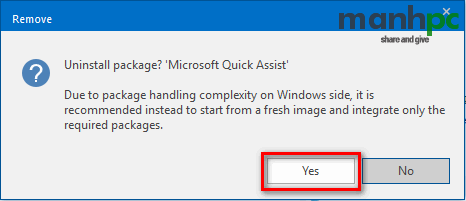
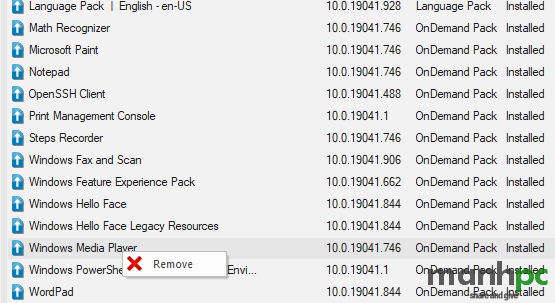
Sau khi mount, bạn click vào Updates bên panel bên trái, nhìn sang panel bên phải bạn sẽ thấy danh sách các gói tính năng mặc định. Để gỡ gói nào bạn click phải chuột lên và chọn Remove.
Click Yes
Gỡ bỏ gói Windows Media Player
Gỡ bỏ các ứng dụng Windows Apps
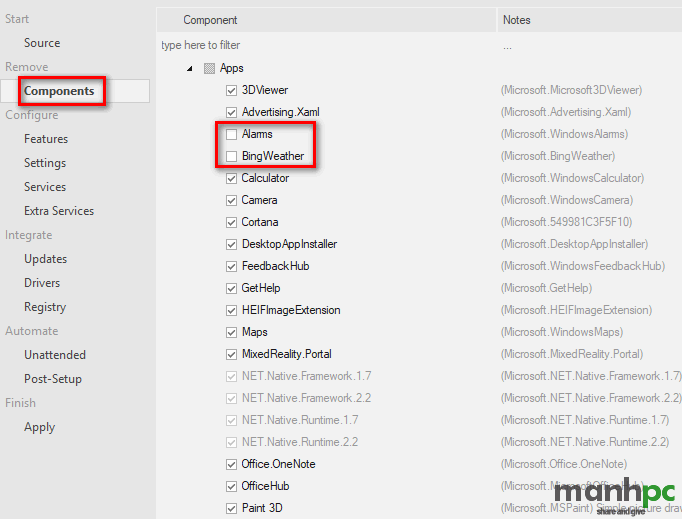
Click vào Components -> Bung rộng Windows Apps trong ô bên phải -> bung rộng Apps sẽ thấy danh sách các Windows Apps mà bạn có thể gỡ bỏ. Những ô có dấu tích bị ẩn thì bạn không thể gỡ được. Bạn muốn xóa Apps nào thì bạn bỏ tích ô đó.
Tắt bật Windows Features
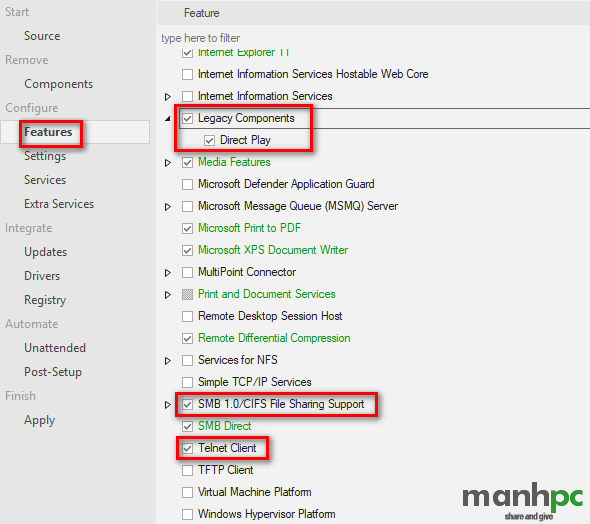
Click vào Features trong panel bên trái bạn sẽ thấy danh sách các Windows Feature mà bạn các thể tắt bật trong khung bên phải. Bạn muốn bật Features nào thì bạn tích vào ô đó và bỏ tích thì là tắt.
Chỉnh sửa Offline Registry
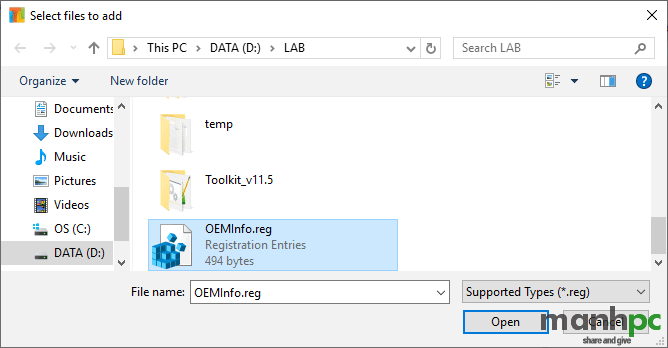
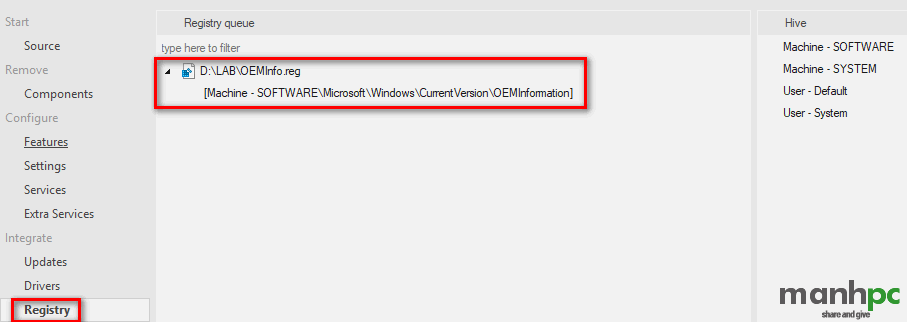
Để thêm một file Registry có đinh dạng .reg mà bạn đã có từ trước thì sau khi bạn click vào Registry trong panel bên trái thì bạn cần click vào Add -> chọn đến file .reg.
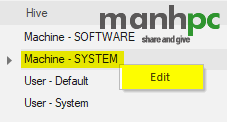
Ngoài ra bạn có thể mount các tổ hợp offline registry vào công cụ Registry Editor tại máy của bạn bằng cách Click phải chuột vào các dòng trong khung Hive bên panel phải rồi chọn Edit
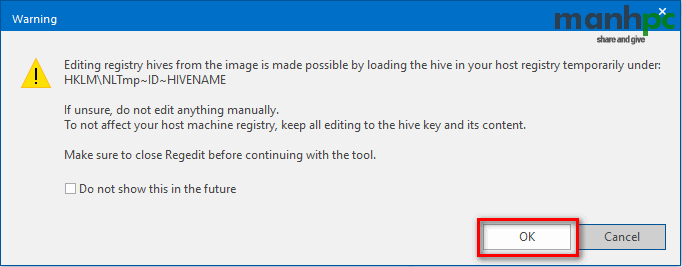
Click OK
Mở Registry Editor
Chỉnh sửa:
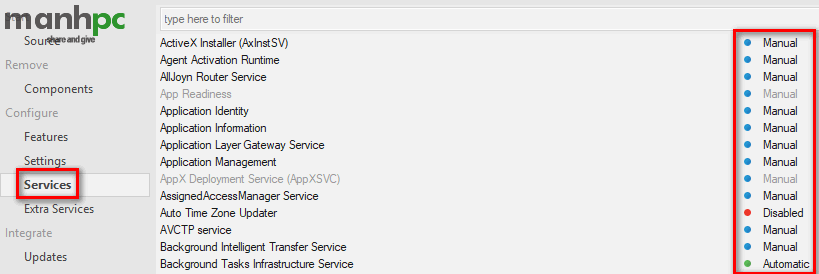
Tắt bật các Services
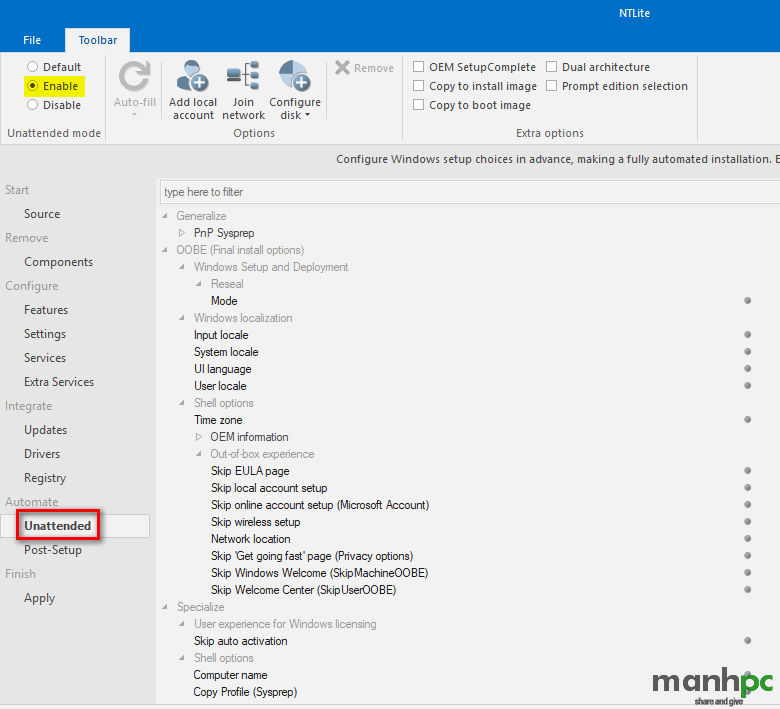
Cấu hình file trả lời tự động
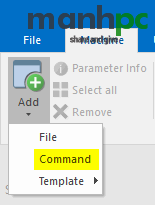
Cấu hình Post-Setup
Sử dụng Dism++
Link tải phần mềm tại Github hoặc tại GoogDrive
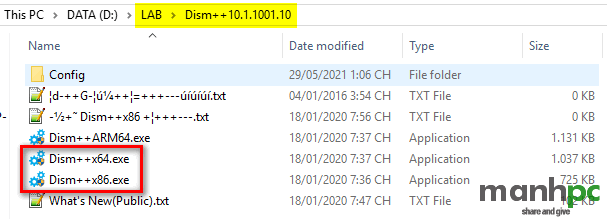
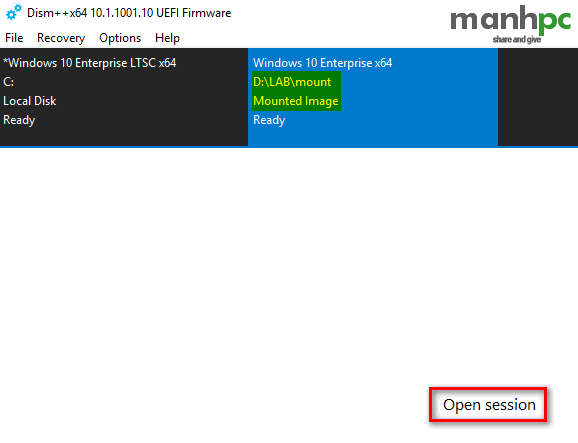
Bạn chạy file Dism++x64.exe để mở phần mềm lên. Sau khi mở lên bạn vào File -> Mount Image.
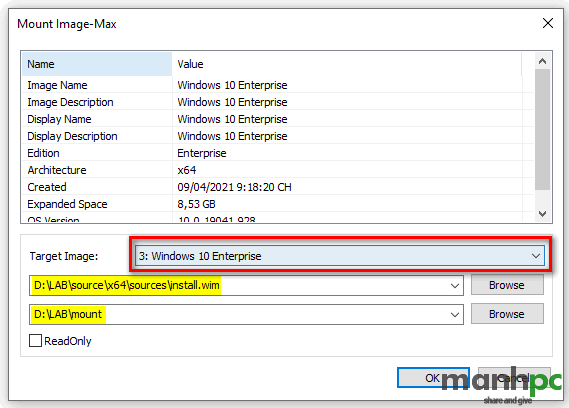
Trong hình bên trên hai ô được tô vàng là đường dẫn đến file install.wim và nơi sẽ mount image. Trong Target Image là nơi chọn Image nào bạn sẽ mount. Sau khi Image được mount xong bạn click vào Open session.
Optional Features
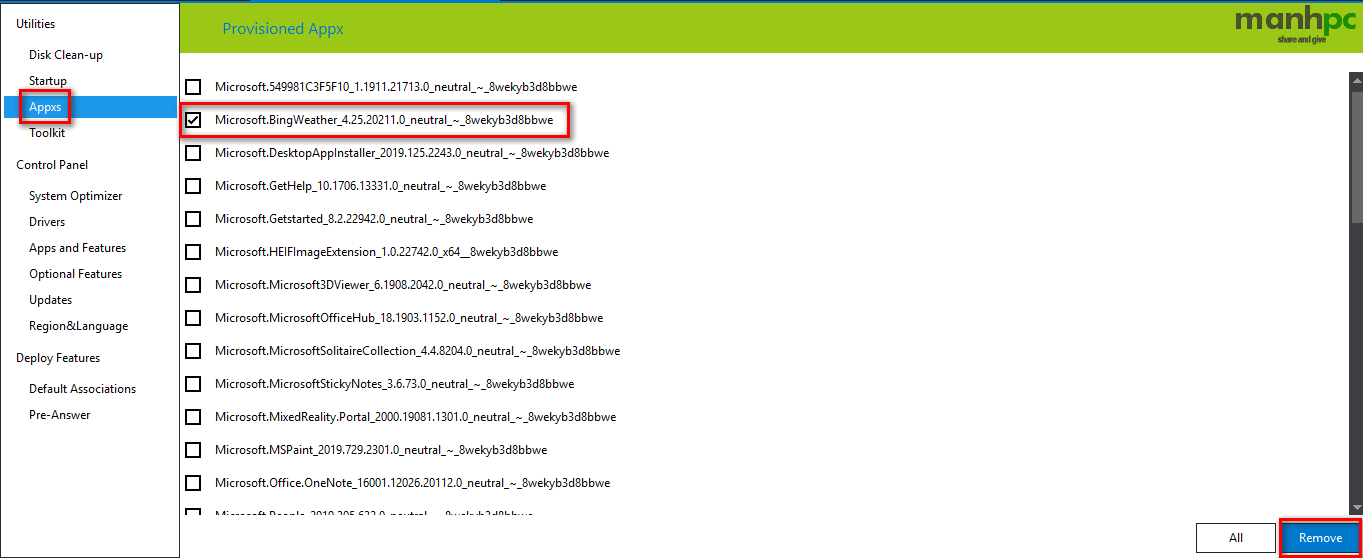
Appxs
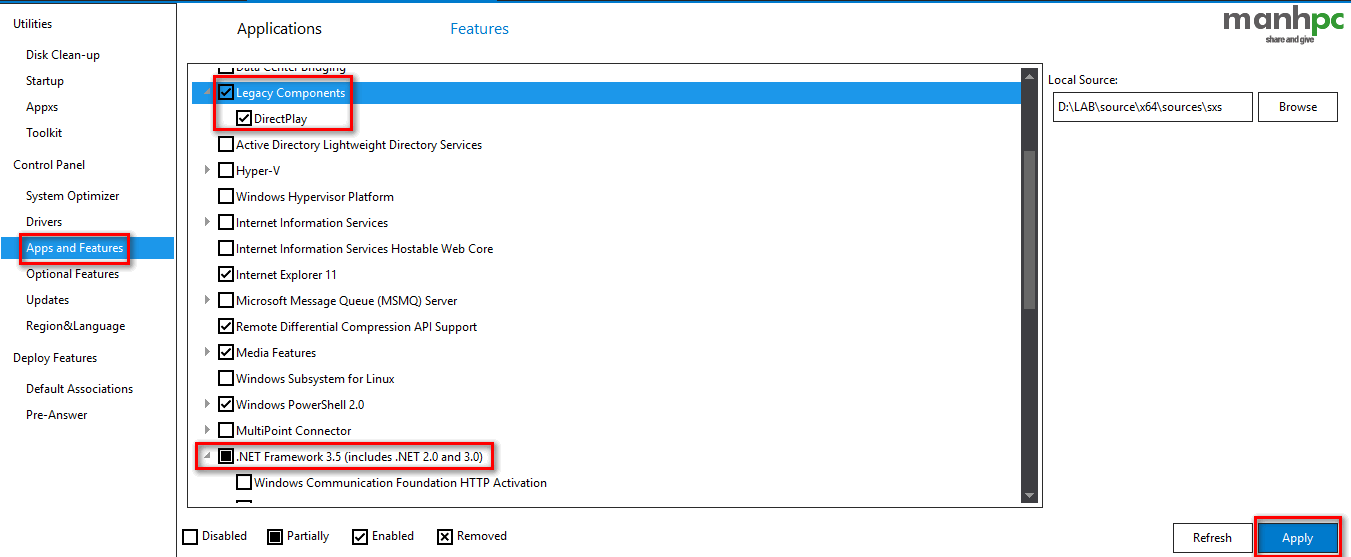
Apps and Features
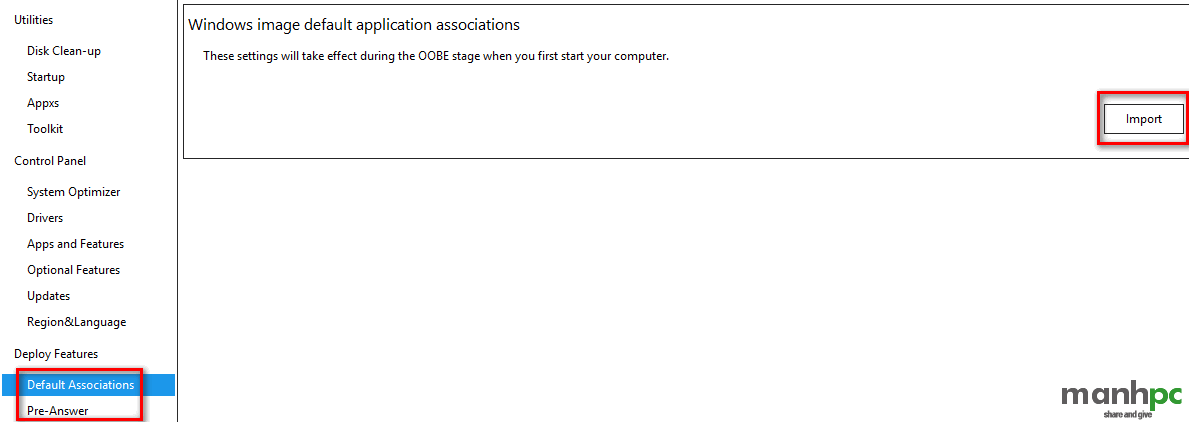
Deploy Features
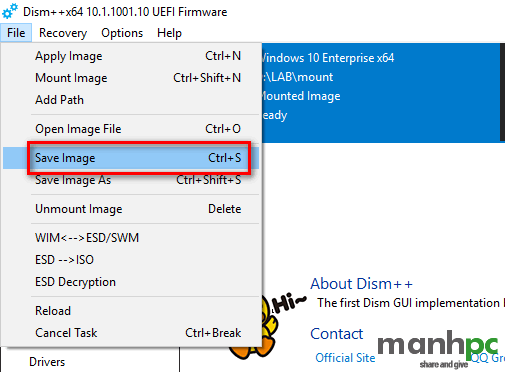
Sau khi cấu hình xong bạn vào File -> Save Image
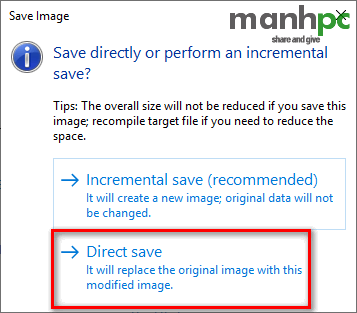
Chọn Direct save để ghi vào luôn file install.wim. Chọn Incremental save khi bạn muốn save Image bạn vừa sửa xong sang một file install.wim mới.
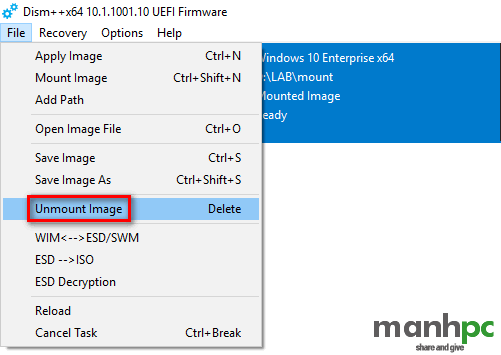
Sau khi Save xong bạn vào File -> Unmount Image
Kết luận
Như vậy trong bài viết này tôi vừa giới thiệu tới bạn những thao tác cơ bản để bạn có thể làm việc được với file install.wim và boot.wim trong bộ cài Windows đó là: thêm driver, thêm và xóa các Windows Package, tích hợp các ngôn ngữ. Ngoài ra tôi cũng giới thiệu tới bạn một số lệnh và công cụ giúp bạn tùy biến lại bộ cài Windows mà không cần phải cài nó. Bạn có thể copy các lệnh bên trên tại đây. Trong quá trình thao tác thực tế nếu còn vướng mắc điều gì bạn hãy để lại thông tin trong phần bình luận nhé. Cảm ơn bạn đã đọc bài!
Chúc bạn thành công!
Xem thêm:






 Tích hợp vào file boot.wim